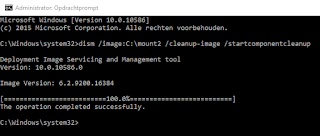
When creating Windows images with lot's of updates, it's possible to shrink them before or after capturing the image. When deploying systems with less free disk space (like thin clients) this may be needed to fit. The DISM tool contains multiple servicing commands related to the component store (or the WINSXS directory). This location is used during servicing operations within Windows installations. Servicing operations include, but are not limited to, Windows Update, service pack, and hotfix installations.
The component store contains all the files that are required for a Windows installation. And, any updates to those files are also held within the component store as the updates are installed. This causes the component store to grow over time as more updates, features, or roles are added to the installation. The component store uses NTFS hard links between itself and other Windows directories to increase the robustness of the Windows platform.
The following commands can be used to shrink Windows installations and/or WIM images:
When creating a reference image use the online command:
Dism.exe /online /Cleanup-Image /StartComponentCleanup
Dism.exe /online /Cleanup-Image /StartComponentCleanup /ResetBase
Dism.exe /online /Cleanup-Image /SPSuperseded
When the image is already created, mount it and use the offline command:
Dism /image:<path> /Cleanup-Image /StartComponentCleanup
You can also run the following command to check the status of the Component Store:
Dims.exe /Online /Cleanup-Image /AnalyzeComponentStore
This can save multiple gigabytes on the image size!
For more information:
Clean Up the WinSxS Folder
How to address disk space issues that are caused by a large Windows component store (WinSxS) directory
How to Clean up the WinSxS Directory and Free Up Disk Space on Windows Server 2008 R2 with New Update
Thursday, January 28, 2016
Shrink your Windows server and client images
Labels:
Cleanup-Image,
Components store,
Dism,
ResetBase,
Shrink,
Shrink image,
Updates,
Winsxs
Friday, January 22, 2016
Managing Group Policy for Windows 10
With every new Operating System, there will be new policy definitions available. With Windows 10 however, there may be new policies coming with a new build too. For example, when looking at Administrative Templates (.admx) for Windows 10, you can download the RTM version and 1511 version as well. There is a Windows 10 ADMX spreadsheet available too.
Just download the new ADMX files, install them on a server and copy the files (including language files) to your local or central Sysvol - PolicyDefinitions location. All existing files may be overwritten, older files will still be available. For more details on central store: Have a look at this post.
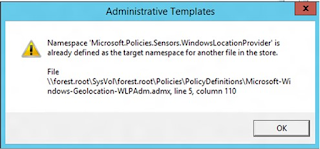
Just be aware of the following issue: Namespace is already defined error when you edit a policy in Windows.
This issue occurs because the LocationProviderADM.admx file was renamed as Microsoft-Windows-Geolocation-WLPAdm.admx in Windows 10. After you copy the .admx files from Windows 10 to a central store that contains a LocationProviderADM.ADMX file that is from an earlier release of Windows, there are two .admx files that contain the same settings but have different names. Therefore, the "namespace is already defined" error is received.
The solution for this is really easy:
1. Delete (or rename!) the LocationProviderADM.admx and LocationProviderADM.adml files from the central store.
2. Rename Microsoft-Windows-Geolocation-WLPAdm.admx to LocationProviderADM.admx
3. Rename Microsoft-Windows-Geolocation-WLPAdm.adml to LocationProviderADM.adml
After implementing new policy definitions, and using above solution, everything works fine! Just remember: With every new Windows 10 build, there may be new policies as well.
Happy configuring!
Labels:
ADM,
Administrative Templates,
ADMX,
Group Policy,
SYSVOL,
Windows 10
Thursday, January 14, 2016
Jalasoft announces Xian Network Manager v7
Sponsor post
For more than ten years Jalasoft has been supporting Microsoft System Center Operations Manager (SCOM). Today this is coming to an end. Jalasoft decided to disconnect their flagship product, Xian Network Manager.
The next version Xian NM v7, will no longer connect with SCOM, will run on Linux Ubuntu and use PostgreSQL as the main repository. This all with the goal to make System Monitoring affordable for the home market Jalasoft is located, Bolivia and Latin America.
Xian NM v7 will contain all the monitoring power for network devices that the previous versions had and on top of that it will monitor now also other parts of your infrastructure such as desktops, servers, generators. The big thing now is that you do not need SCOM anymore, Xian NM v7 works completely on its own. It is the perfect tool to start monitoring your environment.
Jalasoft has grown in the past 15 years from a small 6 person company to over 600 people, making it the biggest software company in its kind in South America. With customer all over the world, we feel it is time that South American businesses have access to qualitative and affordable IT solutions.
Have a look here for more information.
Labels:
Jalasoft,
Sponsor post,
Xian Network Manager
Monday, January 11, 2016
New projects coming with lots off cool stuff
Next coming months I will do several new projects with lots of cool stuff. Most projects will be around the products: ConfigMgr 1511, Windows 10, ADFS and Enterprise Mobility Suite (Azure AD Premium, Rights Management, Intune in hybrid mode).
Expect multiple blogposts about my experiences soon. Azure cloud and Enterprise mobility Suite is the way to go! Microsoft is bringing cool features here :) #lovemyjob
Expect multiple blogposts about my experiences soon. Azure cloud and Enterprise mobility Suite is the way to go! Microsoft is bringing cool features here :) #lovemyjob
Thursday, January 7, 2016
Why there is no free Display Dock offer for Lumia 950 owners?
Why would Microsoft offer a new Display Dock to 950XL owners and not for people like me who purchased the 950 model. I don't want to hold a 5.7" Phone daily, just because of the free Display Dock offer. (I guess most people ordered the 950XL for that one?)
The Lumia 950XL has benefits enough for $100 extra:
-5.7" display
-Gorilla Glass 4
-Qualcomm Snapdragon 810
-3340mAh battery
Still pity because I don’t want to spend another $99 just to try the Continuum feature. Colleagues asking me about the feature a lot, but cannot show it to them. A missed oppurtunity if you ask me!
Expect a personal review for the Lumia 950 soon. (and hopefully for the Continuum feature at a later time)
Labels:
Continuum,
Display Dock,
Lumia,
Lumia 950,
Lumia 950XL,
Microsoft,
Microsoft Lumia
Wednesday, January 6, 2016
Choosing between BIOS (Legacy) or UEFI during deployment
When deploying new systems with ConfigMgr you can choose between BIOS (Legacy) or UEFI mode. Since Windows 8 UEFI it's recommended because of security (SecureBoot) and faster OS loading. Therefore I prefer UEFI above of BIOS in Windows 8.x and Windows 10. When looking for UEFI setup have a look at this blogpost: PXE Boot files in RemoteInstall folder explained (UEFI)
When option 60 is missing in DHCP use the following commands:
-C:\WINDOWS\system32>netsh
-netsh>dhcp
-netsh dhcp>server \\<server_machine_name>
-netsh dhcp>add optiondef 60 PXEClient String 0 comment="PXE support"
-netsh dhcp>set optionvalue 60 STRING PXEClient
-netsh dhcp>exit
A Server Option is added after that, which is active on all scopes.
When the message Waiting for Approval is displayed after that do the following:
-Start Windows Deployment Services
-Start Properties on WDS server
-Go to the "PXE Response" tab
-Change PXE Response Policy to "Respond to all client computers"
After that UEFI deployment will be working fine :-)
Hope it helps!
Labels:
0x102,
0xc0000359,
BIOS,
EFI,
PXE,
PXE Boot,
RemoteInstall,
UEFI,
WDS,
wdsmgfw.efi,
wdsnbp.com
Monday, January 4, 2016
The Windows Boot configuration data file does not contain a valid OS Entry
When starting OS deployment from ConfigMgr you get the following error message: The Windows Boot configuration data file does not contain a valid OS Entry. This because Windows Deployment Services (WDS) has been manually configured at some point. The best course of action at this point is to reset the installation of WDS by reinstalling the PXE Service Point and WDS.
What also can be the cause is that deployment is started on an unknown system, and Enable Unknown computer support isn't checked at the Distribution Point settings. Just select this option and deploy a task sequence to All Unknown Computers collection too. After that your headache will be gone :-)
Source: Gerry Hampson Device Management (comments)
Subscribe to:
Comments (Atom)


