When OS deployment is done on systems, sometimes it's needed to wipe just the C drive and keep existing data on the D drive. When using a default task sequence in SCCM/ConfigMgr or MDT all data is wiped. This because exiting partitions will be deleted and created again. In this blogpost I explain what to do in this situation.
Just create a default task sequence for OS deployment first. Just edit it after creation and remove any “Format and Partition Disk” step. You can't use this step without wiping the disk at all. In the "Apply Operating System Image" step, make the following modifications before deployment: Set the destination to a specific Disk 0 and Partition 1 (for example), so it's fixed after that.
That way only the partition configured will be used. Other partitions or disks will be saved this way! During the "Apply Operating System Image" step, the configured Disk and Partition will be formatted first before installation. Job completed!
During OS deployment in ConfigMgr there are many ways to assign a computername. This can be done automatically or filled in before deployment. How to assign a dynamic computername is described here: How to assign a dynamic computername during OSD. In that post I'm using a script to create a dynamic computername from default BIOS values (assettag, serialnumber).
But what to do when you're using your own format which is not known in BIOS values? Then other ways are available. First there are ConfigMgr/MDT Task Sequence Variables. An overview of these Task Sequence Variables can be found here: http://technet.microsoft.com/en-us/library/bb632442.aspx
There are also many scripts to find for dynamic computername assignment. More about that on the following TechNet post: "SCCM R2 Unknown Computer Support and changing computer name during Task Sequence" http://social.technet.microsoft.com/Forums/en-US/configmgrosd/thread/5924e840-eb6e-48c1-858f-766a5be625a6/
The one I've used before is the ConfigMgr/MDT method, which asks the computername before deployment (manually) and uses this name during OS deployment. I will describe the steps needed for that here. First created a Non-mandatory advertisement on a OSD collection (in my case created as "Operating System Deployment"). On that specific OSD collection rightclick and choose "Modify Collection Settings".
Under "Collection Variables" tab create a new Variable called "OSDComputerName" and make sure it has no Value. Untick the "Do not display this value in the ConfigMgr console" also.
When choose OK the value will be available beneath "Collection Variables". Now choose OK to finish this configuration setting. Start the computer placed in this collection now and make sure it's non-mandatory. Use F12 for PXE boot indeed.
Once the task sequence is selected it prompts you to input the missing Task Sequence Variable. Watch out not to press Next here, but double click on "OSDComputerName" instead.
Fill in the computername of your choice (in my case HHO-01) and press OK. That way the computername will be saved and used during Operating System Deployment.
When the value is seen in the Task Sequence Wizard press Next. The Task Sequence selected will be running fine then because the missing Task Sequence Variable is known now.
That's all to assign a computername before OS deployment. Again ConfigMgr uses multiple ways to make OS deployment flexible and usable. This great product continues to astonish me with many great opportunities out there.
Last week I used an existing Microsoft Deployment Toolkit (MDT) 2010 installation on a Windows Server 2008 server. This for creating a new Windows 7 SP1 image and deploying it also. Most of times I install MDT for ConfigMgr integration only. Now for me the change to see MDT features and functionality. In this blog we have a look at the setup and choices made during configuration.
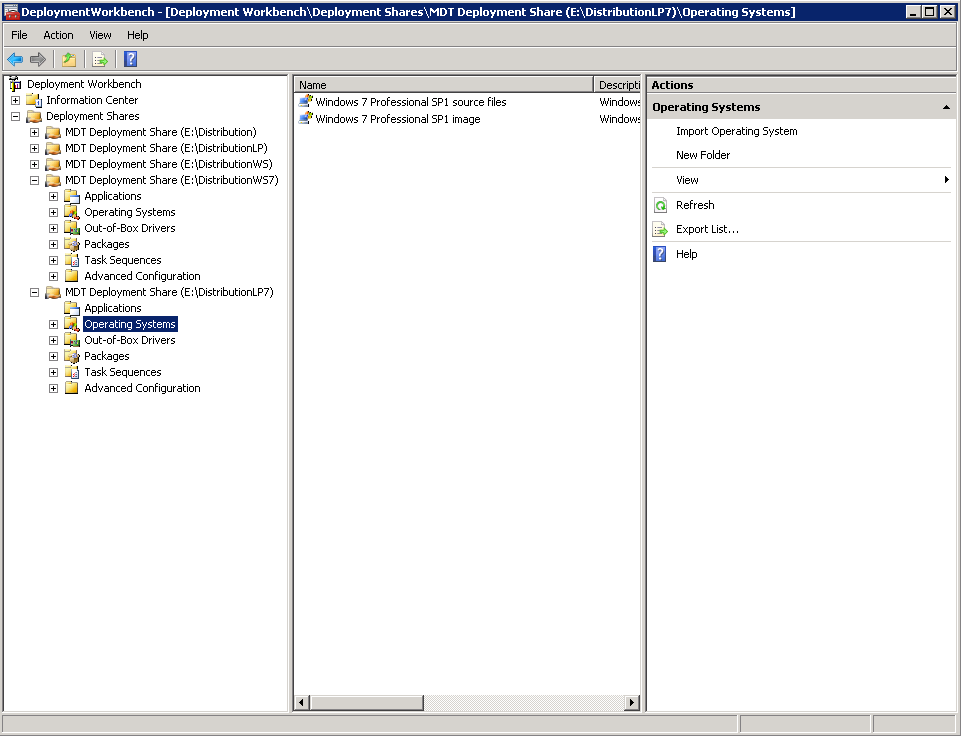
There was already an MDT installation present; this because of Windows XP deployment. Therefore I decided to create a new Deployment Share first. A Deployment Share is the place where packages, drivers and applications will be placed. This is a real share on the disk, so Deployment Share is a good chosen word here.
In MDT 2008 it was necessary to create an additional Deployment Point also. In MDT 2010 this is not needed anymore. All components are placed on a single Deployment Share now. There can be multiple Deployment Shares if you want. This for using different INI-files needed (for example). Multiple Deployment Shares can be opened at the same time in the MDT console. These can be linked, so that when content is changed, it will be updated on the other share(s) also.
After that importing an Operating System image is needed. This can be done with a "Full set of source files" from installation media. The best thing to do is to start a "Standard Client task sequence" to create a new OS image. Just make sure that an image capture is configured in the task sequence used for creating a OS image.
The OS image created can be imported again later to make it available in other task sequences. Select then the "Custom image file" in the "Standard Client task sequence". This task sequence (used for deployment) can be included applications, drivers and motifications also.
Best practice for the task sequence used for capturing, is not including an administator password and product key in it. Also the device used for capturing must be a workgroup member. The administator password and product key can be configured later during deployment.
Now have a look at the Deployment Share properties. These include the Bootstrap.ini and Rules (customsettings.ini) files. These settings will determine the behaviour during Operating System Deployment. After that an update is needed on the Deployment Share, which will also create the necessary ISO and WIM files (again) needed for Boot functionality.
Make sure to update the Boot image files on Windows Deployment Services (WDS) when new settings are placed in the Bootstrap.ini file. Otherwise it will not be functional when starting a new image deployment.
Note: When using "_SMSTSORGNAME=" the IT Organization name can be changed during task sequence progress.
The ISO file can be used to burn on CD/DVD or USB device for booting from media. The WIM file can be used in Windows Deployment Services (WDS) for booting with PXE boot. Just press F12 during startup en see the magic happen. After choosing the right Boot image, the OS deployment can start without any other messages displayed. In this environment only the computername is needed. That's all needed!
It's nice to see that MDT 2010 is easy to setup and not that hard to use for OS deployment. Just configure the necessary steps needed, and OS deployment will be available. MDT 2010 is (without the usage of ConfigMgr) still a very good deployment solution!
The most common error during re-deployment was the following one:
Property LTISuspend is now = Litetouch has encountered an Environment Error (Boot into WinPE!).
If booting from a USB Flash Disk, please remove all drives before Retrying.
Otherwise, ensure the hard disk is selected first in the boot order of the BIOS.
This because after deployment there may be still C:\MININT or C:\_SMSTaskSequence folders left. When OS deployment is done these folders are not necessary anymore and can be deleted.
The best way for doing this is start from Windows PE and open a command shell. Type in the following commands then: (1) Diskpart (2) Select Disk 0 (3) clean. After that start over again in Windows PE and OS deployment will be functional then.
One last solution is using Johan Arwidmark's Final Configuration script. This script will clean out any Leftover MININT or Sysprep folders. Enable WindowsUpdate, Set a default domain value (read from the JOINDOMAIN environment variable), and then do a proper final reboot. It can be found here: http://www.deployvista.com/Blog/tabid/70/EntryID/61/language/en-US/Default.aspx
Note: You need to set SkipFinalSummary=YES in customsettings.ini (the script will check for it)
Thanks to Anton van Pelt, Twitter: @antonaustirol25 for sharing his knowledge on this!
With ConfigMgr 2007 there can be put many information in the Task Sequence used for OSD. With Windows XP, Vista or 7 there will be different files created for using a unattend installation. All information set in the Task Sequence will be used for creating that specific file. Only a dynamically computername is missing here! How to assign a dynamic computername during OSD, that's the question!
In a Task Sequence used for OSD, this information can be placed in "Apply Windows Settings" and "Apply Network Settings". In "Apply Windows Settings" the following information is (most of times) set:
- User/Organization name
- Product key
- Local administrator password
- Time zone
In "Apply Network Settings" the following information is (most of times) set:
- Join a workgroup or domain
- Set specific domain information
- Account used for domain join
With this information a sysprep.inf file (for Windows XP) or a unattend.xml file (for Windows Vista or 7) is created at specific places. The sysprep.inf file will be created/placed at C:\Sysprep (with the deployment tools). The unattend.xml will be created/placed at C:\Windows\Panther\Unattend. Sysprep is already build-in for Windows Vista and 7.
During above steps ("Apply Windows Settings" and "Apply Network Settings") these files will be generated. During "Setup windows and ConfigMgr" these files will be used for having a unattend installation. The only information missing here is how to set the computername?
With MDT integration an additional step is used for making that possible. Then a Task Sequence variable can be used for dynamically assigning a computername. This is explained here: http://blog.coretech.dk/mip/wrong-pc-name-after-deployment/
With ConfigMgr only (without MDT integration) an additional script is needed for unattended installation, or the computername must be filled-in manually during OSD (not recommended). The additional script must have lines in it for recognizing the computername in the BIOS, and place that information in the sysprep.inf or unattend.xml file.
Most of times I disable both "Apply Windows Settings" and "Apply Network Settings" steps in the Task Sequence, and making use of the sysprep.inf and/or unattend.xml which is created by ConfigMgr during OSD. The only change I make then is to replace the Computername with an "*" sign, and create a separate package from this file.
Then I put that file (as package) at the "Apply Operating System" step. The package which contains the script (converted to executable) is put in an additional step, in this case: "Assettag To Unattend". The script I use is as follows (using the Asset Tag as computername):
Windows XP on HP devices:
#include <WinAPI.au3>
#include <WindowsConstants.au3>
#include <File.au3>
#include <Array.au3>
RunWait("cmd.exe /c " & "wmic /node:localhost systemenclosure get smbiosassettag > c:\sysprep\assettag.txt", "",@SW_HIDE)
$file = FileOpen("C:\sysprep\assettag.txt", 0)
$assettag = FileReadLine($file,2)
FileClose($file)
ReplaceInFile('C:\sysprep\sysprep.inf', "*", $assettag)
Func ReplaceInFile($io_file, $io_word, $io_replacement)
Dim $Records
$Lines = _FileCountLines($io_File)
If Not _FileReadToArray($io_file, $Records) Then
ConsoleWriteError("There was an error reading > " & $io_file & @CRLF)
Exit
ElseIf _FileReadToArray($io_file, $Records) == "" Then
ConsoleWriteError("File is empty!" & @CRLF)
ElseIf Not @error Then
ConsoleWrite("> File succeeded!" & @CRLF)
EndIf
$File = FileOpen($io_file, 2)
For $ax = 1 To $Records[0]
ConsoleWrite("+> " & $Records[$ax] & @CRLF)
$Replace = StringReplace($Records[$ax], $io_word, $io_replacement)
ConsoleWrite("+> " & $Replace & @CRLF)
If _FileCountLines($io_file) < UBound($Lines) - 1 Then
FileWrite($File, $Replace & @CRLF)
Else
FileWrite($File, $Replace & @CRLF)
EndIf
Next
FileClose($File)
EndFunc
Windows XP on Dell devices:
Replace "systemenclosure get smbiosassettag" with
"systemenclosure get serialnumber". Then it works also on Dell devices.
Windows Vista or 7 on HP devices:
#include <WinAPI.au3>
#include <WindowsConstants.au3>
#include <File.au3>
#include <Array.au3>
RunWait("cmd.exe /c " & "wmic /node:localhost systemenclosure get smbiosassettag > c:\_SMSTaskSequence\assettag.txt", "",@SW_HIDE)
$file = FileOpen("C:\_SMSTaskSequence\assettag.txt", 0)
$assettag = FileReadLine($file,2)
FileClose($file)
ReplaceInFile('C:\Windows\Panther\unattend\unattend.xml', "*", StringStripWS ($assettag,8))
Func ReplaceInFile($io_file, $io_word, $io_replacement)
Dim $Records
$Lines = _FileCountLines($io_File)
If Not _FileReadToArray($io_file, $Records) Then
ConsoleWriteError("There was an error reading > " & $io_file & @CRLF)
Exit
ElseIf _FileReadToArray($io_file, $Records) == "" Then
ConsoleWriteError("File is empty!" & @CRLF)
ElseIf Not @error Then
ConsoleWrite("> File succeeded!" & @CRLF)
EndIf
$File = FileOpen($io_file, 2)
For $ax = 1 To $Records[0]
ConsoleWrite("+> " & $Records[$ax] & @CRLF)
$Replace = StringReplace($Records[$ax], $io_word, $io_replacement)
ConsoleWrite("+> " & $Replace & @CRLF)
If _FileCountLines($io_file) < UBound($Lines) - 1 Then
FileWrite($File, $Replace & @CRLF)
Else
FileWrite($File, $Replace & @CRLF)
EndIf
Next
FileClose($File)
EndFunc
Windows Vista or 7 on Dell devices:
Replace "systemenclosure get smbiosassettag" with
"systemenclosure get serialnumber". Then it works also on Dell devices.
(thanks to Wilfred Hanekamp for sharing the script)
Download and install AutoIt for making changes to this script, and building a executable file from it. With this script, assigning a dynamic computername is possible, without using MDT integration!
ConfigMgr rocks again!
Update 15-11-2011: Because of some comments that the script isn't working I replaced the script with additional values. This time the script must be functional again.
Update 16-3-2012: Again I replaced the script with additional values. In my environment the script is running fine.