Thursday, August 25, 2011

Troubleshooting Windows Deployment Services

When having ConfigMgr installed, Windows Deployment Services (WDS) will be used also. This is necessary for having PXE boot functionality available. But what to do if WDS is not working anymore, so no OS deployment is possible? Last week I had the oppurtunity to troubleshoot this myself. In this blog I will explain the error message and the solution for this also.

First, for having a look at WDS functionality have a look a this blogpost: http://henkhoogendoorn.blogspot.com/2011/06/windows-deployment-services-on-server.html

In this case the WDS service wasn't starting anymore. In Event Viewer the following error message was seen: 
  • Faulting application svchost.exe_WDSServer, version 6.0.6001.18000, time stamp 0x47919291, faulting module wimgapi.dll, version 6.1.7600.16385, time stamp 0x4a5bc365, exception code 0xc0000005, fault offset 0x0000000000032a8e, process id 0xc4c, application start time 0x01cc51b67426d7ba.

When looking at the error message different solutions are available. A few of them mentions the following: 
  • I had the same problem after adding a NIC driver to my boot image. The solution for me was to re-update the PXE distribution point. Then the WDS service starts. No need to re-install WDS and PXE service point.
  • Had exactly the same issue. Re-updated the distribution points for boot images and then WDS started without any issues.
  • I had to install the PXE Service Point and WDS. After that the WDS service started successfully.
 
Unfortunately this wasn't the solution here. There was also the possibility to install the PXE Service Point and WDS again. Then the following steps are needed:
  1. Uninstall the PXE Service Point. Monitor the PXESetup.log and make sure it uninstalls correctly.
  2. Once the PXE Service Point has successfully uninstalled, uninstall WDS. Once the WDS uninstall is complete, reboot the server.
  3. Once the server is rebooted, rename the RemoteInstall folder on the root level of all drives. Make sure to check all drives and to rename all of the RemoteInstall folders. Not all drives may contain a RemoteInstall folder and usually only one of the drives has a RemoteInstall folder. When renaming the folder, it may break an existing share. It is OK to go ahead and break this share.
  4. Reinstall WDS. Once WDS is finished reinstalling, reboot the server.
  5. Once the server has restarted, in the ConfigMgr 2007 Admin Console, add the PXE Service Point role.
  6. Monitor the PXESetup.log and make sure that installation was successfully. If the PXESetup.log prompts for the server to be rebooted, make sure to reboot the server.
  7. Once the PXE Service Point has been successfully installed (and if necessary, the server restarted), check to make sure that the WDS service has started. If it has not started, try to manually start it.
In my case I tried the following. That way it wasn't needed to install both PXE Service Point and WDS again:

Just add new Boot images after that when needed.
Remember the following here: To import a custom boot image, the boot image must already be finalized or the SMS Provider will reject it.

Thursday, August 11, 2011

Installing System Center Orchestator Beta release

On june 17th 2011 the System Center Orchestrator Beta release has become available for public download. System Center Orchestrator Beta (formerly known as Opalis) is a new member of the System Center suite, and provides automation of processes and workflows between the various System Center products.

Let's download the new Beta release first on Technet Downloads: http://www.microsoft.com/download/en/details.aspx?id=26503 

Before installing both DotNet Framework 3.5 SP1 and 4.0 are needed on the server. The installation is done on a Windows Server 2008 R2 Enterprise x64 server. After that the installation can start. Choose "Install Orchestrator" for this.

Next in line after this screen are:
  • Product registration - Product registration
  • Getting started - Select features to install (Management Server, Runbook Server, Runbook Designer, Orchestration console and web service)
  • Prerequisites - Setup will install these missing software prerequisites (Enable IIS role on this computer)
  • Configuration - Configure the service account
  • Configuration - Configure the database (SQL 2008 R2 server needed)
  • Configuration - Configure Orchestrator management group 
  • Configuration - Configure the port for the web service (default 81, 82)
  • Configuration - Select the installation location
  • Configuration - Installation summary
  • Processing - Installating features (Management Server, Runbook Server, Runbook Designer, Orchestration console and web service)
  • Finished - Setup completed successfully
After that the installation is done. In the start menu the following shortcuts are available for starting now:
  • Data Store Configuration - The data store is the Oracle or SQL Server database where configuration information, runbooks, and logs are stored
  • Deployment Manager - Is used to deploy runbook servers, Runbook Designers, and integration packs across your Orchestrator deployment
  • Orchestration Console - A web-based console in which you can see which runbooks are currently running, view their real-time status, and start or stop your runbooks
  • Runbook Designer - The tool that designers use to create, modify, and publish runbooks 
Finally a nice view of the Orchestration Console is seen. Next time I will explain what to do next and how to create and configure runbooks.

Wednesday, August 10, 2011

Troubleshooting Wake On LAN (WOL) in ConfigMgr

In my other blog about Wake On LAN (WOL): http://henkhoogendoorn.blogspot.com/2011/05/wake-on-lan-wol-functionality-in.html I explained which functionality becomes available in ConfigMgr 2007/2012. This can be used to schedule OS deployment, Software distribution and Patch management during non-working hours to wake-up devices. But what to do when it isn't working and you don't know what to do next? In this blog I will explain my best practices from the field, and how WOL will be functional (again).

Most of times using Unicast is the easiest one to configure. Then devices in the same subnet can be used for WOL functionality only. In the field however there are most of times different subnets for servers and clients. Then "Subnet-directed broadcasts" is the best way for configure WOL functionality. More about that in my other blog: "Wake On LAN (WOL) functionality in ConfigMgr".


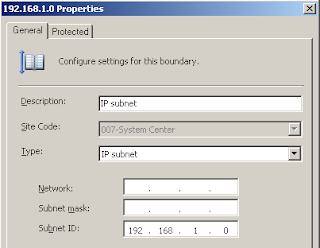
First something about Site boundaries here. In ConfigMgr it's possible to create Site boundaries with IP-subnets, AD-sites and IP-address ranges. They all seems okay, but because ConfigMgr cannot handle supernetting, IP-address ranges is the only right choice here! A supernet is an Internet Protocol (IP) network that is formed from the combination of two or more networks (or subnets). WIKI page: http://en.wikipedia.org/wiki/Supernet

Because supernetting can be used in both IP-subnets and AD-sites, they are not the best choice for implementing Wake On LAN functionality. There's also a nice TechNet blog available about that: Known Issue: Supernets in Active Directory Sites Used as Site Boundaries: http://blogs.technet.com/b/configmgrteam/archive/2009/12/21/known-issue-supernets-in-active-directory-sites-used-as-site-boundaries.aspx

(after creating an IP-subnet, only the Subnet ID remains visible) 

(with IP-address ranges, the complete range remains visible) 

Now the best practices from the field, based on above suggestions: 
  • Remove any existing Site Boundaries based on both IP-subnets and AD-sites (write down there IP-address ranges, but don't use them anymore)
  • Create IP-address ranges based on formerly existing Site boundaries (only use complete ranges from 1-255 to get Wake On LAN working)
  • In Site properties > select "Use wake-up packets only" and "Subnet-directed broadcasts" (Power on commands are used only with Out of Band Management)
  • In Site properties > the UDP port can remains on port 9 (default), when there are issues with that use port 12287
  • Create a new advertisement now, and set an mandatory assignment on that (otherwise there is no WOL functionality possible)
After this WOL functionality must be available on "Subnet-directed broadcasts". Remember that WOL functionality is only available on OS deployment, Software distribution and Patch management in combination with an mandatory assignment. Good luck!

Thursday, August 4, 2011

The process is not in background processing mode

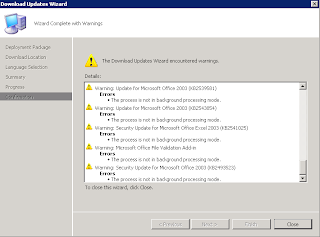
When trying to download Software Updates in ConfigMgr it is possible that the following error message is displayed: "The process is not in background processing mode". When trying again the error message stays. Rebooting the ConfigMgr server doesn't help, so what to do next?


The solution is not that hard I think. It's BITS that's malfunction here! Just follow these steps to make it functional again:
  • Logon to the ConfigMgr server (which in my case is also the WSUS server)
  • Stop the Background Intelligent Transfer Service (BITS) service
  • Stop the Windows Update (WUAUSERV) service
  • Browse to the "Documents and Settings\All Users\Application Data\Microsoft\Network\Downloader" folder and delete both files in here (qmgr0.dat and qmgr1.dat)
On Windows Server 2008 (R2) servers it's needed to give Everyone NTFS permissions to browse that folders. This because Everyone is by default on the deny list here.
  • Browse to the "C:\Windows" directory and delete the SoftwareDistribution folder in here
The SoftwareDistribution folder and qmgr0.dat/qmgr1.dat files will be created again after starting both services again.
  • Start the Windows Update (WUAUSERV) service again
  • Start the Background Intelligent Transfer Service (BITS) service again
  • Open the ConfigMgr console and start a "site wide software update synchronization" by right clicking on Software Updates > Software Repository and choose: Run Synchronization
After that downloading Software Updates will be functional again!


Note: When it's still not working after these steps, have a look at possible changes in the Proxy server configuration. Especially Authentication settings can do the trick here!

Update 28-2-2013: When Microsoft or third party updates are still not download after above change, just try the following: Edit Anonymous Authentication for the IIS website (by right clicking) and change it from a Specific User to Application pool identity.
Thanks to Kapil Dham for the solution on this.