Wednesday, October 12, 2011

Definition Update Automation with ConfigMgr working now

Yesterday I posted a blog because the "Definition Update Automation Tool for Forefront Endpoint Protection 2010" wasn't working in my environment. Have a look at Definition Update Automation with Configuration Manager for that one. Today I succeeded to automatically receive new definitions and publish them. In this blog I will post my results and a few good tips and tricks also.

I configured a scheduled task with the following settings:

Run the task with the SYSTEM account and with highest privileges. Configure it for Windows 7 (when needed).

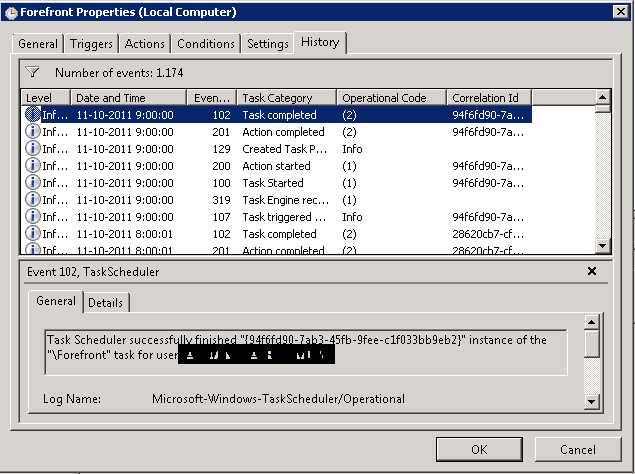
Run the task every hour a day so updates will be downloaded and publish almost immediately when released.

Start a program with the default settings described in "Definition Update Automation with Configuration Manager" http://technet.microsoft.com/en-us/library/hh297450.aspx

The task will run fine after that. Just make sure the tool is placed in the right folder and user account choosen has enough rights.

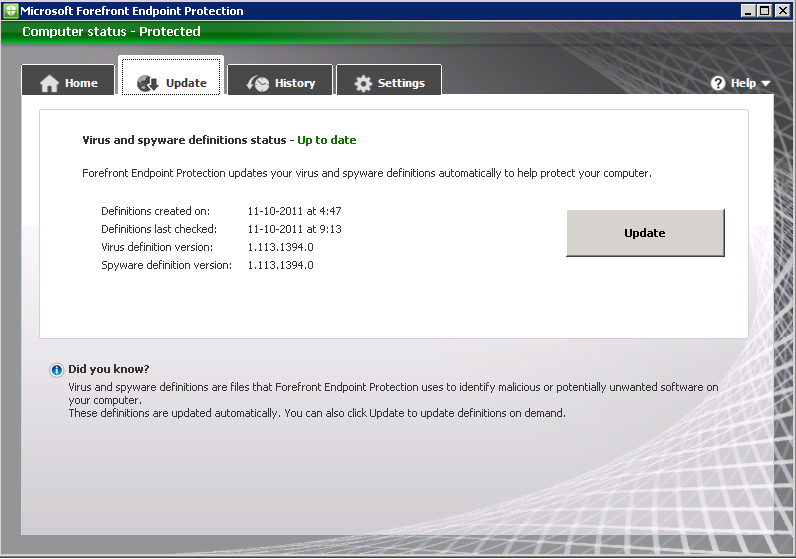
Existing Forefront clients will be automatically updated to the new definition version. This when deploying a new Forefront client also.

It's possible to consult reports for actual information. There are a few reports beneath the Forefront pane and more eventually beneath reporting services.

My personal favorite is report 389 "FEP information for a specific computer". That way it's possible to see Forefront install, policy and update information in one overview.

When adding the Forefront client in a task sequence this tick must be cleared. Otherwise it's not possible to select the program in a task sequence.

After that, the program is selectable but will not install during a task sequence. This because the script cannot be used during a task sequence install.

Just create a new package and program for that with the following settings: "FEPinstall.exe /q /s /policy <path>\<policy-export>.xml". Be sure that the Network access account AND client computers has access to the source folder. That way Forefront client install by task sequence is possible with the exported policy added.

A few sites with good information on Forefront deployment and troubleshooting issues:

Errors When Using the FEP 2010 Definition Update Automation Tool
http://blogs.technet.com/b/clientsecurity/archive/2011/07/18/errors-when-using-the-fep-2010-definition-update-automation-tool.aspx

Installing the Forefront Endpoint Protection 2010 client and OSD
http://ccmexec.com/2011/02/installing-the-forefront-endpoint-protection-2010-client-and-osd/

Invalid argument format (index 7) "AND", arguments are supposed to start with a / (SoftwareUpdateAutomation.exe)
http://social.technet.microsoft.com/Forums/en-US/FCSNext/thread/ca500b36-c667-4030-85f9-ebd0defbdaf7/ 

Definition update automation tool
http://social.technet.microsoft.com/Forums/en-US/FCSNext/thread/9105024f-3a61-4fe0-bc88-803b502881a8/

Monday, October 10, 2011

Definition Update Automation with Configuration Manager

With System Center Configuration Manager (ConfigMgr) it's possible to install and use Forefront Endpoint Protection (FEP) 2010 also. Both products can be integrated so ConfigMgr will also handle Forefront Antivirus and Definition updates. Microsoft released some Forefront Endpoint Protection (FEP) 2010 Update Rollup 1 Tools also. These free downloads make it easier for Forefront Endpoint Protection 2010 Update Rollup 1 customers to use Group Policy for centralized management, provide optimized settings for various server roles, and diagnose and troubleshoot support issues. It can be downloaded here: http://www.microsoft.com/download/en/details.aspx?id=26613

The one I'm using is "Definition Update Automation Tool for Forefront Endpoint Protection 2010". This tool enables you to automate downloading and publication of FEP definition updates using the Configuration Manager 2007 Software Update feature. This is a command line tool that uses the Configuration Manager API to download new definitions from Microsoft Update, distribute them to the software update point, and publish the definitions to the endpoints. To automate the tool, you must add a Windows task to run it automatically at a scheduled interval. More information about "Definition Update Automation with Configuration Manager" can be found here: http://technet.microsoft.com/en-us/library/hh297450.aspx

Point is, it isn't working in my environment. It's true that new definitions are downloaded automatically in Deployment Packages. But distribute them and publish the definitions isn't working yet. This because Distribution Points are not updated after running the tool and new definitions are not added to Deployment Management. The command I'm using is: SoftwareUpdateAutomation.exe
  • /AssignmentName <AssignmentName>
  • /PackageName <PackageName>
  • /RefreshDP
  • /UpdateFilter "ArticleID=2461484 AND IsSuperseded=0 AND IsEnabled=1 AND IsExpired=0"
Anyone else has the same behaviour seen? I will post the results when it's working properly in my environment. To be continued till then..

Friday, October 7, 2011

Failed to run task sequence error in ConfigMgr 2007

When using (multiple) driver packages in a ConfigMgr task sequence it's possible that the following error message is displayed: "Failed To Run Task Sequence". This error message will be displayed before the task sequence will actually run, because ConfigMgr checks all packages that are connected in a task sequence.


When looking in the SMSTS.log file the following error message is displayed: "Failed to find ccm_SoftwareDistribution object for AdvertID="<AdvertID>", PackageID="<PackageID>", ProgramID="*". The Package ID displayed here refers to the driver package which is not found by the ConfigMgr task sequence.

To resolve the error message it's needed to update at least the driver package listed in the SMSTS.log file at "PackageID="<PackageID>". When no driver package is updated once before, do the same for all drivers packages which are connected in the task sequence.

Just select Distribution Points > Update Distribution Points on all driver packages needed, and look in the Package status for a new source version displayed. When starting the task sequence again (after reboot) the error message must be resolved.

Thursday, October 6, 2011

Integrate Forefront Endpoint Protection (FEP) 2010 with ConfigMgr

With System Center Configuration Manager (ConfigMgr) it's possible to install and use Forefront Endpoint Protection (FEP) 2010 also. Both products can be integrated so ConfigMgr will also handle Forefront Antivirus and Definition updates. In this blog I will describe the installation of Forefront and configuring policies.

Before FEP 2010 can be installed some prerequisites are needed on the ConfigMgr server. These are:
When installing choose the following options:
  • Select "FEP 2010 Update Rollup 1"
  • Welcome to FEP 2010 Server Setup Wizard: Fill in name and organization
  • MS Software License Terms: "I accept the software license terms"
Based on type of installation there's the choice between Basic topology (with remote reporting database), Advanced topology & ConfigMgr console extension.

  • Installation Options: Advanced topology (Select All)
  • FEP 2010 Server Database Configuration: FEPDB_<sitecode>
  • Reporting Configuration: MS FEP 2010 Reporting Database settings: FEPDW_<sitecode>
  • Reporting Configuration: SQL Reporting Services execution account (domain user account)
  • Updates and Customer Experience Options (enable/disable)
  • Microsoft SpyNet Policy Configuration (enable/disable)
  • Specifify Installation Location
  • Prerequisites Verification: All verifications passed
  • Setup Summary and Complete
After that an Forefront Endpoint Protection pane is visible in the ConfigMgr console.

The following functionality is added in the ConfigMgr console now: 
  • Collections > FEP Collections
    • Definition Status
    • Deployment Status
    • Operations
    • Policy Distribution Status
    • Protection Status
    • Security Status
  • Software Distribution > Packages
    • FEP – Deployment
    • FEP – Operations
    • FEP – Policies
  • Software Distribution > Advertisements
    • FEP Operations
    • FEP Policies
  • Software Updates > Update Repository
    • Definition Updates > Microsoft > FEP 2010
  • Reporting > Reports/Reporting Services
    • FEP: FEP information for a specific computer
    • FEP – Deployment: Computers with a specific deployment state
    • FEP – Deployment: Deployment for a specific collection
    • FEP – Deployment: Deployment Overview
    • FEP – Policy: Policy Distribution for a specific collection
    • FEP – Policy: Computers with a specific policy distribution state
    • FEP – Policy: Policy Distribution Overview
  • Desired Configuration Management
    • Configuration Baselines
    • Configuration Items
  • Forefront Endpoint Protection node
    • Policies > Default Server Policy
    • Policies > Default Desktop Policy
    • Alerts > Malware Detection Alerts
    • Alerts > Malware Outbreak Alert
    • Alerts > Repeated Malware Detection Alerts
    • Alerts > Multiple Malware Detection Alerts
    • Reports > Antimalware Activity Report
    • Reports > Antimalware Protection Summary Report
    • Reports > Computer List Reports

Microsoft Forefront Endpoint Protection 2010 Update Rollup 1 includes the Definition Update Automation tool. This tool enables you to use System Center Configuration Manager 2007 software update points to distribute FEP definition updates to your client computers.

To configure your environment to use the Definition Update Automation tool, you must first download the tool (fepsuasetup.cab) and copy it to the appropriate location on your Configuration Manager site server. It can be download here: http://technet.microsoft.com/en-us/library/hh297450.aspx

There are also Microsoft Forefront Endpoint Protection (FEP) 2010 Update Rollup 1 Tools available. These free downloads make it easier for Forefront Endpoint Protection 2010 Update Rollup 1 customers to use Group Policy for centralized management, provide optimized settings for various server roles, and diagnose and troubleshoot support issues. They can be download here: http://www.microsoft.com/download/en/details.aspx?id=26613

As you can see many new functionality comes available in ConfigMgr. Now it's time to configure policies and create update packages. More about that in the next blogpost.

Tuesday, October 4, 2011

Error in ConfigMgr after Reporting Services Point installation

In ConfigMgr the default Reporting Point role is installed normally. Then reports will be generated and processed on the ConfigMgr server. There is however the choice to install a Reporting Services Point role on the SQL Server. Then reports will be generated and processed on the SQL Server. Much faster that way, industry standard formatting and the possibility to export reports to many formats!


Just add the Reporting Services Point role to the SQL Server and follow the steps in SQL "Reporting Services Configuration". Create a ReportServer database and virtual directory there. Then go back to the ConfigMgr server and choose "Copy Reports to Reporting Services". Just follow the wizard and specify the SQL Server with Reporting Services installed (and configured!).


After copying reports is done it's possible that an error message is displayed in the ConfigMgr system status. The Message ID displayed is 7403 : SMS SRS web service is not running on SRS Reporting Point server "<SQL server>". Although Reporting Services is running fine and reports can be started it's not quite nicely.


The solution for this is not that hard, but maybe not easy to find. An SQL Server update is needed to resolve this issue. Now the Cumulative Update (CU) package 4 for SQL Server 2008 R2 fix the error 7403. It can be downloaded here: http://support.microsoft.com/kb/2345451/en-us

It's even better to install Service Pack (SP) 1 to include all Cumulative Updates released before. It can be download here: http://www.microsoft.com/download/en/details.aspx?id=26727 

Mandatory need for Reporting Services?
An Reporting Services Point is needed when Power Management (R3) and/or Forefront Endpoint Protection (FEP) integration is used in ConfigMgr. If that's not the case, you can choose between both Reporting solutions!

ConfigMgr and OpsMgr on the same SQL Server?
When multiple Reporting Services instances are needed (for example: ConfigMgr and OpsMgr on the same server), remember to place ConfigMgr in the "default instance". you need to install ConfigMgr first because it wants the default instance where as OpsMgr can bet set to a different one.  So you should be able to have them both use the same server, but not the same instance.

Tuesday, September 27, 2011

How to install OpsMgr 2007 R2 on SQL Server 2008 R2

Last week I installed System Center Operations Manager (OpsMgr) 2007 R2 on SQL Server 2008 R2. This is supported by Microsoft, but the OpsMgr wizard does not recognize a SQL Server 2008 R2 installation. Therefore a specific installation order is needed to have it all functional. All steps needed will be explained in this blogpost. Just follow them for having a correct installation.

I won't describe the SQL 2008 R2 installation here, so make sure it's ready before installation. First choose "Check Prerequisites" on the OpsMgr server. The following Roles and Role Services must be added:
  • Application Server
  • Web Server (IIS)
    • Common HTTP Features (Static Content, Default Document, Directory Browsing, HTTP Errors)
    • Application Development (ASP.NET, .NET Extensibility, ISAPI Extensions, ISAPI Filters)
    • Health and Diagnostics (HTTP Logging, Request Monitor)
    • Security (Windows Authentication, Request Filtering)
    • Performance (Static Content Compression)
    • Management Tools (IIS Management Console, IIS 6 Metabase Compatibility, IIS 6 WMI Compatibility)
The "Microsoft ASP.NET 2.0 AJAX Extensions 1.0" is needed here also. When Prerequisites looks fine the installation can be continued. There are 2 service accounts needed for OpsMgr functionality (Administrator and Action account).

Normally the installation starts with "Install Operations Manager 2007 R2" for installing the databases. This because the specific order which must be followed during installation:
  1. OperationsManager database component (SQL Server)
  2. OperationsManager Data Warehouse component (SQL Server)
  3. OperationsManager Management Server and console components (OpsMgr Server)
  4. OperationsManager Reporting component (SQL Server)
Now another utility is used for creating the database and Data Warehouse components. It's called DBCreateWizard.exe which is found in the <OpsMgr source>\SupportTools\AMD64 folder. Use it twice for creating both databases and decide the name and size in it.

Then Operations Manager can be installed on the OpsMgr server with the default GUI. Just start with "Install Operations Manager 2007 R2" again and select all components except "Database". Follow all necessary steps during setup for a complete installation. There is the possibility to install it on another location or drive here.

Again a different approach is needed now. Before the Reporting component can be installed a workaround is needed. Otherwise it won't be functional. Have a look at local groups on the SQL Server and rename “SQLServerReportServerUser$<OpsMgr Server>$MSRS10_50.MSSQLSERVER” to “SQLServerReportServerUser$<OpsMgr Server>$MSRS10.MSSQLSERVER”.
 
Now the Reporting component can be installed with the default GUI. Just start with "Install Operations Manager 2007 R2 Reporting" and select the "Reporting Server" component only. No Data Warehouse installation is needed on SQL Server 2008 R2. Follow all necessary steps during setup for the installation. Again there is the possibility to install it on another location or drive.

All components are installed now, but the local group must be changed again. Rename the local group to “SQLServerReportServerUser$<OpsMgr Server>$MSRS10_50.MSSQLSERVER” back again. After that Operations Manager is installed and usable. The Reporting component is even functional then.

To install latest hotfixes CU3 is needed. It can be download here: http://www.microsoft.com/download/en/details.aspx?id=17893
All steps needed for a functional installation are explained now. Hope you like it and use these steps for instaling OpsMgr 2007 R2 yourself!

Wednesday, September 21, 2011

Guide to remove Windows 8 on a VHD (Virtual Hard Disk)

Last week I posted a setup for installing Windows 8 on a VHD (Virtual Hard Disk). Have a look for that here: Guide to install Windows 8 on a VHD. Now I received some questions how to make the Windows 8 setup undone, so Windows 7 will be the default Operating System again. In this blog I will give some solutions for this!

First it's possible to make Windows 7 the default Operating System again, without removing the Windows 8 installation. This is the easiest one to configure. Just boot from hard disk then, and while on the "Choose an Operating System" screen select "Change defaults or choose other options".
Then select "Choose the default operating system" to select Windows 7 as default OS again. It's also possible to change the default timer (from 30 seconds to 5 seconds) for faster boot there.
That way another boot menu will be used (from Windows 7 OS) which is must faster for booting Windows 7 AND Windows 8. I prefer this one because it's faster, not for the better menu.

Now another solution for totally remove Window8 from the boot menu. There are a few possibilities to make this possible:
  • Use BCDEDIT and remove the Windows 8 boot entry
  • Rebuild the boot menu from the Windows 7 DVD repair option
  • Use BCDBOOT to repair boot files or create a new BCD store

It's of cource possible to remove the VHD file from hard disk. Then the boot menu will not be changed, and when selected "Windows 8" an error will follow:
Nothing to worry about, but not the better solution. It can be still part of a solution when using BCDEDIT, Windows 7 repair option or BCDBOOT. I will explain them all now.

With BCDEDIT many options comes available to add, delete, edit, and append entries in the boot configuration data (BCD) store. The BCD store contains boot configuration parameters and controls how the operating system is booted.

When not sure about BCDEDIT command first create a backup with: BCDEDIT /Export C:\BCDCOPY. Then delete the Windows 8 entry with the BCDEDIT /Delete command. For doing that the Identifier is needed. This can be found with the BCDEDIT command (without parameters):
The command for deleting Windows 8 here (in my case) is BCDEDIT /Delete {3b0c2878-9f48-11df-8e48-a2ba939022f2} /Cleanup. Let's have a try! I've deleted the Windows 8 entry and Windows 7 is booting immediately after reboot. Exactly what I want. No need to display the 30 seconds timer anymore, because there's only a single OS left.
When running BCDEDIT again my Windows 8 entry is gone, and Windows 7 will be the only OS left to boot. When I want to go back to Windows 8 again I choose: BCDEDIT /Import C:\BCDCOPY to have it all functional again.

The second solution is the Windows 7 repair option. Just start from a Windows DVD and choose "Repair your computer". Then select your OS (Windows 7) and choose "Startup Repair". The boot manager will then be repaired, and Windows 7 will be the default OS again. That way no rollback to Windows 8 is possible, because a clean boot manager is created.
 
If you click on “Startup Repair” then Windows will scan your system for common errors and will hopefully figure out that your boot manager is broken. A simple solution and maybe the most effective?

At last there is the BCDBOOT command. With BCDBOOT it's possible to copy critical boot files to the system partition and to create a new system BCD store.
 
I'm not that familiar with BCDBOOT, but for more information about this there is a TechNet post available: BCDboot Command-Line Options. It seems the most effective for creating a new BCD store or to add boot options to an existing BCD store.

For example, to create a BCD store on the default system partition with the optional locale parameter set to US English, you would use the following command: BCDBOOT C:\Windows /l en-us

Hope you have enough tools by now to remove Windows 8 from the boot menu and re-use Windows 7 as the only OS installed (if needed).

Saturday, September 17, 2011

New Task Manager functionality in Windows 8

Windows 8 is a real hype this week on twitter all over the world. It's a totally different OS then Windows 7 and other Windows releases. The biggest difference is the Metro User Interface which introduces Tiles and new interfaces. One of the many differences (it's almost all new) in Windows 8 is the Task Manager. Not immediately the most striking application, but many times used when looking at performance issues.

Let's have a look at the Task Manager screens now. I show you all screens available in it:

Default Processes information (CPU, Memory, Disk, Network), Nice!

Nice graphic charts to see on the Performance screen.. (CPU, Memory and Disk are default in it with detailed information)

The App History tab shows all applications with total resource usage
(not much information for me here..)

Not much to see on the Startup screen at the moment..

This shows all resources in use per User session, very cool!

Details looks like Processes on the old Task Manager.. quite default

Services at last show all running and stopped.. well services 

As you can see this is a big step forward compared with the old Task Manager. Much more to see here, and nice detailed information!
Windows 8 totally rocks with the Metro User Interface and new look and feel. More blogposts about Windows 8 will follow later..

Friday, September 16, 2011

Guide to install Windows 8 on a VHD (Virtual Hard Disk)

Yesterday I posted a blog about installing Windows 8 on a virtual machine. Easy to do, but not exactly what I want. This because i think it's better to create a VHD (Virtual Hard Disk) and use the full resources of your device. Today my second install of Windows 8 takes place, this time on a VHD. The following steps are needed to get it done.

1) Download the Windows 7 USB/DVD download tool and install it on your Windows device. Download
2) Start the Windows 7 USB/DVD download tool and follow the steps. Select the Windows 8 ISO and use a empty USB device (4GB min.)

Select the Windows 8 ISO file on the hard disk

Use an empty USB device for installing Windows 8

Select the empty USB device and start/begin copying

Copy job is done and the USB device is ready to use now!

3) Open Disk Management and create a VHD file with Action > Create VHD. I've selected a dynamically expanding 20GB Virtual Hard Disk.

It's also possible to use DISKPART for that, but I'm just a GUI user. The steps needed for this will be then:
  • DISKPART
  • CREATE VDISK FILE="D:\VHD\Win8.vhd" TYPE=Expandable MAXIMUM=20000
  • SELECT VDISK FILE="D:\VHD\Win8.vhd"
  • ATTACH VDISK
  • CREATE PARTITION PRIMARY (optional)
  • EXIT
Just create a VHD file on your hard disk with enough free space

4) Now it's time to start from the bootable USB device. Choose USB when booting in the BIOS boot order menu. Windows 8 installation is starting then from the USB device!
5) Choose for a Custom installation, dont select an existing partition but just press SHIFT-F10 for a command window. Now choose the following commands:
  • DISKPART
  • SELECT VDISK FILE="D:\VHD\Win8.vhd" (Use List Disk in Diskpart to see what's drive the VHD is on. It's different then usual, so see comments for that one)
  • ATTACH VDISK
  • EXIT
6) Select the Windows installation screen again and press Refresh. That way the new created VHD partition becomes available.
7) Just install Windows 8 on the selected VHD partition, and let the magic happen! It will takes some time..

During installation a few reboots are needed. After that Windows 8 will be started. Select your network connection (wired/wireless) and start working immediately. There are default Apps for Twitter and Facebook available, so there's enough to do and see ;)

After the next restart a boot menu becomes available. When choose Options here, there's the choice between Windows 7 (existing OS) and Windows Developer Preview (a.k.a. Windows 8).

Both Operating Systems can be used by now, no need to use a virtual machine (or something like that) anymore. Just experience the full OS on full screen with all hardware resources available! Mine is running on 1680x1050 and wireless connection. That way Windows 8 will let you experience the true functionality.

Update: This guide can also be used for Windows 8 Consumer Preview. Just remember to write down the product key needed.

Update 1-3-2012: When the 0x000000f error is showed on first boot, and no OS can be started at all, just try the following:
  • Boot from USB to be able to select your Windows (7) OS
  • Remove Windows 8 from boot order with BCDEDIT
  • Disable BitLocker (!)
  • Try again…
Thanks to @micmyh for support on this!

Update 1-6-2012: This guide can also be used for Windows 8 Release Preview. Just remember to write down the product key needed.

Thursday, September 15, 2011

Windows Developer Preview or Windows 8 for developers available

On 14-9-2011 the first build of Windows Developer Preview is showed to the world. The Windows Developer Preview is a pre-beta version of Windows 8 for developers. Windows 8 is build on Metro, the User Interface we know from Windows Phone 7. That way it's usable on desktops, laptops and tablets, with touch interface!

In this blog I show you the installation & look and feel. Support for ConfigMgr 2007/2012 functionality follows later. First download the ISO from here: http://msdn.microsoft.com/en-us/windows/home/
I've created an virtual machine with 1 CPU, 2GB RAM and 20GB Disk. That's enough for having a smooth running virtual machine. The ISO can be mounted with a virtual CD/DVD-drive for installing Windows 8.

When the error message "This 64-bit application couldn't load because your PC doesn't have a 64-bit processor" is shown, enable "Virtualization" or "Hardware Virtualization" in your BIOS to get it working.

When using Virtual PC download the 32-bit version of Windows 8. Virtual PC can only handle 32 bit guest systems. I've download the 64-bit version and used Oracle VirtualBox to install Windows 8 and capture screenshots.

The installation is approximately done in 10 a 15 minutes. During installation the following screens are seen:
Looks the same as Windows 7 installation..

Finalizing your settings/ Preparing your PC

Windows 8 is already up and running, yeah!

Windows desktop is still available as TILE

When installing an program/tool a popup opens

This is the default screen when restarting..

A start menu in Metro UI is also available

Tiles can be managed by a ribbon with menu options

Nice to see in Windows 8 is the choice to switch between the Metro User Interface (UI) and the classic Windows (7) desktop. Known functionality as Control Panel, Windows Explorer and Internet Explorer are still available. New installations adds new tiles on the Metro UI. 

All tiles can be fully managed by an ribbon, which comes available when right-clicking a tile. When starting a tile/application, go back to the leftdown corner to access the start menu. That way going back to the Metro UI is possible. The application remains available that way.

Next time I have a look at more functionality and ConfigMgr support. Stay tuned for more!

Thursday, September 8, 2011

Integrate System Center Updates Publisher (SCUP) 2011 with ConfigMgr

With System Center Configuration Manager (ConfigMgr) and WSUS integrated, it's possible to install and use System Center Updates Publisher (SCUP) 2011 also (free usage). With SCUP 2011 you can create and install packages that's not in WSUS by default. That way updates from DELL, HP and ADOBE (for example) can be used in your existing WSUS installation for deploying to clients. By default there are some catalogs that can be imported in SCUP 2011. Manually created packages from JAVA (for example) can be used also.


First download and install SCUP 2011 from the following website:
http://www.microsoft.com/download/en/details.aspx?displaylang=en&id=11940
Microsoft DotNet 4.0 is needed on the server to have SCUP 2011 installed.

After that install the following hotfix on the server (needed for the Signing certificate):
http://www.microsoft.com/download/en/details.aspx?displaylang=en&id=20689 (x86)
or http://www.microsoft.com/download/en/details.aspx?displaylang=en&id=12390 (x64)


When SCUP 2011 is installed successfully choose Options. Choose "Enable publishing to an update server" and create an Signing certificate also. On the next tab select "Enable Configuration Manager integration". Now open a Management Console with the Certificates component in it.

The Signing certificate created will be available in the WSUS Certicate folder after configuraton. Choose copy, and past in on both "Trusted Root certification" and "Trusted Publishers". There is also the choice to save a local copy from it. That way it can be published bij Group Policy if needed for client computers. The Management Console can be closed after that.


Best thing now is to reboot the server, and open the SCUP 2011 console again. Now it's time to import the default catalogs and create additional packages yourself. After synchronization these updates will be available in ConfigMgr. Just select the updates needed, choose Assign and Publish to create them. When synchronization with WSUS is done, they will be available in ConfigMgr.

Kent Agerlund, ConfigMgr MVP, wrote a great getting starting guide to System Center Updates Publisher 2011 up on his blog. Check it out here
http://blogs.technet.com/b/jasonlewis/archive/2011/06/13/scup-2011-installation-amp-configuration-guide.aspx

Monday, September 5, 2011

Integration with Configuration Manager 2007/2012

With System Center Configuration Manager (ConfigMgr) 2007 there is many functionality available by default. With ConfigMgr 2012 this becomes even better, even MORE functionality will be in it. With both solutions there is the possibility to extend ConfigMgr with additional functionality. In this blog I will describe the most important ones.

Microsoft Deployment Toolkit (MDT) 2010: Adding new Task Sequences, new options in Task Sequences, new Boot images and all build-in scripts in ConfigMgr. Have a look at this blogpost(s) for more information about this:
http://henkhoogendoorn.blogspot.com/2010/12/mdt-integration-in-configmgr-2007.html
http://henkhoogendoorn.blogspot.com/2011/06/microsoft-deployment-toolkit-mdt-2010.html

Application Virtualization (App-V): Adding App-V streaming functionality in ConfigMgr, so no App-V Management and/or Streaming server is needed anymore. Just publish and update App-V packages from within the ConfigMgr console! Have a look at this blogpost(s) for more information:
http://henkhoogendoorn.blogspot.com/2010/12/configmgr-2007-with-app-v-integration.html
http://henkhoogendoorn.blogspot.com/2011/06/configmgr-2012-beta-2-with-app-v.html

ForeFront Endpoint Protection (FEP) 2010: It is possible to fully manage ForeFront from within the ConfigMgr console. Just deploy the ForeFront clients and manage policies with ConfigMgr. Definition files can be downloaded with WSUS integration in ConfigMgr. More about that on TechNet: http://technet.microsoft.com/en-us/library/cc161958.aspx

User State Migration Tool (USMT) 4.0: With USMT it is possible to store files and/or settings during OS deployment migrations. With hard-link migration it is possible to migrate user accounts, files and settings in less time using megabytes of disk space instead of gigabytes. More about that can be found here: http://technet.microsoft.com/en-us/library/dd560752(WS.10).aspx

Windows Server Updates Services (WSUS): Manage Software updates in ConfigMgr instead of WSUS, with even more control during installation. That way all management can be done in one single console, and additional ConfigMgr functionality as Maintenance Windows can be used. Have a look at this blogpost for this:
http://henkhoogendoorn.blogspot.com/2011/04/patch-management-in-configmgr-2012-beta.html

System Center Updates Publisher (SCUP) 2011: When ConfigMgr and WSUS is used (both together), SCUP can be installed for non-Windows patches. That way patches from HP, Dell, Adobe and Java (for example) can be managed and deployed in WSUS integration in ConfigMgr! How to setup, is explained here: http://blogs.technet.com/b/jasonlewis/archive/2007/11/30/how-to-setup-scup-and-configmgr-2007-to-deploy-custom-updates.aspx

System Center Configuration Manager 2007 Toolkit V2: The Configuration Manager 2007 Toolkit V2 contains 11 downloadable tools to help you manage and troubleshoot Configuration Manager 2007. It can be downloaded here: http://www.microsoft.com/download/en/details.aspx?id=9257

Right Click Tools or SCCM Console Extensions: The Right Click Tools or SCCM Console Extensions installation adds additional functionaly for server and client management. It becomes very handy during management and troubleshooting. More information can be found here:
http://myitforum.com/cs2/blogs/rhouchins/archive/2008/04/09/sccm-right-click-tools.aspx
http://myitforum.com/cs2/blogs/direland/pages/sccm-console-extensions.aspx

System Center Client Center: This tool is designed for IT Professionals to troubleshoot SMS/SCCM Client related Issues. The SCCM Client Center provides a quick and easy overview of client settings, including running services and SCCM settings in a good easy to use, user interface. Download it here:
http://sourceforge.net/projects/smsclictr/

With these tools more possiblities becomes available in ConfigMgr. Hopefully you have experienced new ideas with these products, and maybe more enthousiastic now to extend ConfigMgr functionality! Stay tuned for more later.