Showing posts with label Applications. Show all posts

Thursday, September 8, 2016

Software Center not showing applications in ConfigMgr Current Branch

Recently I had an issue at customer location where applications were not showing in ConfigMgr Current Branch. When opening Application Catalog instead all applications showing up without any problem. In the old days only software packages were displayed in Software Center, leaving the Application Catalog for applications. Apparently I was closer to the solution then expected, because I was still looking at the older Software Center, where using the new one was enabled in Client settings. Let's have a closer look.

At this location the shortcut was offered by Group Policy Preferences instead of ConfigMgr default. Microsoft did update the Software Center in ConfigMgr Current Branch, but did not replace the executable which is used. Therefore the link which is used for the old and new Software Center differs form each other:
Old location > C:\Windows\CCM\SCClient.exe
New location > C:\Windows\CCM\ClientUX\SCClient.exe

So yes, you can offer both old and new Software Center, where the old one only showing software packages, and the new one offers both software packages and applications. Long story short: after changing the shortcut in Group Policy Preferences, the issue was gone. Happy with this easy solution ;-)

Thursday, March 24, 2016

No inventoried software found in Asset Intelligence

When looking in Asset Intelligence - Inventoried Software, by default there is no software found. It will display "No items found" in most environments. When you want to have all software collected here, specific configuration is needed. This must be done on the Hardware Inventory part, because software is collected by WMI these days.

Trick is, the default setting in Hardware Inventory on the necessary classes is not activated. The class you need for installed applications is named InstalledSoftware and for executables InstalledExecutable. Just open Default Client Settings (or Custom Settings when there is another policy created for clients), select Hardware Inventory, Set Classes, and select both classes here.

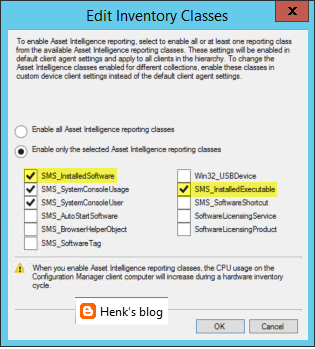
Furthermore there is a change needed on the Asset Intelligence part. Rightclick on Asset Intelligence (Assets and Compliance) for that, select Edit Inventory Classes, and select both classes again.

And yes, there will be a warning mentioning this will be increasing computer resources during Hardware Inventory :-)

When the clients get the client policy changes, software will be found en displayed in the ConfigMgr console.

Very handy if you ask me!

Source: blog.hosebei.ch 

Tuesday, November 10, 2015

Deploy a customized Windows 10 start menu during deployment

Did you know that when deploying Windows 10, it's possible to copy a default start menu too? When using a Windows 10 image from media, the start menu is filled with apps you never use :) Therefore remove (almost) all apps, and fill it with apps you want to use!

The command used to export the start menu is: Powershell export-startlayout –path "<path>\LayoutModification.xml"

An example looks like this:
<LayoutModificationTemplate Version="1" xmlns="http://schemas.microsoft.com/Start/2014/LayoutModification">
  <DefaultLayoutOverride>
    <StartLayoutCollection>
      <defaultlayout:StartLayout GroupCellWidth="6" xmlns:defaultlayout="http://schemas.microsoft.com/Start/2014/FullDefaultLayout">
        <start:Group Name="Office 2013" xmlns:start="http://schemas.microsoft.com/Start/2014/StartLayout">
          <start:DesktopApplicationTile Size="2x2" Column="0" Row="2" DesktopApplicationID="{7C5A40EF-A0FB-4BFC-874A-C0F2E0B9FA8E}\Microsoft Office\Office15\WINWORD.EXE" />
          <start:DesktopApplicationTile Size="2x2" Column="0" Row="0" DesktopApplicationID="{7C5A40EF-A0FB-4BFC-874A-C0F2E0B9FA8E}\Microsoft Office\Office15\EXCEL.EXE" />
          <start:DesktopApplicationTile Size="2x2" Column="2" Row="0" DesktopApplicationID="Microsoft.Office.OUTLOOK.EXE.15" />
          <start:DesktopApplicationTile Size="2x2" Column="4" Row="0" DesktopApplicationID="{7C5A40EF-A0FB-4BFC-874A-C0F2E0B9FA8E}\Microsoft Office\Office15\POWERPNT.EXE" />
        </start:Group>
        <start:Group Name="Applications" xmlns:start="http://schemas.microsoft.com/Start/2014/StartLayout">
          <start:DesktopApplicationTile Size="2x2" Column="4" Row="0" DesktopApplicationID="{7C5A40EF-A0FB-4BFC-874A-C0F2E0B9FA8E}\FastStone Capture\FSCapture.exe" />
          <start:Tile Size="2x2" Column="0" Row="0" AppUserModelID="Microsoft.WindowsCalculator_8wekyb3d8bbwe!App" />
          <start:DesktopApplicationTile Size="2x2" Column="0" Row="2" DesktopApplicationID="Microsoft.InternetExplorer.Default" />
          <start:DesktopApplicationTile Size="2x2" Column="2" Row="0"
DesktopApplicationID="{6D809377-6AF0-444B-8957-A3773F02200E}\CCleaner\CCleaner64.exe" />
        </start:Group>
      </defaultlayout:StartLayout>
    </StartLayoutCollection>
  </DefaultLayoutOverride>
</LayoutModificationTemplate>


During deployment copy the LayoutModification.xml with the following command to make it available for all users:
copy /y LayoutModification.xml "C:\Users\Default\AppData\Local\Microsoft\Windows\Shell"


With that the start menu is active when logon after deployment. Very nice if you ask me! :) Only thing so far is Internet Explorer is missing from the start menu. Is there a way to place that in the xml file too? Hope to find a solution for that as well, because all other apps are added as expected!

Update: On Microsoft Community and ccmexec.com the answer is found. Just create a "Internet Explorer.lnk" and copy the file:
copy /y "Internet Explorer.lnk" "C:\ProgramData\Microsoft\Windows\Start Menu\Programs\Accessories"
A PowerShell script is available there too, which do the same thing! Just remember the script looks for StartMenu.xml

Within LayoutModification.xml change DesktopApplicationID="Microsoft.InternetExplorer.Default" to DesktopApplicationLinkPath="%ALLUSERSPROFILE%\Microsoft\Windows\Start Menu\Programs\Accessories\Internet Explorer.lnk"
After that Internet Explorer will shown up in the start menu!


Keep up the good work :)

Monday, November 17, 2014

Deploy multiple applications using Dynamic Variables in a Task Sequence

When deploying applications within a task sequence you can add 10 applications at maximum in a single step. When deploying more applications you can add another "Install application" step or choose for "Install applications according to dynamic variable list". That way you can use a single step for as many applications you want. Just configure the following steps:

-Create a collection and add Collection Variables on it. Name must be APP01, APP02, APP03 (for example) and so on. Value must be the name of the application. Add as many applications needed.
-In the task sequence add a "Install application" step and choose for "Install applications according to dynamic variable list": APP (for example). Mark "If an application installation fails, continue installing other applications in the list" when needed.
-Just make sure that on every application used, "Allow this application to be installed from the Install Application task sequence action without being deployed" is checked.
(instead of APP you can use any name you want, as long as numbers are used. The name used in task sequence must be same.)

Deploy the task sequence on the created collection. All applications will get deployed in a sequence based on the numbering of the collection variables choosed. Just another way for installing applications ;)
In my case I'm installing around 30 applications in a single step. Not a problem at all, and very easy to configure.

More blogposts on this topic:
Deploy multiple packages using Dynamic Variables in a Task Sequence

Friday, March 4, 2011

How to uninstall applications with ConfigMgr

With ConfigMgr 2007 it is possible to publish MSI applications. But what to do when there is an update for a specific application? In this blog I will explain what to do for removing the existing application on devices, and publish a new version of it. Then ConfigMgr is not only the recommend solution for updating App-V packages, but also for MSI applications!

First create a MSI-based application and program in ConfigMgr. Important detail is then to fill in the Windows Installer information! With this information it is possible for ConfigMgr to uninstall applications from devices. For doing this go to the "Windows Installer" tab in the program, choose Import, and browse to the MSI file of the application. Then the "Windows Installer product code" will be automatically filled in.


Do this for all MSI-based applications! With applications that are only available as EXE file, use a "EXE to MSI file" solution for creating MSI files of all applications that will be installed (and/or updated) with ConfigMgr.

Now what to do for updating the application? Best practice is to uninstall it first (or a in-place upgrade must be possible)! Create a new program (in the application itself) for that. In the program the following information must be placed:


In this case the following Command line is used: msiexec.exe /x {FC7BACF0-1FFA-4605-B3B4-A66AB382752D} /qn (example)
No need for fill in Windows Installer information in this program. Choose "Whether or not a user is logged on" on the Environment tab.

Advertise this new program to the collection where specific clients are been, and wait till the program will be uninstalled. When it is removed a new update for this application can be installed. In the Event Viewer this information can also been found.

When a update from a specific application must be done, with uninstalling the older version, the following can be done:


Create a new Software package, and choose on the Advanced tab for "Run another program first". Select the remove/uninstall program for the old application, and update the MSI application. That's all you have to do for uninstalling or updating applications!