On 23 march 2011 during MMS 2011 in Las Vegas, ConfigMgr 2012 Beta 2 is released. Because I'm doing ConfigMgr implementations most of times, I want to know which changes are made during installation. In this blog the setup of this new release is viewed, to see if there are any differences between previous releases. This installation is done on a Windows Server 2008 R2 Enterprise x64 server.
Let's download first the new Beta release "ConfigMgr_2012_Beta2_ENU_7561" on Technet Downloads: http://technet.microsoft.com/en-us/bb403698
Unpack the file, and start Splash.hta for starting the setup. The following screen will be seen then, which has many new options in it:
When choosing INSTALL a message is displayed that DotNet Framework 3.5 SP1 and 4.0 are needed for starting the installation. So let's see first what's needed on the server for having a successful installation:
- DotNet Framework 3.5 SP1 and 4.0 (with default IIS Role Services)
- SQL Server 2008 SP1 with Cumulative Update 10 or higher (SP2 and R2 are not supported yet)
- Remote Differential Compression (RDC)
- Background Intelligence Transfer Service (BITS)
- Windows Server Updates Servies (WSUS) > (optional)
- IIS Role Services > IIS 6 WMI Compatibility
Then the installation begins..
Next in line after this screen are:
- Available Setup Options (Primary Site Server, Central Administration Site, Recover a Site Server)
- Microsoft Software License Terms
- Updated Prerequisite Components (14 items till now)
- Site and Installation Settings (Site Code, Site Name)
- Primary Site Installation (install a standalone site, or join an existing hierarchy)
- Database Server (SQL Server 2008 SP1 with cumulative update 10 is needed)
When this error message is displayed after installing SQL Server 2008 SP1 with cumulative update 10, the TCP/IP protocol must be enabled.
Start "SQL Server Configuration Manager" for that, choose Protocols, and enable TCP/IP. Then restart SQL Server service for make changes active.
Now the installation can be continued:
- SMS Provider Settings (cannot be installed on a clustered SQL server)
- Client Computer Communication Settings (Native or Mixed mode)
- Site System Roles (Choose HTTP or HTTPS for MP or DP, this can be choosen per rol)
- Customer Experience Improvement Program Configuration
- Setting Summary
- Prerequisite Check
- Install.. (this takes a while..)
After that ConfigMgr 2012 Beta 2 is installed! Not that hard I think?
Next blog will zoom deeper in configuring this new ConfigMgr release! I'm very excited about this new ConfigMgr release! I hope you are too!
Thanks to my PQR collegue Stephan Wibier, for the SQL (TCP/IP protocol) advise!
With ConfigMgr 2007 there can be put many information in the Task Sequence used for OSD. With Windows XP, Vista or 7 there will be different files created for using a unattend installation. All information set in the Task Sequence will be used for creating that specific file. Only a dynamically computername is missing here! How to assign a dynamic computername during OSD, that's the question!
In a Task Sequence used for OSD, this information can be placed in "Apply Windows Settings" and "Apply Network Settings". In "Apply Windows Settings" the following information is (most of times) set:
- User/Organization name
- Product key
- Local administrator password
- Time zone
In "Apply Network Settings" the following information is (most of times) set:
- Join a workgroup or domain
- Set specific domain information
- Account used for domain join
With this information a sysprep.inf file (for Windows XP) or a unattend.xml file (for Windows Vista or 7) is created at specific places. The sysprep.inf file will be created/placed at C:\Sysprep (with the deployment tools). The unattend.xml will be created/placed at C:\Windows\Panther\Unattend. Sysprep is already build-in for Windows Vista and 7.
During above steps ("Apply Windows Settings" and "Apply Network Settings") these files will be generated. During "Setup windows and ConfigMgr" these files will be used for having a unattend installation. The only information missing here is how to set the computername?
With MDT integration an additional step is used for making that possible. Then a Task Sequence variable can be used for dynamically assigning a computername. This is explained here: http://blog.coretech.dk/mip/wrong-pc-name-after-deployment/
With ConfigMgr only (without MDT integration) an additional script is needed for unattended installation, or the computername must be filled-in manually during OSD (not recommended). The additional script must have lines in it for recognizing the computername in the BIOS, and place that information in the sysprep.inf or unattend.xml file.
Most of times I disable both "Apply Windows Settings" and "Apply Network Settings" steps in the Task Sequence, and making use of the sysprep.inf and/or unattend.xml which is created by ConfigMgr during OSD. The only change I make then is to replace the Computername with an "*" sign, and create a separate package from this file.
Then I put that file (as package) at the "Apply Operating System" step. The package which contains the script (converted to executable) is put in an additional step, in this case: "Assettag To Unattend". The script I use is as follows (using the Asset Tag as computername):
Windows XP on HP devices:
#include <WinAPI.au3>
#include <WindowsConstants.au3>
#include <File.au3>
#include <Array.au3>
RunWait("cmd.exe /c " & "wmic /node:localhost systemenclosure get smbiosassettag > c:\sysprep\assettag.txt", "",@SW_HIDE)
$file = FileOpen("C:\sysprep\assettag.txt", 0)
$assettag = FileReadLine($file,2)
FileClose($file)
ReplaceInFile('C:\sysprep\sysprep.inf', "*", $assettag)
Func ReplaceInFile($io_file, $io_word, $io_replacement)
Dim $Records
$Lines = _FileCountLines($io_File)
If Not _FileReadToArray($io_file, $Records) Then
ConsoleWriteError("There was an error reading > " & $io_file & @CRLF)
Exit
ElseIf _FileReadToArray($io_file, $Records) == "" Then
ConsoleWriteError("File is empty!" & @CRLF)
ElseIf Not @error Then
ConsoleWrite("> File succeeded!" & @CRLF)
EndIf
$File = FileOpen($io_file, 2)
For $ax = 1 To $Records[0]
ConsoleWrite("+> " & $Records[$ax] & @CRLF)
$Replace = StringReplace($Records[$ax], $io_word, $io_replacement)
ConsoleWrite("+> " & $Replace & @CRLF)
If _FileCountLines($io_file) < UBound($Lines) - 1 Then
FileWrite($File, $Replace & @CRLF)
Else
FileWrite($File, $Replace & @CRLF)
EndIf
Next
FileClose($File)
EndFunc
Windows XP on Dell devices:
Replace "systemenclosure get smbiosassettag" with
"systemenclosure get serialnumber". Then it works also on Dell devices.
Windows Vista or 7 on HP devices:
#include <WinAPI.au3>
#include <WindowsConstants.au3>
#include <File.au3>
#include <Array.au3>
RunWait("cmd.exe /c " & "wmic /node:localhost systemenclosure get smbiosassettag > c:\_SMSTaskSequence\assettag.txt", "",@SW_HIDE)
$file = FileOpen("C:\_SMSTaskSequence\assettag.txt", 0)
$assettag = FileReadLine($file,2)
FileClose($file)
ReplaceInFile('C:\Windows\Panther\unattend\unattend.xml', "*", StringStripWS ($assettag,8))
Func ReplaceInFile($io_file, $io_word, $io_replacement)
Dim $Records
$Lines = _FileCountLines($io_File)
If Not _FileReadToArray($io_file, $Records) Then
ConsoleWriteError("There was an error reading > " & $io_file & @CRLF)
Exit
ElseIf _FileReadToArray($io_file, $Records) == "" Then
ConsoleWriteError("File is empty!" & @CRLF)
ElseIf Not @error Then
ConsoleWrite("> File succeeded!" & @CRLF)
EndIf
$File = FileOpen($io_file, 2)
For $ax = 1 To $Records[0]
ConsoleWrite("+> " & $Records[$ax] & @CRLF)
$Replace = StringReplace($Records[$ax], $io_word, $io_replacement)
ConsoleWrite("+> " & $Replace & @CRLF)
If _FileCountLines($io_file) < UBound($Lines) - 1 Then
FileWrite($File, $Replace & @CRLF)
Else
FileWrite($File, $Replace & @CRLF)
EndIf
Next
FileClose($File)
EndFunc
Windows Vista or 7 on Dell devices:
Replace "systemenclosure get smbiosassettag" with
"systemenclosure get serialnumber". Then it works also on Dell devices.
(thanks to Wilfred Hanekamp for sharing the script)
Download and install AutoIt for making changes to this script, and building a executable file from it. With this script, assigning a dynamic computername is possible, without using MDT integration!
ConfigMgr rocks again!
Update 15-11-2011: Because of some comments that the script isn't working I replaced the script with additional values. This time the script must be functional again.
Update 16-3-2012: Again I replaced the script with additional values. In my environment the script is running fine.
In ConfigMgr 2007 R2 there can be created Task Sequence Media. This is extremely useful when PXE boot is not available, or not allowed, and an image must be deployed. Default there will be jobs for Stand-alone media (used for offline devices), Bootable media (used for deployment) & Capture media (used for capture a reference machine). With ConfigMgr R3 there is even more functionality available in the Task Sequence Media wizard. Then there will be a job added for Prestaged Media (used for re-deployment).
In this blog the Task Sequence Bootable Media will be explained. Choose to create Bootable media, and apply it to USB or CD/DVD. Also make sure the Task Sequence used for OSD is advertised on the collection used for deployment. For a new device use "All Unknown Computers", for known devices use a deployment collection (for example). Then start the device with Bootable media. When a password is set for security reasons, this must be filled-in first.
When multiple Task Sequences are advertised on the collection, all will be displayed. Choose which OS to install, and finish the Bootable media used for OSD. The Bootable media will then copy the WinPE boot image to the local drive. After that the USB device or CD/DVD used for Bootable media must be removed.
After rebooting the Task Sequence will run the same as using PXE boot. This because the WinPE boot image and Task Sequence are stored on the local drive now. Other packages and OS image which are used in the Task Sequence will be accessed directly at the Distribution Point.
This way OSD is possible without using PXE boot functionality!
OSD = Operating System Deployment
WinPE = Windows Preinstallation Environment
In my last blog I talked about Obsolete clients in ConfigMgr. This happens during multiple deployments on the same device. There is also a known issue between ConfigMgr in combination with VMware View. Till VMware View v4.0 there was no refresh option possible, so when deleting and provisioning a new VDI desktop, a new object gets created in ConfigMgr collections.
The problem with that is you can get as many objects, for example 10 (ten) objects, which will all be online, not obsolete, and all you can use for managing the VDI desktop. When you delete an online SCCM object, all will be deleted for the same device. This is NOT an environment which can be successfully managed!
With VMware View v4.5 there is indeed a refresh option available, which can be better managed within ConfigMgr. There are additional steps needed for not getting many objects in ConfigMgr collections.
This will be explained in the following article:
View Composer supports ConfigMgr 2007 SP1 software
http://kb.vmware.com/selfservice/microsites/search.do?language=en_US&cmd=displayKC&externalId=1023821
Steps to take for getting rid of multiple objects are:
- Net stop ccmexec (stops SMS Agent Host service)
- Ccmdelcert.exe (can be found in ConfigMgr install folder, copy file to local disk and start it)
The ccmdelcert utility is bundled with the SMS 2007 and SMS 2003 toolkits.
- Ccmsetup.exe RESETKEYINFORMATION=TRUE (can be found in ConfigMgr Client folder, copy folder to local disk and start setup)
- Delete Smscfg.ini file in C:\Windows directory (then a unique GUID will be generated next time)
Note: When you install ConfigMgr, the application does not generate a GUID in the Windows registry. Instead, ConfigMgr stores the GUID in the file, C:\Windows\SMSCfg. You do not have to remove an ConfigMgr GUID from the Windows registry on the parent virtual machine.
- Create a new snapshot, and attach it in VMware View environment
By default, ConfigMgr generates unique GUID's in the linked-clone desktops when the ConfigMgr application agent starts up. After you perform refresh operations, the unique ConfigMgr GUID's are preserved in the linked clones.
Remember: This procedure only works with the refresh operation. Recomposing the pool will cause new GUID values to be generated.
Cool thing is you can manage VDI desktops as easy with ConfigMgr, as fysical desktops/servers. All things like OS deployment, Software distribution (also App-V packages), Patch management, Task sequences (for deploying applications), Remote Control, and so on will also work on VDI desktops! All you need is a ConfigMgr client in the VDI template, with customization for GUID's.
There is also a VMware View Optimization Guide for Windows 7 available.
http://www.vmware.com/resources/techresources/10157 and/or
http://www.vmware.com/files/pdf/VMware-View-OptimizationGuideWindows7-EN.pdf
This guide provides administrators with the information necessary to create a standard image of Windows 7 leveraging the Microsoft Deployment Toolkit or by utilizing a script-based approach to optimize a traditionally installed Windows 7 virtual machine. The recommended configuration settings optimize Windows 7 to help enhance the overall scalability and performance within a VMware View Virtual Desktop Infrastructure.
Includes files in this PDF are Commands.txt and ts.xml, which can be used for importing in MDT or a combination of ConfigMgr/MDT. These files will optimize a Windows 7 VDI template for best performance during usage!
Conclusion: ConfigMgr 2007 in combination with VMware View is the right choice for managing VDI desktops!
When deploying devices multiple times a day, for example when testing a new Task Sequence, ConfigMgr clients will become obsolete. This because everytime a device gets a new image, the ConfigMgr client will be installed again with a new GUID. The older object will be marked as obsolete, and a new object becomes available. Because of this obsolete object, OS deployment and Software distribution doesn't work anymore. This can be managed as follows.
First configure a Maintenance task for deleting them automatically. Go to Site Management > Site Settings > Site Maintenance > Tasks for enabling and configuring "Delete Obsolete Client Discovery Data". This way daily management of obsolete clients is not needed anymore. Mostly the following configuration I choose at customers:
This because this task is disabled by default, and deletes only data older the 7 (seven) days. Because I want a daily refresh in colllections, I choose to set it to 1 (one) day. This is the only thing in ConfigMgr for automatically deleting obsolete clients. But what to do when there will be multiple deployments on the same day, with the same device? Then manually delete the obsolete client is needed. For doing that, the following must be done:
Go to the All Systems collections and choose "Update collection membership". Also do a refresh afterwards. Then multiple objects can be available for the same device. Delete the Obsolete one will also then delete this object from other collections. That's pity! So remember to which collection(s) this device belongs! There is also another way for recognizing multiple objects.
Go to the collection where your device is placed for OSD (for example). Now rightclick on this collection and choose properties > Membership Rules. Click the blue computer icon for adding new devices:
Choose System Resource (Resource class) & Name (Attribute name). Fill in the device name searching for (Value):
Don't use Collection Limiting for searching devices, otherwise you have less change to find them:
When having obsolete client data, multiple devices will be seen. Choose "Select All" for adding them to the collection:
After that new devices are added, and obsolete items can be deleted:
When devices are in the right collections again, advertisements will be functional again. These are all workarounds for managing obsolete clients in ConfigMgr. When there are more possibilities for managing them , I like to hear them. Managing obsolete clients stays a challenge this way!?
Update: You can also use a query on the client name to manage collection membership instead of direct allocations. That way the new clients appear in the same collections as obsolete ones automatically. (thanks to arricc)
Most of times during a ConfigMgr 2007 implementation, there will be Delegation of Control configured. This will be done beneath Security Rights -Users/Rights in the ConfigMgr console. At that place there can be different roles configured, for example: Administrators role, Support role or Reporting role. But what to do when only Remote Control functionality is needed? In this blog I will explain what to do for configuring Remote Control in ConfigMgr.
Remote Control functionality is build-in with the ConfigMgr client. Check Site Management > Site Settings > Client Agents > Remote Tools Client Agent for configuring settings and security.
Most of time I choose this settings at General tab:
Beneath Security, Users and Groups must be added for Remote Control functionality:
This will add users and groups in the registry of all clients and servers managed within ConfigMgr 2007: HKEY_LOCAL_MACHINE\SOFTWARE\Microsoft\SMS\Client\Client Components\Remote Control
In the Notification tab there are multiple choices for configuring:
Most of times I don't configure settings beneath the "Remote Assistance" and "Remote Desktop" tab. These are not needed for Remote Control functionality!
Now set security in the ConfigMgr console, by going to Security Rights -Users/Rights in the ConfigMgr console. Add a new user or group for having Remote Control rights.
I've created a RemoteControl user for this blog:
Choose to add another right or modify an existing one:
I put rights here to use Remote Tools on every collection:
Configuring is done, and the user/groups has now access rights:
For using the Remote Control functionality in ConfigMgr console now, all you hace to do is install (or virtualize) this console, and offer it to the rights users. Default the whole console will be displayed, and only the parts which you have access to, can be managed/used. You can also building a custom ConfigMgr admin console, which has for example only collections in it. See this URL for building one yourself: http://scug.be/blogs/sccm/archive/2008/07/16/building-a-custom-configmgr-2007-admin-console.aspx
Another way for giving specific users access to Remote Control functionality, is build a package with only 2 (two) files in it. This will be RC.exe and Rdpencom.dll (both can be found at ConfigMgr source > AdminUI > Bin > i386 location. Just distribute these files, and make sure security is done in the ConfigMgr console, and you're done!
The only real difference in both solutions will be the search option. In the ConfigMgr console > Collections, there can be searched in All Systems for the device which must be taken over. In the single RC.exe file solution, a name must be typed-in for having Remote Control functionality.
Remember that firewall rules must be added for having Remote Control functionality on the client when firewall is active. Otherwise an error message will follow, with a "Unable to connect" message. See this URL for used ports in ConfigMgr 2007: http://technet.microsoft.com/en-us/library/bb632618.aspx
Hope I make things clear with posting blogs like this!
In ConfigMgr 2007 R2 there can be created Task Sequence Media. This is extremely useful when PXE boot is not available, or not allowed, and an image must be created. Default there will be jobs for Stand-alone media (used for offline devices), Bootable media (used for deployment) & Capture media (used for capture a reference machine). With ConfigMgr R3 there is even more functionality available in the Task Sequence Media wizard. Then there will be a job added for Prestaged Media (used for re-deployment).
In this blog the Task Sequence Capture Media will be explained. Install a reference machine with Windows installation, Windows Updates and possibly Microsoft Office. Then start The burned Capture Media for starting ConfigMgr Task Sequence. For a Windows XP image the device must be placed in a Workgroup, and Sysprep deployment tools must be placed in C:\sysprep. On Windows Vista & 7 this is not necessary. Then only the device must be placed in a Workgroup. The Sysprep deployment tools are already build-in.
Choose Next, and fill in the path and name for storing the image, and use an account which has security rights for storing the image on that location. Choose Next again and Sysprep will start running. After the reboot WinPE will start, and a Capture job will save the image to the given location.
After capturing the only thing to do is importing the WIM image on "OSD - Operating System Images", and add it to the Distribution point. No additional Build and Capture Task Sequence is needed anymore! This becomes very handy when PXE boot is not working or not possible in a environment!
For OSD can also the "Bootable media" be used for deploying the image. This will be a different ISO file to create, and deployment will also works this way!
When installing ConfigMgr 2007 with all default roles on the local server, you must decide on which drive the Distribution point (share) will be placed.
Without any configuration the Distribution point share will be placed on the drive with the most free space. When after a while of time there is more free space on another drive, new packages will be placed on that drive. Then a new Distribution point share will be created, and software packages will be on multiple drives. This is not very handy for manage your ConfigMgr 2007 environment.
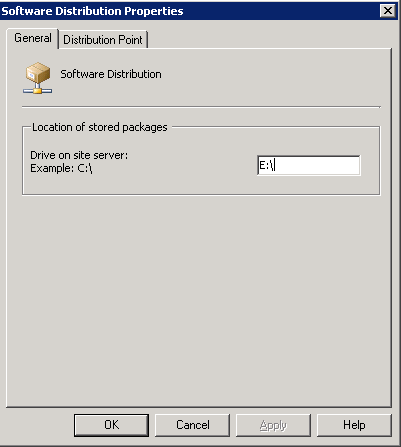
In the Software Distribution properties (Site Management - Component Configuration) there can be a default "Location of stored packages" set. Here will be the first packages stored. This is no guarantee that all packages that will added later, will be placed on the same share! To do this a workaround is available, that works also with (older) SMS 2003 environments.
Create a new txt file on all drives where you don't want a Distribution point share, and name it "no_sms_on_drive.sms". That way you make the above setting mandatory for the default "Location of stored packages". Much better that way to decide where to put the packages!
In my environment it will looks like this:
No Distribution point share (and packages) will be placed on the C:\ drive!
No Distribution point share (and packages) will be placed on the D:\ drive!
The Distribution point share (and ALL packages) will be placed on the E:\ drive! Here will be the SMSPKG folder stored, and all packages will be on the same drive. All content folders are stored on the D:\ drive this way (beneath the SCCM folder).
Hope to helped you with this (easy) solution!
With ConfigMgr advanced driver management is possible for all kind of devices. Best practice for this is creating driver packages for all different devices, and put them in the Task Sequence used for deployment. With WMI queries you can decide then which driver package will be used on different types of devices.
For more information about that see my other blog: Driver management in ConfigMgr 2007 http://henkhoogendoorn.blogspot.com/2010/10/driver-management-in-configmgr-2007.html
Now drivers are seperated in different driver packages, but what to do with the Drivers folder where all single drivers are placed? For all drivers imported there can be folders created, for dividing different drivers and hardware. Also specific Categories can be created for recognizing drivers and hardware by model. Do the following for that:
As you can see I've imported HP8000 drivers, which has been assigned to a new category. Press Next for importing this drivers in the ConfigMgr database.
All drivers are successfully imported in the ConfigMgr database. Now do it again for a new type device or model.
Now I've imported HP8100 drivers, which has also been assigned to a new category. Press Next again for importing this drivers in the ConfigMgr database.
This time (all) drivers will fail to import in the ConfigMgr database. Why is that? This because drivers can be already existing in the database. Default in ConfigMgr 2007 there can be only 1 instance per driver in the database!
But.. There is a hotfix available for solving that! (kb2213600)
http://support.microsoft.com/kb/2213600
With this hotfix drivers can be multiple times imported in different folders. So I install this hotfix in my environment, and do the same thing as before.
This time all drivers are indeed successfully imported in the ConfigMgr database. Let's have a moment now to look in the ConfigMgr console.
In the ConfigMgr console drivers are seperated now by device and hardware model. This way everyone can see to which device the drivers belongs!
When creating driver packages now, it's easy to see that the structure for driver management is the same in both Drivers and Driver packages. This way advanced driver management is created in the ConfigMgr console!
Once last thing: when deleting older drivers in the ConfigMgr console, this drivers will also be deleted from older folders from different models. To prevent this create an OLD folder, and move the old driver folders (model) beneath the OLD folder.
Also a collegue of mine (Stephan Wibier) has found that when a txt file exist in the driver source folder, this will not happen. Drivers that are the same for different models will then not deleted. This text file must exist in all folders and sub-folders then, for all drivers that are imported. This txt file has named in this example HP8000.txt for the HP8000 driver folders, and HP8100.txt for the HP8100 driver folders.
Hope you learned a lot this way about advanced driver management in ConfigMgr 2007!
Follow us on Twitter:
Henk Hoogendoorn (PQR) @henkhoogendoorn
Stephan Wibier (PQR) @stephanwibier
When installing ConfigMgr 2007, there are many default collections in the console. Most collections will be never used actually. Only the "All Systems" is handy for recognizing all devices. Best thing is to move the default collections to a new collection. How this works I will explain in this blog.
In ConfigMgr 2007 there are 17 default collections after installation. In ConfigMgr 2012 there will be default 2 User collections and 5 Device collections. Much better that way!
Because all these collections are filling up the console, it's better to moves the ones not using. To do this create a new collection (for example: All Microsoft collections). Now right-click on this collection, and choose New - Link to collection. Browse for the collection you want to move, and choose OK. This will copy the collection (and query) to the new collection.
Do this for every collection that's not used. Most of times only the "All Systems" collection is handy for use. The other collections becomes sub-collections of the new "All Microsoft collections" collection (and will be still available afterwards)! Delete the original collections after copying, these are not necessary anymore. In my console it will looks like this (after copying and deleting):
Beneath "All Microsoft collections" and "Software Distribution" are my sub-collections. The first for moved default collections, and the second for all Applications that are bound to user groups. That way the console is clear of collections that are not used often!
The moved collections can still be used for advertisements, so don't worry about that. It's only handy for a clear view in ConfigMgr 2007.
When I'm implementing ConfigMgr 2007 at customers, default collections are almost not used. Only the "All Systems" is handy for recognizing devices. Mostly I create collections for existing or new Active Directory OU's. (for example: Desktops, Laptops, VDI). When devices are placed in this OU's you can browse for this. Use "Active Directory System Group Discovery" for that, and the query can be created.
Read the blog: "Configure dynamic collections in ConfigMgr" for a complete guide to create dynamic collections.
http://henkhoogendoorn.blogspot.com/2011/01/configure-dynamic-collections-in.html
But what to do when there are no devices found in OU's, or worst, the OU's doesn't yet exist? In that case you cannot browse for this, so queries must be manually filled in. If you are specifying a full path, the FQDN of the Active Directory domain and a path to the OU is used to locate the OU in question.
So, in my example, the path is "SYSTEMCENTER.COM/VIRTUAL MACHINES" for the OU. With this information it's not needed to link ConfigMgr collections to existing Active Directory OU's anymore!
With ConfigMgr 2007 it is possible to publish MSI applications. But what to do when there is an update for a specific application? In this blog I will explain what to do for removing the existing application on devices, and publish a new version of it. Then ConfigMgr is not only the recommend solution for updating App-V packages, but also for MSI applications!
First create a MSI-based application and program in ConfigMgr. Important detail is then to fill in the Windows Installer information! With this information it is possible for ConfigMgr to uninstall applications from devices. For doing this go to the "Windows Installer" tab in the program, choose Import, and browse to the MSI file of the application. Then the "Windows Installer product code" will be automatically filled in.
Do this for all MSI-based applications! With applications that are only available as EXE file, use a "EXE to MSI file" solution for creating MSI files of all applications that will be installed (and/or updated) with ConfigMgr.
Now what to do for updating the application? Best practice is to uninstall it first (or a in-place upgrade must be possible)! Create a new program (in the application itself) for that. In the program the following information must be placed:
In this case the following Command line is used: msiexec.exe /x {FC7BACF0-1FFA-4605-B3B4-A66AB382752D} /qn (example)
No need for fill in Windows Installer information in this program. Choose "Whether or not a user is logged on" on the Environment tab.
Advertise this new program to the collection where specific clients are been, and wait till the program will be uninstalled. When it is removed a new update for this application can be installed. In the Event Viewer this information can also been found.
When a update from a specific application must be done, with uninstalling the older version, the following can be done:
Create a new Software package, and choose on the Advanced tab for "Run another program first". Select the remove/uninstall program for the old application, and update the MSI application. That's all you have to do for uninstalling or updating applications!
Because there are many challenges to control in ConfigMgr, I will post another blog about handy tips and tricks! This time I will order them on subject, so it's easy to find the right one! Everyday there are new challenges in ConfigMgr, but still it's a cool product. This because when it works, it can do a lot for you. And with new releases and updates it can even do more!
Here the new tips and tricks section:
Windows XP:
- With Windows XP your image is not that big (500Mb), but many Driver packages are needed (for every device a driver package). Put all Driver packages in the Task sequence, with a query on it. That way you can have a single image, single Task sequence, for many different devices.
- Because Windows XP don't recognize SATA disks by default, put SATA drivers in the Driver packages, and select the right model in the Task Sequence! That way it's not needed to change the BIOS setting from AHCI to ATA/IDE or something like that.
- Most of time I create a Sysprep package (extract files from deploy.cab), and put the sysprep.inf file in the Task sequence. That way you are flexible, and put desktops and laptops in their own OU's!
- For having Multicast functionality with maximum results, put the source files of applications in the image. That way you're still flexible with a clean image and sources (image gets bigger), and data goes only once over the network. This because Multicast only works in WinPE mode.
- Because there are so many Software updates after Windows XP SP3, update your image with as many updates that's possible. That way deployment goes faster, and less updates needs to be installed during or after deployment. For example: only install Office updates during Task sequence progress.
Windows 7:
- For creating Window 7 images, it's not necessary to add a product key in the Tasks sequence. Otherwise capturing the image will fail. The product key must be placed in the unattend.xml file, so installation can choose which Windows 7 version must be installed.
- With Windows 7 no large driver packages will be needed anymore. This because there is a large driver library build-in, and only specific (older) drivers must be manually added. Windows 7 is easy to install that way!
- Using sysprep, and creating a sysprep package is not necessary anymore. Just create a unattend.xml, and Windows will automatically run sysprep during deployment. Again: Windows 7 is easy to install that way!
- More tips and tricks for Windows 7 will follow later!
Software Updates:
The combination of ConfigMgr and Software Updates is not always a simple one. This because when it's not working, it's not always easy to find the solution. Here are some best practices for installing and configuring:
- When installing WSUS, choose always for a custom website, with ports 8530 and 8531. This way the ConfigMgr Management Point and Software Updates are not both configured on port 80 and 443 (best practice).
- When WSUS is installed, check permissions on the WSUS and WSUSContent folder. On both folders the Network Service account must have the right permissions. On the WSUS folder set Read permissions and on the WSUSContent folder set Full Control permissions for the Network Service account.
- When WSUS is installed with a custom website check security on the IIS website. This must be set to Anonymous authentication, with a "IUSR_<ConfigMgr Server>" account. This must be a Domain User account, with Local Admin rights on the ConfigMgr server.
- With MP Troubleshooter (ConfigMgr 2007 Toolkit) you can check if the IIS account has enough permissions for accessing both websites. It's always necessary for having enough (local) rights on the ConfigMgr server.
- Sometimes a Proxy server must be used for synchronizing updates. Try both configurations (on and off) with or without an User account. Sometimes there must also made a bypass on the Proxy server for getting it to work.
- At last, do a "Run Synchronization" on the Update Repository and follow the Software Updates in the wsyncmgr.log (easy to see with SMS Trace - ConfigMgr 2007 Toolkit). When synchronization is done, do it again till no updates are available anymore. Then create Search Folders.
- With Search folders it's easy to see which updates has come available for the last month (example) for a specific product. This updates can be drag-and-dropped on the Update Lists for creating overviews.
Driver Management:
- When importing drivers, only once a specific driver can be imported. With that knowledge it's not possible to create a specific folder for every hardware model. What i do most of time, is put a label (tag) on drivers, with the model number.
- When creating driver packages it's possible to have a mix of drivers (multiple hardware models). This because a specific driver can be imported once, and that driver must be available for multiple hardware models (for example).
- There is a hotfix available for importing drivers multiple times, for creating specific driver packages. This hotfix can be found at: http://support.microsoft.com/kb/2213600
- When using Dell systems, it's easy to using the "Dell Client Deployment Pack". Then the only thing you have to do is importing the CAB files, and Dell will create the driver packages for you!
- When using Dell systems, you can update or change BIOS settings with the "Dell Client Configuration Utility". Both downloads are plug-ins for ConfigMgr 2007, and will be visible in the console.
- On the Microsoft Update Catalogue, drivers can be found on specific names, or with Hardware ID's like the following:
"PCI\VEN_14E4&DEV_1677&SUBSYS_01AD1028". Just look in the details from drivers you want a specific driver for.
Service accounts:
- There are two (2) service accounts needed, when using ConfigMgr the right way. The Network Access (NA) account, and the Push Installation (PI) account. Both accounts can have Domain User rights, but the PI account must at least Local administrator on the device then.
- When setting up ConfigMgr with minimal (Domain User) security rights, more time is needed for setting up the server(s). This because sometimes the service accounts are used, and sometimes the Primary server computeraccount is used.
Access to remote share:
- The server which is your primary site server role is the one which needs to go to the source folder. So, the computer account in Active Directory for your primary site server is the account which needs to have at least Read rights to the remote network share, and read NTFS rights to the files/folders on that share.
Again, these are a few most common error messages and best practices during Task Sequence deployment in ConfigMgr. When having questions on a specific deployment issue, write a comment on this blog.
That's all for now, more tips and tricks later?!
For multiple years I am busy now with (client) deployment, delivering applications, configuring policies, and a lot of troubleshooting. This with many products, on both fysical and virtual systems. For example:
- System Center tools: Configuration Manager (SMS, SCCM), Operations Manager (MOM, SCOM), Essentials, Updates Publisher (SCUP), Server Updates Services (WSUS)
- Deployment tools: Ghost Server, Deployment Services (WDS), Deployment Toolkit (MDT) Configuration Manager (SMS, SCCM), Altiris Server, Wyse Device Manager (WDM)
- Knowledge of: Desktop Optimization Pack (MDOP), VMware View (VDI), RES PowerFuse, RES Wisdom, Group Policy Objects (GPO), Group Policy Preferences (GPP)
When doing (client) deployment in ConfigMgr 2007, you can have a lot of challenges. A few of this challenges I will describe in this blog. When having questions on a specific deployment issue, write a comment on this blog.
Here they are (most of them i've seen during the last few months):
- When deploying a device multiple times during a "capture and deploy" Task Sequence, and a abortpxe.com error message is displayed, delete the obsolete object in the specific collection, and add the new object again. Most of times there will be two objects with the same name. (where one will be obsolete)
- When deploying a device multiple times, and startover again within 15 minutes, there will be a error message displayed. This is default WDS (Windows Deployment Services) behaviour, and can be solved with restarting the WDS service.
- When creating a new Windows image from source files, put the auto-apply drivers or apply driver package step before the "Apply Operating System" step. Otherwise specific drivers (SATA disks for example) will not be functional when booting from disk.
- When distributing a Windows image (WIM file), put the auto-apply drivers or driver package step after the "Apply Operating System" step. Otherwise an error will follow, and Task Sequence fails.
- When using multiple driver packages for one single Windows image, put a WMI query on it. With the query SELECT * FROM Win32_ComputerSystem WHERE Model LIKE "%<MODEL>%" you can decide which driver package belongs to which system.
- When drivers or driver packages are not installed during deployment, add an extra line in sysprep.inf which contains "UpdateInstalledDrivers=Yes" to make it work again (Windows XP solution).
- When putting Software Updates in the Task Sequence, and the system is not yet domain member, add the next lines to the "Setup windows and ConfigMgr" step (SMSSLP=SERVERNAME.FQDN.COM SMSMP=SERVERNAME.FQDN.COM)
- When Software Updates are not installed during the Task Sequence, change the advertisement at Download Settings > Slow network boundary from "Do not install updates" to "Download software updates from distribution point and install".
- When build and capture Windows 7 in ConfigMgr, don't add a product key in the Task Sequence (Apply OS step). Otherwise it fails with error 8004005 and exit code 31. This because the product key and product will not match then!
- When access to a remote share (distribution point) is not working, then additional rights are needed. The server which is your Primary site server is the one which needs to go to the source folder. This account needs to have at least Read rights to the network share, and read NTFS rights to the files/folders on that share.
- When a "PXE-E32: TFTP open timeout" error message is displayed during PXE network boot, import the device manually in ConfigMgr, or activate "Unknown computer support" feature.
- When "Program Files cannot be located on a Distribution point" error message is displayed during loading the boot image, select "When no local distribution point is available, use a remote distribution point" in the advertisement.
Again, these are a few most common error messages and best practices during Task Sequence deployment in ConfigMgr. When having questions on a specific deployment issue, write a comment on this blog.
That's all for now, more tips and tricks later?!