Last month (June 2016) I went to both Windows Management User Group (WMUG) and System Center User Group (SCUG). Both with great sessions and speakers. On WMUG both Mirko Colemberg and Mike Terrill were speaking. On SCUG I listen to Pieter Wigleven, Stefan van der Wiele, Mirko Colemberg and Peter Daalmans. Let's have a look at some notes taken.
SCUG #1 (Pieter Wigleven)
-Windows 10 enrollment options: Join devices to Azure AD, Password reset, Require multi-factor, Sync settings, Application proxy
-Apps like Twitter (for example) can be installed automatically
-Windows Information Protection policies within Intune standalone (AKA Enterprise Data Protection)
-Edition upgrade policy Pro > Enterprise (or the other way around) with a provisioning package
-Wi-Fi profile and Defender block (within Intune policy)
-Use myapps.microsoft.com (access panel) for additional apps (with SSO support)
-Deploy Line-Of-Business (LOB) apps via Microsoft Business store
-Add x86 software to Microsoft Business store (future usage)
-When using BitLocker encryption policies, the recovery password will be kept in Azure too.
-No Direct Access support in Azure till now, but Auto-VPN instead.
SCUG #2 (Mirko Colemberg)
-Session on Microsoft Advanced Threat Analytics (ATA) and Windows Defender Advanced Threat Protection (ATP)
-Story (ATA): 200+ days. That's the average amount of time that attackers reside within your network until they are detected, gathering classified data and information, waiting to strike at just the right moment. Microsoft ATA helps you identify breaches and threats using behavioral analysis and provides a clear, actionable report on a simple attack timeline.
-Story (ATP): Protecting our enterprise customers has never been more challenging. Security threats are increasingly brazen and highly sophisticated. A new Windows 10 service that helps our customers to detect, investigate and respond to targeted and advanced attacks on their network.
-Source: Microsoft ATA & Microsoft ATP
-Microsoft ATA is only for information, not for protection. Maybe it will be combined with Defender in future.
-Windows Defender ATP policies will be in SCCM (next build), but is not in Intune available at the moment.
SCUG #3 (Peter Daalmans)
-Start with ConfigMgr 1511 during clean install or upgrade. Don't use build 1602 for this. Possible but not recommended!
-Since ConfigMgr Technical Preview (1511) there was an update every month (with new features)! Very good job Microsoft.
-New ConfigMgr Current Branch builds needs to be installed within a year, to be supported. No LTSB version available.
-Use the service connection tool for new ConfigMgr builds, when in offline mode or behind a proxy. Cool stuff! > Microsoft
-After 1602 it's not possible to upgrade or install newer builds directly. It will break ConfigMgr and missing features!
More on Servicing here: Promote the ConfigMgr client in Current Branch (1602)
More about WMUG and SCUG sessions HERE.

Showing posts with label BIOS. Show all posts
Showing posts with label BIOS. Show all posts
Thursday, July 7, 2016

Monday, July 4, 2016
Lessons learned from WMUG and SCUG last month (part 1)
Last month (June 2016) I went to both Windows Management User Group (WMUG) and System Center User Group (SCUG). Both with great sessions and speakers. On WMUG both Mirko Colemberg and Mike Terrill were speaking. On SCUG I listen to Pieter Wigleven, Stefan van der Wiele, Mirko Colemberg and Peter Daalmans. Let's have a look at some notes taken.
WMUG #1 (Mirko Colemberg)
-Integrate Windows Store for Business (WSfB) in ConfigMgr 1605TP or 1606 directly. Just advertise them within ConfigMgr directly.
-Assign to users or user groups? Also for user groups! (WSfB)
-Wsreset.exe = reset the store (when it's malfunction)
-You can drawback apps too! Then the user cannot open the app anymore.
-Block Windows 10 Public Store using Microsoft Intune (but still allow the business store) > Microsoft
-Integration in MS Intune available, all apps are visible there too! Just advertise them within MS Intune directly.
-Use developer.microsoft.com for creating LOB apps yourself.
-Some Windows 10 apps are for Mobile usage only, others for Desktops usage.
-Apps can be used online and (sometimes) offline. It depends..
-Use PowerShell for adding APPX packages, not the CM or Intune wizard.
More on WSfB here: Using the new Windows Store for Business for apps on Windows devices
WMUG #2 (Mike Terrill)
-Using Resource Explorer to watch BIOS and UEFI information on Dell, HP and Lenovo systems.
-For Windows 10 Redstone you need ConfigMgr Current Branch, not 2012 (R2) anymore (because not supported)
-Using 1507 (RTM) or 1511 boot images? Hotfix needed for 1511, so better use the 1507 bits.
-Upgrade BIOS versions during task sequence possible! Need to test this myself first, and report later.
-Download package content > task sequence working directory (for reference packages)
-Dell systems: Use Dell Client Configuration Utility > Download
-HP systems: Use HP BIOS Configuration Utility > Download
-Lenovo systems: Use BIOS Deployment Guide > Download
-New dynamic variables available within ConfigMgr builds
-Using 1E’s Free Tools > Download
More on UEFI here: Choosing between BIOS (Legacy) or UEFI during deployment
Stay tuned for more information in a next blogpost!
WMUG #1 (Mirko Colemberg)
-Integrate Windows Store for Business (WSfB) in ConfigMgr 1605TP or 1606 directly. Just advertise them within ConfigMgr directly.
-Assign to users or user groups? Also for user groups! (WSfB)
-Wsreset.exe = reset the store (when it's malfunction)
-You can drawback apps too! Then the user cannot open the app anymore.
-Block Windows 10 Public Store using Microsoft Intune (but still allow the business store) > Microsoft
-Integration in MS Intune available, all apps are visible there too! Just advertise them within MS Intune directly.
-Use developer.microsoft.com for creating LOB apps yourself.
-Some Windows 10 apps are for Mobile usage only, others for Desktops usage.
-Apps can be used online and (sometimes) offline. It depends..
-Use PowerShell for adding APPX packages, not the CM or Intune wizard.
More on WSfB here: Using the new Windows Store for Business for apps on Windows devices
WMUG #2 (Mike Terrill)
-Using Resource Explorer to watch BIOS and UEFI information on Dell, HP and Lenovo systems.
-For Windows 10 Redstone you need ConfigMgr Current Branch, not 2012 (R2) anymore (because not supported)
-Using 1507 (RTM) or 1511 boot images? Hotfix needed for 1511, so better use the 1507 bits.
-Upgrade BIOS versions during task sequence possible! Need to test this myself first, and report later.
-Download package content > task sequence working directory (for reference packages)
-Dell systems: Use Dell Client Configuration Utility > Download
-HP systems: Use HP BIOS Configuration Utility > Download
-Lenovo systems: Use BIOS Deployment Guide > Download
-New dynamic variables available within ConfigMgr builds
-Using 1E’s Free Tools > Download
More on UEFI here: Choosing between BIOS (Legacy) or UEFI during deployment
Stay tuned for more information in a next blogpost!
Wednesday, January 6, 2016
Choosing between BIOS (Legacy) or UEFI during deployment
When deploying new systems with ConfigMgr you can choose between BIOS (Legacy) or UEFI mode. Since Windows 8 UEFI it's recommended because of security (SecureBoot) and faster OS loading. Therefore I prefer UEFI above of BIOS in Windows 8.x and Windows 10. When looking for UEFI setup have a look at this blogpost: PXE Boot files in RemoteInstall folder explained (UEFI)
When option 60 is missing in DHCP use the following commands:
-C:\WINDOWS\system32>netsh
-netsh>dhcp
-netsh dhcp>server \\<server_machine_name>
-netsh dhcp>add optiondef 60 PXEClient String 0 comment="PXE support"
-netsh dhcp>set optionvalue 60 STRING PXEClient
-netsh dhcp>exit
A Server Option is added after that, which is active on all scopes.
When the message Waiting for Approval is displayed after that do the following:
-Start Windows Deployment Services
-Start Properties on WDS server
-Go to the "PXE Response" tab
-Change PXE Response Policy to "Respond to all client computers"
After that UEFI deployment will be working fine :-)
Hope it helps!
When option 60 is missing in DHCP use the following commands:
-C:\WINDOWS\system32>netsh
-netsh>dhcp
-netsh dhcp>server \\<server_machine_name>
-netsh dhcp>add optiondef 60 PXEClient String 0 comment="PXE support"
-netsh dhcp>set optionvalue 60 STRING PXEClient
-netsh dhcp>exit
A Server Option is added after that, which is active on all scopes.
When the message Waiting for Approval is displayed after that do the following:
-Start Windows Deployment Services
-Start Properties on WDS server
-Go to the "PXE Response" tab
-Change PXE Response Policy to "Respond to all client computers"
After that UEFI deployment will be working fine :-)
Hope it helps!
Friday, February 27, 2015
How to use the same external ethernet adapter for multiple systems
When doing deployment on modern ultrabooks or devices like Microsoft Surface, no ethernet adapter is build in. You must use external adapters by using USB connected to have the same behavior. When using multiple cables however, or using the same ethernet adapter for multiple devices, ConfigMgr is going crazy. When that happens it's good to know that SMBIOS GUID's can be used as well instead of using a MAC address. Let's have a read on that one.
The MAC address of a network interface is its unique identifier. Think of it as the serial number of that network interface. When switching network interfaces between devices, MAC addresses wil change also. Therefore we need a SMBIOS GUID. ConfigMgr 2012 uses SMBIOS to identify computers, and falls back to MAC addresses if SMBIOS information is not available. SMBIOS is the GUID that is stored in the Device’s BIOS or UEFI. It’s unique to the device and ConfigMgr uses it to recognize prestaged computers.
 When importing systems in ConfigMgr, a computer name and MAC address or SMBIOS GUID must be filled in. MAC addresses can be found in command prompt when typing in "ipconfig /all". SMBIOS can be found in BIOS or by typing in "wmic csproduct get uuid". After re-deployment, where I switched network interfaces, the correct computer name was still used. So when using SMBIOS instead of MAC, it's allowed to switch network interfaces. Good news!
When importing of many new systems is needed, just ask your hardware vendor for a list of SMBIOS GUID's. That way it's easy to import them in ConfigMgr, and prevent MAC address isues. For example: SurfacePro3, 00:1E:8C:17:F0:E5, 3164B0C0-AB47-11DC-A63B-001E8C17F0E5 (for usage in a CSV file). The future is bright, ConfigMgr is still in lead on this one ;)
For more information, have a look on: Microsoft blogs
The MAC address of a network interface is its unique identifier. Think of it as the serial number of that network interface. When switching network interfaces between devices, MAC addresses wil change also. Therefore we need a SMBIOS GUID. ConfigMgr 2012 uses SMBIOS to identify computers, and falls back to MAC addresses if SMBIOS information is not available. SMBIOS is the GUID that is stored in the Device’s BIOS or UEFI. It’s unique to the device and ConfigMgr uses it to recognize prestaged computers.
When importing of many new systems is needed, just ask your hardware vendor for a list of SMBIOS GUID's. That way it's easy to import them in ConfigMgr, and prevent MAC address isues. For example: SurfacePro3, 00:1E:8C:17:F0:E5, 3164B0C0-AB47-11DC-A63B-001E8C17F0E5 (for usage in a CSV file). The future is bright, ConfigMgr is still in lead on this one ;)
For more information, have a look on: Microsoft blogs
Wednesday, November 19, 2014
Clearing Duplicate Firmware Objects in UEFI BIOS (resolved)
When deploying physical or virtual systems with a UEFI BIOS, at every deployment there will be a bootmgfw.efi file created. This is bad for two reasons: (1) there will be lot of files in the bootstore after a few deployments, (2) on Hyper-V Generation 2 VM's this will be top file in boot order, so PXE boot isn't active at next deployment. That way you need to "Move up" the Network adapter after each deployment. In this blogpost I describe how to edit the bootstore and remove the EFI files. Not that easy if you ask me. At the moment it's not clear to me is this' a bug, or choosen by default?
Warning: Removing entries in the bootstore can disrupt your VM. This because besides of Windows Boot Manager items (bootmgfw.efi) EFI SCSI and Network devices (disk, network) can be removed also!
 Let's have a look at the steps needed to free up boot store, these are coming from http://jeff.squarecontrol.com/archives/184 but there's an error in it:
 To view these duplicate entries, use the command: bcdedit /enum firmware
1. Save a copy of the current BCD system store by running the following command: bcdedit /export newbcd
2. Make another backup of the system store, just in case: copy newbcd bcdbackup
3. Enumerate the firmware namespace objects in the BCD system store, saving to a text file: bcdedit /enum firmware > enumfw.txt
4. Open the enumfw.txt file in Notepad, and delete all lines except those with firmware GUIDs. Delete the {fwbootmgr} and {bootmgr} lines as well – you only want the GUIDs.
5. Rename the edited enumfw.txt file to a command file called enumfw.cmd.
6. Insert the following BCDEDIT command in front of each identifier in the enumfw.cmd file: bcdedit /store newbcd /delete
 Let's wait here because the command mentioned is not right. Because of an error you get the message: "The boot configuration data store could not be opened". This because for two reasons: (1) the QUIDs mentioned must be within double-quotes, (2) the /f qualifier is missing (optional).
 When using both double-quotes and /f qualifier in the end it's working fine.
 No error message this time: "The operation completed successfully"! Let's start edit the bootstore and remove the EFI files furthermore.
7. Add the following command to the end of the enumfw.cmd file, then save it: bcdedit /import newbcd /clean
Note: The /import /clean option deletes all NVRAM entries and then re-initializes NVRAM based on the firmware namespace objects in the newbcd BCD store.
 8.Run the enumfw.cmd file and reboot the system afterwards (optional). This time it will be working fine.
 Use bcdedit /enum firmware to verify that the extra entries are gone. Just great that all bootmgfw.efi files are removed now!
Still I would like to know is this' a bug, or choosen by default? In this case I'm using around 10 Virtual Machines (used as Microsoft RDS hosts), but what to do when having many many more VM's? That seems like a lot of work to me? (to be continued)
Source:
Clearing Duplicate Firmware Objects in UEFI BIOS
bcdedit: The delete command specified is not valid
Warning: Removing entries in the bootstore can disrupt your VM. This because besides of Windows Boot Manager items (bootmgfw.efi) EFI SCSI and Network devices (disk, network) can be removed also!


1. Save a copy of the current BCD system store by running the following command: bcdedit /export newbcd
2. Make another backup of the system store, just in case: copy newbcd bcdbackup
3. Enumerate the firmware namespace objects in the BCD system store, saving to a text file: bcdedit /enum firmware > enumfw.txt
4. Open the enumfw.txt file in Notepad, and delete all lines except those with firmware GUIDs. Delete the {fwbootmgr} and {bootmgr} lines as well – you only want the GUIDs.
5. Rename the edited enumfw.txt file to a command file called enumfw.cmd.
6. Insert the following BCDEDIT command in front of each identifier in the enumfw.cmd file: bcdedit /store newbcd /delete


7. Add the following command to the end of the enumfw.cmd file, then save it: bcdedit /import newbcd /clean
Note: The /import /clean option deletes all NVRAM entries and then re-initializes NVRAM based on the firmware namespace objects in the newbcd BCD store.

Still I would like to know is this' a bug, or choosen by default? In this case I'm using around 10 Virtual Machines (used as Microsoft RDS hosts), but what to do when having many many more VM's? That seems like a lot of work to me? (to be continued)
Source:
Clearing Duplicate Firmware Objects in UEFI BIOS
bcdedit: The delete command specified is not valid
Monday, November 10, 2014
How to deploy a Windows Image on UEFI-based Computers
In an earlier post I described how to deploy a Windows Image on UEFI-based Computers using PXE boot. This post can be found here: Blogpost. This time I want to deploy a Windows image on a Hyper-V Generation 2 VM using ConfigMgr boot media. Because Generation 2 is using UEFI and Secureboot, deployment is not working by default. Let's have a look at some errors I see when starting deployment from a 64-bit boot image.
 -Unable to find a raw disk that could be partitioned as the system disk.
-Failed to prepare the system partition for staging. The system cannot find the drive specified. (Error: 8007000F; Source: Windows)
-Failed to stage WinPE. Code(0x8007000F)
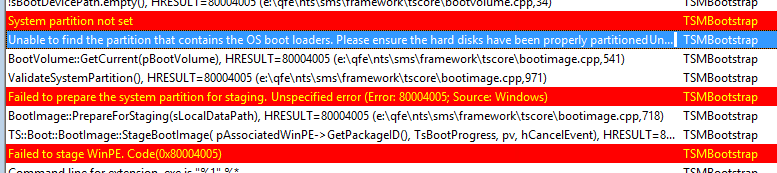 -System partition not set.
-Unable to find the partition that contains the OS boot loaders. Please ensure the hard disks have been properly partitioned.
-Failed to prepare the system partition for staging. Unspecified error (Error: 80004005; Source: Windows)
-Failed to stage WinPE. Code(0x80004005)
Trick is you must disable Secureboot and create UEFI partitions yourself. Just turn Secureboot off in properties and when ConfigMgr boot media is started press F8 and create partitions yourself.
Comment 8-4-2016: Create a diskpart script and add it into your USB/ISO (not PXE) media, if you don't want to type it manually. Press F8 and start your script with: diskpart /s filename.txt (Source)
More blogposts on this topic:
PXE Boot files in RemoteInstall folder explained (UEFI)
-Failed to prepare the system partition for staging. The system cannot find the drive specified. (Error: 8007000F; Source: Windows)
-Failed to stage WinPE. Code(0x8007000F)
-Unable to find the partition that contains the OS boot loaders. Please ensure the hard disks have been properly partitioned.
-Failed to prepare the system partition for staging. Unspecified error (Error: 80004005; Source: Windows)
-Failed to stage WinPE. Code(0x80004005)
Trick is you must disable Secureboot and create UEFI partitions yourself. Just turn Secureboot off in properties and when ConfigMgr boot media is started press F8 and create partitions yourself.
- Diskpart
- Select disk 0 (0 being the disk to setup)
- Clean (wipe the disk)
- Convert gpt (convert disk to GPT)
- Create partition efi size=200 (EFI system partition)
- Assign letter=s (Any allowable letter)
- Format quick fs=FAT32 (Format the ESP)
- Create partition msr size=128 (Create the MSR partition)
- Create partition primary (Create Windows partition)
- Assign letter=c
- Format quick fs=NTFS (Format primary partition)
- Exit
Comment 8-4-2016: Create a diskpart script and add it into your USB/ISO (not PXE) media, if you don't want to type it manually. Press F8 and start your script with: diskpart /s filename.txt (Source)
More blogposts on this topic:
PXE Boot files in RemoteInstall folder explained (UEFI)
Thursday, March 6, 2014
PXE Boot files in RemoteInstall folder explained (UEFI)
2 years ago I published a blogpost about PXE Boot Files. Today this is the most read blogpost on Henk's blog. This time I want to update this blogpost for UEFI. The Unified Extensible Firmware Interface (UEFI) is meant to replace the Basic Input/Output System (BIOS) firmware interface. When using PXE boot or want to deploy an image some special configuration is needed. Let's have a look.
Recently I did a deployment on a new Lenovo Helix device with UEFI firmware. By default when using PXE boot in combination with DHCP Options this isn't working. This because some special configuration is needed in DHCP. When using IP-helpers, BIOS and UEFI can be used both together. No special configuration needed for that. But with DHCP Options PXE boot doesn't seems to work at all!
 As described before (PXE Boot files in RemoteInstall folder explained) there are multiple files in the RemoteInstall folder. These days there is however a new file added for UEFI support called wdsmgfw.efi. This file is a special NBP developed for use by Windows Deployment Services (WDS) UEFI usage.
When using DHCP Options for PXE Boot, Option 66 and 67 are needed. Option 66 must be the IP-address of your WDS or SCCM server, Option 67 must be SMSBoot\x86\wdsnbp.com (which is the first file needed during the PXE Boot process). This is working only on systems with a BIOS firmware, not a UEFI firmware. When using UEFI, Option 67 must be set to wdsmgfw.efi (No BIOS support)!

 When changing SMSBoot\x86\wdsnbp.com to SMSBoot\x86\wdsmgfw.efi an error message is displayed. This because my SCCM server (which is Windows 2008 R2) doesn't support an x86 UEFI boot file. Therefore x64 must be used instead. When using Windows 2012 (R2) both x86 and x64 are supported. After using x64 the device gets the wdsmgfw.efi file and tries to contact the WDS Server, but after some time I get error 0x102.
 Therefore another fix is needed. This time DHCP Option 60 must be added. DHCP Option 60 is used normally when DHCP and WDS are on the same box. In my situation this isn't the case, but still this fix is needed! Try to configure this one to PXEClient to get the job done. All seems fine now, but still an error message will be displayed. This time the error \Windows\System32\boot\winload.efi and 0xc0000359 is showed. Therefore a different boot image must be used.
When deploying Windows images I normally use an x86 boot image. For UEFI support (on Windows Server 2008 R2 only?) it's needed however to select an x64 boot image. When that's done OS deployment is working finally. Let's do a recap on all configuration needed when using Windows Server 2008 R2 for WDS in combination with UEFI firmware on endpoints.
1) DHCP Option 67: smsboot\x64\wdsmgfw.efi
2) DHCP Option 60: PXEClient
3) Task Sequence: Select x64 boot image
Multiple sources were used to get the job done:
PXE Boot with UEFI. WDS not sending WinPE wim
Black screen or trap error when booting EFI PXE client to Windows Server 2008 R2 WDS Server
SCCM OSD to UEFI laptop with PXE boot crashes - winload.efi
Recently I did a deployment on a new Lenovo Helix device with UEFI firmware. By default when using PXE boot in combination with DHCP Options this isn't working. This because some special configuration is needed in DHCP. When using IP-helpers, BIOS and UEFI can be used both together. No special configuration needed for that. But with DHCP Options PXE boot doesn't seems to work at all!
When using DHCP Options for PXE Boot, Option 66 and 67 are needed. Option 66 must be the IP-address of your WDS or SCCM server, Option 67 must be SMSBoot\x86\wdsnbp.com (which is the first file needed during the PXE Boot process). This is working only on systems with a BIOS firmware, not a UEFI firmware. When using UEFI, Option 67 must be set to wdsmgfw.efi (No BIOS support)!
When deploying Windows images I normally use an x86 boot image. For UEFI support (on Windows Server 2008 R2 only?) it's needed however to select an x64 boot image. When that's done OS deployment is working finally. Let's do a recap on all configuration needed when using Windows Server 2008 R2 for WDS in combination with UEFI firmware on endpoints.
1) DHCP Option 67: smsboot\x64\wdsmgfw.efi
2) DHCP Option 60: PXEClient
3) Task Sequence: Select x64 boot image
Multiple sources were used to get the job done:
PXE Boot with UEFI. WDS not sending WinPE wim
Black screen or trap error when booting EFI PXE client to Windows Server 2008 R2 WDS Server
SCCM OSD to UEFI laptop with PXE boot crashes - winload.efi
Subscribe to:
Posts (Atom)