When deploying new systems with ConfigMgr you can choose between BIOS (Legacy) or UEFI mode. Since Windows 8 UEFI it's recommended because of security (SecureBoot) and faster OS loading. Therefore I prefer UEFI above of BIOS in Windows 8.x and Windows 10. When looking for UEFI setup have a look at this blogpost: PXE Boot files in RemoteInstall folder explained (UEFI)
When option 60 is missing in DHCP use the following commands:
-C:\WINDOWS\system32>netsh
-netsh>dhcp
-netsh dhcp>server \\<server_machine_name>
-netsh dhcp>add optiondef 60 PXEClient String 0 comment="PXE support"
-netsh dhcp>set optionvalue 60 STRING PXEClient
-netsh dhcp>exit
A Server Option is added after that, which is active on all scopes.
When the message Waiting for Approval is displayed after that do the following:
-Start Windows Deployment Services
-Start Properties on WDS server
-Go to the "PXE Response" tab
-Change PXE Response Policy to "Respond to all client computers"
After that UEFI deployment will be working fine :-)
Hope it helps!

Showing posts with label WDS. Show all posts
Showing posts with label WDS. Show all posts
Wednesday, January 6, 2016

Friday, February 20, 2015
ConfigMgr migration, PXE Provider shutdown (SMSPXE)
Today I did another ConfigMgr upgrade from SP1 to R2 with 3 remote Distribution points (DPs). Nothing to worry you will say. After the upgrade (which was 100% fine) the Primary server and 1 remote DP was working fine. Deployment could be done, everything okay. Nothing to see in Site and System status. The other 2 remote DP's however didn't want to PXE boot because of error "PXE-E53: No boot filename received". Last line in SMSPXE.log was ================= PXE Provider shutdown. =====================
I did a lot of things after that:
-Restart WDS services
-Update both boot images and checked properties
-Restart multiple Site servers
-Checked logfiles (On primary and Site servers)
-Checked DHCP scope options
-Checked local security
-Checked SMS Component Manager
-Checked firewall status
-Checked no antivirus in place
SMSPXE.log was showing me the following lines:
-RequestMPKeyInformation: Send() failed.
-Failed to get information for MP: http://FQDN. 80004005
-PXE::MP_InitializeTransport failed; 0x80004005
-PXE::MP_LookupDevice failed; 0x80004005
-RequestMPKeyInformation: Send() failed.
-Failed to get information for MP: http://FQDN. 80004005
-PXE::MP_InitializeTransport failed; 0x80004005
-PXE::MP_ReportStatus failed; 0x80004005
-PXE Provider failed to process message.
-Unspecified error (Error: 80004005; Source: Windows)
-98:4B:E1:7E:6D:89, 39C6D000-9BED-11E0-0000-984BE17E6D89: Not serviced.
-Cannot read the registry value of MACIgnoreListFile (00000000)
-MAC Ignore List Filename in registry is empty

Nothing didn't work here! When looking on MS TechNet they say you must reinstall WDS, PXE, DP all over again. Not exactly what I had in mind here. Long story short, after a few hours checking I rebooted the Primary Site server, restarted WDS services on both DPs again, and everything was working in a few minutes. First line in SMSPXE.log was now ================= PXE Provider loaded. =====================
Very happy with the (easy) solution, but very strange ConfigMgr didn't gave me an error. There's no mentioning of rebooting a Primary Site server after the upgrade also. Lessons learned: Reboot the Primary Site server and Site servers after an migration always.
Source:
Upgrade ConfigMgr 2012 SP1 to 2012 R2 Preview
Management Point PXE Boot Error 80004005 After SP1 Upgrade
SCCM 2012 R2 upgrade broken WDS/PXE
PXE-E53: No boot filename received
I did a lot of things after that:
-Restart WDS services
-Update both boot images and checked properties
-Restart multiple Site servers
-Checked logfiles (On primary and Site servers)
-Checked DHCP scope options
-Checked local security
-Checked SMS Component Manager
-Checked firewall status
-Checked no antivirus in place
SMSPXE.log was showing me the following lines:
-RequestMPKeyInformation: Send() failed.
-Failed to get information for MP: http://FQDN. 80004005
-PXE::MP_InitializeTransport failed; 0x80004005
-PXE::MP_LookupDevice failed; 0x80004005
-RequestMPKeyInformation: Send() failed.
-Failed to get information for MP: http://FQDN. 80004005
-PXE::MP_InitializeTransport failed; 0x80004005
-PXE::MP_ReportStatus failed; 0x80004005
-PXE Provider failed to process message.
-Unspecified error (Error: 80004005; Source: Windows)
-98:4B:E1:7E:6D:89, 39C6D000-9BED-11E0-0000-984BE17E6D89: Not serviced.
-Cannot read the registry value of MACIgnoreListFile (00000000)
-MAC Ignore List Filename in registry is empty
Nothing didn't work here! When looking on MS TechNet they say you must reinstall WDS, PXE, DP all over again. Not exactly what I had in mind here. Long story short, after a few hours checking I rebooted the Primary Site server, restarted WDS services on both DPs again, and everything was working in a few minutes. First line in SMSPXE.log was now ================= PXE Provider loaded. =====================
Very happy with the (easy) solution, but very strange ConfigMgr didn't gave me an error. There's no mentioning of rebooting a Primary Site server after the upgrade also. Lessons learned: Reboot the Primary Site server and Site servers after an migration always.
Source:
Upgrade ConfigMgr 2012 SP1 to 2012 R2 Preview
Management Point PXE Boot Error 80004005 After SP1 Upgrade
SCCM 2012 R2 upgrade broken WDS/PXE
PXE-E53: No boot filename received
Monday, November 10, 2014
How to deploy a Windows Image on UEFI-based Computers
In an earlier post I described how to deploy a Windows Image on UEFI-based Computers using PXE boot. This post can be found here: Blogpost. This time I want to deploy a Windows image on a Hyper-V Generation 2 VM using ConfigMgr boot media. Because Generation 2 is using UEFI and Secureboot, deployment is not working by default. Let's have a look at some errors I see when starting deployment from a 64-bit boot image.
 -Unable to find a raw disk that could be partitioned as the system disk.
-Failed to prepare the system partition for staging. The system cannot find the drive specified. (Error: 8007000F; Source: Windows)
-Failed to stage WinPE. Code(0x8007000F)
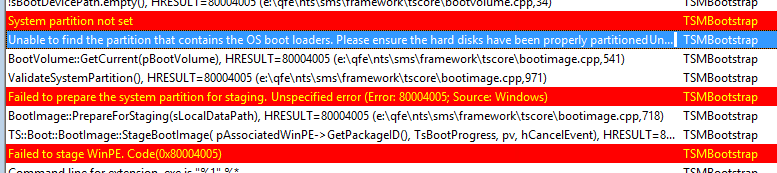 -System partition not set.
-Unable to find the partition that contains the OS boot loaders. Please ensure the hard disks have been properly partitioned.
-Failed to prepare the system partition for staging. Unspecified error (Error: 80004005; Source: Windows)
-Failed to stage WinPE. Code(0x80004005)
Trick is you must disable Secureboot and create UEFI partitions yourself. Just turn Secureboot off in properties and when ConfigMgr boot media is started press F8 and create partitions yourself.
Comment 8-4-2016: Create a diskpart script and add it into your USB/ISO (not PXE) media, if you don't want to type it manually. Press F8 and start your script with: diskpart /s filename.txt (Source)
More blogposts on this topic:
PXE Boot files in RemoteInstall folder explained (UEFI)
-Failed to prepare the system partition for staging. The system cannot find the drive specified. (Error: 8007000F; Source: Windows)
-Failed to stage WinPE. Code(0x8007000F)
-Unable to find the partition that contains the OS boot loaders. Please ensure the hard disks have been properly partitioned.
-Failed to prepare the system partition for staging. Unspecified error (Error: 80004005; Source: Windows)
-Failed to stage WinPE. Code(0x80004005)
Trick is you must disable Secureboot and create UEFI partitions yourself. Just turn Secureboot off in properties and when ConfigMgr boot media is started press F8 and create partitions yourself.
- Diskpart
- Select disk 0 (0 being the disk to setup)
- Clean (wipe the disk)
- Convert gpt (convert disk to GPT)
- Create partition efi size=200 (EFI system partition)
- Assign letter=s (Any allowable letter)
- Format quick fs=FAT32 (Format the ESP)
- Create partition msr size=128 (Create the MSR partition)
- Create partition primary (Create Windows partition)
- Assign letter=c
- Format quick fs=NTFS (Format primary partition)
- Exit
Comment 8-4-2016: Create a diskpart script and add it into your USB/ISO (not PXE) media, if you don't want to type it manually. Press F8 and start your script with: diskpart /s filename.txt (Source)
More blogposts on this topic:
PXE Boot files in RemoteInstall folder explained (UEFI)
Thursday, March 6, 2014
PXE Boot files in RemoteInstall folder explained (UEFI)
2 years ago I published a blogpost about PXE Boot Files. Today this is the most read blogpost on Henk's blog. This time I want to update this blogpost for UEFI. The Unified Extensible Firmware Interface (UEFI) is meant to replace the Basic Input/Output System (BIOS) firmware interface. When using PXE boot or want to deploy an image some special configuration is needed. Let's have a look.
Recently I did a deployment on a new Lenovo Helix device with UEFI firmware. By default when using PXE boot in combination with DHCP Options this isn't working. This because some special configuration is needed in DHCP. When using IP-helpers, BIOS and UEFI can be used both together. No special configuration needed for that. But with DHCP Options PXE boot doesn't seems to work at all!
 As described before (PXE Boot files in RemoteInstall folder explained) there are multiple files in the RemoteInstall folder. These days there is however a new file added for UEFI support called wdsmgfw.efi. This file is a special NBP developed for use by Windows Deployment Services (WDS) UEFI usage.
When using DHCP Options for PXE Boot, Option 66 and 67 are needed. Option 66 must be the IP-address of your WDS or SCCM server, Option 67 must be SMSBoot\x86\wdsnbp.com (which is the first file needed during the PXE Boot process). This is working only on systems with a BIOS firmware, not a UEFI firmware. When using UEFI, Option 67 must be set to wdsmgfw.efi (No BIOS support)!

 When changing SMSBoot\x86\wdsnbp.com to SMSBoot\x86\wdsmgfw.efi an error message is displayed. This because my SCCM server (which is Windows 2008 R2) doesn't support an x86 UEFI boot file. Therefore x64 must be used instead. When using Windows 2012 (R2) both x86 and x64 are supported. After using x64 the device gets the wdsmgfw.efi file and tries to contact the WDS Server, but after some time I get error 0x102.
 Therefore another fix is needed. This time DHCP Option 60 must be added. DHCP Option 60 is used normally when DHCP and WDS are on the same box. In my situation this isn't the case, but still this fix is needed! Try to configure this one to PXEClient to get the job done. All seems fine now, but still an error message will be displayed. This time the error \Windows\System32\boot\winload.efi and 0xc0000359 is showed. Therefore a different boot image must be used.
When deploying Windows images I normally use an x86 boot image. For UEFI support (on Windows Server 2008 R2 only?) it's needed however to select an x64 boot image. When that's done OS deployment is working finally. Let's do a recap on all configuration needed when using Windows Server 2008 R2 for WDS in combination with UEFI firmware on endpoints.
1) DHCP Option 67: smsboot\x64\wdsmgfw.efi
2) DHCP Option 60: PXEClient
3) Task Sequence: Select x64 boot image
Multiple sources were used to get the job done:
PXE Boot with UEFI. WDS not sending WinPE wim
Black screen or trap error when booting EFI PXE client to Windows Server 2008 R2 WDS Server
SCCM OSD to UEFI laptop with PXE boot crashes - winload.efi
Recently I did a deployment on a new Lenovo Helix device with UEFI firmware. By default when using PXE boot in combination with DHCP Options this isn't working. This because some special configuration is needed in DHCP. When using IP-helpers, BIOS and UEFI can be used both together. No special configuration needed for that. But with DHCP Options PXE boot doesn't seems to work at all!
When using DHCP Options for PXE Boot, Option 66 and 67 are needed. Option 66 must be the IP-address of your WDS or SCCM server, Option 67 must be SMSBoot\x86\wdsnbp.com (which is the first file needed during the PXE Boot process). This is working only on systems with a BIOS firmware, not a UEFI firmware. When using UEFI, Option 67 must be set to wdsmgfw.efi (No BIOS support)!
When deploying Windows images I normally use an x86 boot image. For UEFI support (on Windows Server 2008 R2 only?) it's needed however to select an x64 boot image. When that's done OS deployment is working finally. Let's do a recap on all configuration needed when using Windows Server 2008 R2 for WDS in combination with UEFI firmware on endpoints.
1) DHCP Option 67: smsboot\x64\wdsmgfw.efi
2) DHCP Option 60: PXEClient
3) Task Sequence: Select x64 boot image
Multiple sources were used to get the job done:
PXE Boot with UEFI. WDS not sending WinPE wim
Black screen or trap error when booting EFI PXE client to Windows Server 2008 R2 WDS Server
SCCM OSD to UEFI laptop with PXE boot crashes - winload.efi
Thursday, February 23, 2012
PXE Boot files in RemoteInstall folder explained
When installing WDS for PXE Boot functionality a RemoteInstall folder will be created. Most of times I install this role on the SCCM/ConfigMgr server with MDT integration. It's also possible to use a different server for that, as long the ConfigMgr PXE service point is installed on that server also. In this post I will explain the PXE Boot files which are installed.
After installation, the following files and folders are available in the RemoteInstall folder:
SMSBoot
- abortpxe.com > Used when no advertisement is available
- bootmgfw.efi > (available in x64 folder only)
- bootmgr.exe > In Boot order this is file 3 needed
- pxeboot.com > In Boot order this is file 2 needed
- pxeboot.n12 > Can be used to skip the second F12 requirement (!)
- wdsnbp.com > In Boot order this is file 1 needed (!)
SMSIMAGES
- Boot.xxx00001.wim (WDS x86 boot image)
- Boot.xxx00002.wim (WDS x64 boot image)
SMSTemp
- A temporary folder for updating boot images
Stores
- This is the Drivers (Metadate) store
The following outlines the download process.
1. A client is directed (by using DHCP Options or the PXE Server response) to download Wdsnbp.com
2. Wdsnbp.com validates the DHCP/PXE response packet and proceeds to download PXEBoot.com.
Note: PXEBoot.com requires the client to press the F12 key to initiate PXE boot. One can rename one of the other PXE boot files (such as pxeboot.n12) to download Wdsnbp.com to a different file.
3. PXEBoot.com downloads Bootmgr.exe and the BCD store. The BCD store must reside in a \Boot directory in the TFTP root folder. Additionally, the BCD store must be called BCD.
4. Bootmgr.exe reads the BCD operating system entries and downloads Boot.sdi and the Windows PE image (Winpe.wim).
5. Bootmgr.exe begins booting Windows PE by calling into Winload.exe within the Windows PE image.
And some additional information also:
When using DHCP Options for PXE Boot, Option 66 and 67 are needed. Option 66 must be the IP-address of your WDS server, Option 67 must be SMSBoot\x86\wdsnbp.com (which is the first file needed during the PXE Boot process).
The default pxeboot.com triggers an F12 requirement. The first F12 requirement is needed when Network Service boot is not on top of list in the BIOS boot order. The second F12 requirement is needed because of pxeboot.com, which is only needed when using Lite Touch Installation (LTI).
The second F12 requirement can be skipped however when renaming the default pxeboot.com to pxeboot.f12 and pxeboot.n12 (which means no F12) to pxeboot.com. After that the second F12 requirement is not needed anymore, also not for Lite Touch Installation (LTI). This must be done in both the x86 and x64 folder to make it functional.
More information about "Troubleshooting the PXE Service Point and WDS in Configuration Manager 2007" can be found HERE
After installation, the following files and folders are available in the RemoteInstall folder:
SMSBoot
- abortpxe.com > Used when no advertisement is available
- bootmgfw.efi > (available in x64 folder only)
- bootmgr.exe > In Boot order this is file 3 needed
- pxeboot.com > In Boot order this is file 2 needed
- pxeboot.n12 > Can be used to skip the second F12 requirement (!)
- wdsnbp.com > In Boot order this is file 1 needed (!)
SMSIMAGES
- Boot.xxx00001.wim (WDS x86 boot image)
- Boot.xxx00002.wim (WDS x64 boot image)
SMSTemp
- A temporary folder for updating boot images
Stores
- This is the Drivers (Metadate) store
The following outlines the download process.
1. A client is directed (by using DHCP Options or the PXE Server response) to download Wdsnbp.com
2. Wdsnbp.com validates the DHCP/PXE response packet and proceeds to download PXEBoot.com.
Note: PXEBoot.com requires the client to press the F12 key to initiate PXE boot. One can rename one of the other PXE boot files (such as pxeboot.n12) to download Wdsnbp.com to a different file.
3. PXEBoot.com downloads Bootmgr.exe and the BCD store. The BCD store must reside in a \Boot directory in the TFTP root folder. Additionally, the BCD store must be called BCD.
4. Bootmgr.exe reads the BCD operating system entries and downloads Boot.sdi and the Windows PE image (Winpe.wim).
5. Bootmgr.exe begins booting Windows PE by calling into Winload.exe within the Windows PE image.
And some additional information also:
When using DHCP Options for PXE Boot, Option 66 and 67 are needed. Option 66 must be the IP-address of your WDS server, Option 67 must be SMSBoot\x86\wdsnbp.com (which is the first file needed during the PXE Boot process).
The default pxeboot.com triggers an F12 requirement. The first F12 requirement is needed when Network Service boot is not on top of list in the BIOS boot order. The second F12 requirement is needed because of pxeboot.com, which is only needed when using Lite Touch Installation (LTI).
The second F12 requirement can be skipped however when renaming the default pxeboot.com to pxeboot.f12 and pxeboot.n12 (which means no F12) to pxeboot.com. After that the second F12 requirement is not needed anymore, also not for Lite Touch Installation (LTI). This must be done in both the x86 and x64 folder to make it functional.
More information about "Troubleshooting the PXE Service Point and WDS in Configuration Manager 2007" can be found HERE
Thursday, August 25, 2011
Troubleshooting Windows Deployment Services
When having ConfigMgr installed, Windows Deployment Services (WDS) will be used also. This is necessary for having PXE boot functionality available. But what to do if WDS is not working anymore, so no OS deployment is possible? Last week I had the oppurtunity to troubleshoot this myself. In this blog I will explain the error message and the solution for this also.
First, for having a look at WDS functionality have a look a this blogpost: http://henkhoogendoorn.blogspot.com/2011/06/windows-deployment-services-on-server.html
In this case the WDS service wasn't starting anymore. In Event Viewer the following error message was seen:
When looking at the error message different solutions are available. A few of them mentions the following:
Just add new Boot images after that when needed.
Remember the following here: To import a custom boot image, the boot image must already be finalized or the SMS Provider will reject it.
First, for having a look at WDS functionality have a look a this blogpost: http://henkhoogendoorn.blogspot.com/2011/06/windows-deployment-services-on-server.html
In this case the WDS service wasn't starting anymore. In Event Viewer the following error message was seen:
- Faulting application svchost.exe_WDSServer, version 6.0.6001.18000, time stamp 0x47919291, faulting module wimgapi.dll, version 6.1.7600.16385, time stamp 0x4a5bc365, exception code 0xc0000005, fault offset 0x0000000000032a8e, process id 0xc4c, application start time 0x01cc51b67426d7ba.
When looking at the error message different solutions are available. A few of them mentions the following:
- I had the same problem after adding a NIC driver to my boot image. The solution for me was to re-update the PXE distribution point. Then the WDS service starts. No need to re-install WDS and PXE service point.
- Had exactly the same issue. Re-updated the distribution points for boot images and then WDS started without any issues.
- I had to install the PXE Service Point and WDS. After that the WDS service started successfully.
Unfortunately this wasn't the solution here. There was also the possibility to install the PXE Service Point and WDS again. Then the following steps are needed:
- Uninstall the PXE Service Point. Monitor the PXESetup.log and make sure it uninstalls correctly.
- Once the PXE Service Point has successfully uninstalled, uninstall WDS. Once the WDS uninstall is complete, reboot the server.
- Once the server is rebooted, rename the RemoteInstall folder on the root level of all drives. Make sure to check all drives and to rename all of the RemoteInstall folders. Not all drives may contain a RemoteInstall folder and usually only one of the drives has a RemoteInstall folder. When renaming the folder, it may break an existing share. It is OK to go ahead and break this share.
- Reinstall WDS. Once WDS is finished reinstalling, reboot the server.
- Once the server has restarted, in the ConfigMgr 2007 Admin Console, add the PXE Service Point role.
- Monitor the PXESetup.log and make sure that installation was successfully. If the PXESetup.log prompts for the server to be rebooted, make sure to reboot the server.
- Once the PXE Service Point has been successfully installed (and if necessary, the server restarted), check to make sure that the WDS service has started. If it has not started, try to manually start it.
In my case I tried the following. That way it wasn't needed to install both PXE Service Point and WDS again:
- Delete manually created and/or imported Boot images from ConfigMgr; This because default Boot images are fine, and no additional Boot images are needed (in most situations). Also it isn't supported to use the default boot.wim file from Windows installation media. More about that can be found here: http://technet.microsoft.com/en-us/library/bb680372.aspx
- Remove the RemoteInstall\SMSImages\SMSPKG (sub)folders which are not needed anymore. That way only folders which are used by the default Boot images are still there. No additional folders for drivers and/or OS sources are needed. More about that can be found here: http://blogs.technet.com/b/oob/archive/2011/01/05/troubleshooting-the-pxe-service-point-and-wds-in-configuration-manager-2007.aspx
- After that it was possible again to start the WDS service. New error messages in Event Viewer will not be displayed.
Just add new Boot images after that when needed.
Remember the following here: To import a custom boot image, the boot image must already be finalized or the SMS Provider will reject it.
Thursday, June 16, 2011
Windows Deployment Services on Server 2008 R2
Yesterday I installed Windows Deployment Services (WDS) on a Windows Server 2008 R2 server. A good possibility to see the new features available in this release. Most of times I install WDS needed for ConfigMgr installations. Then there's no need to configure WDS; this will be left unconfigured then. In this blog we have a look at the new features in this release.
First install the WDS role on a Windows Server 2008 R2 server. By default both Deployment Server and Transport Server will be installed. After that configuration must be done. Just import Boot Images, and create Capture Images from that. Then there's the possibility to add images for all kind of Windows editions. In this release there's no support available for RIS (Remote Installation Services) anymore. This was formerly known as "Legacy Images" in Windows Server 2003 editions.

Let's have a look at the console now. There will be default folders for Install Images, Boot Images, Pending Devices, Multicast Transmissions and Drivers in it. Drivers has default folders for All Packages and DriverGroup1 in it. What's the meaning of this folders?:
As mentioned before there are new features in this release. These are Multicast support and additional Driver packages for deployment. That way there's no need to create multiple OS Images for all kind off type devices. Just create multiple Driver packages and add them to the default image; with the use off a query. Let's have a look at all the new functionality.
 Multicast: Transmission Name: This wizard creates a multicast transmission for an image. Once created, Windows Deployment Services will transmit the image to multiple clients using a single transmission, instead of one transmission for eacht client. This can significantly reduce the amount of network bandwidth that is used.
 Rightclick on Drivers will show these options.
 "Add Driver Package" will let you choose between driver packages from an .inf file or a specific folder with drivers. Once the packages are on your server, you can define which client computers will install them using driver groups and you can add them to boot images.
 "Add Driver Group" will create a new driver group which can be used to create a collection of driver packages. This wizard helps you define these clients based on the client's hardware and the install image that is selected during setup.
There are also more possibilities with "Enable/Disable Driver Packages" and "Delete Driver Packages".
 Rightclick on DriverGroup1 will show these options.
 Choose Properties to create new filters. You can use filters to define which clients install the driver packages in this group, based upon the hardware of the installing client and the install image that the client chooses.
 When adding a new filter there is the choice between: Manufacturer, Bios Vendor, Bios Version, Chassis Type, UUID, OS Version, OS Edition and OS Language.
There are also more possibilities with "Modify Filters for this Group" and "Add Driver Packages to this Group".
With WDS on Server 2008 R2 there's better support for multiple devices now! No need to create multiple OS Images anymore; just create multiple driver packages for that. With Multicast support bandwidth can be saved, when multiple devices must be re-installed during working hours. It's good to see that WDS without the need of MDT and/or ConfigMgr is a goodworking solution for deployment.
First install the WDS role on a Windows Server 2008 R2 server. By default both Deployment Server and Transport Server will be installed. After that configuration must be done. Just import Boot Images, and create Capture Images from that. Then there's the possibility to add images for all kind of Windows editions. In this release there's no support available for RIS (Remote Installation Services) anymore. This was formerly known as "Legacy Images" in Windows Server 2003 editions.

Let's have a look at the console now. There will be default folders for Install Images, Boot Images, Pending Devices, Multicast Transmissions and Drivers in it. Drivers has default folders for All Packages and DriverGroup1 in it. What's the meaning of this folders?:
- Install Images: All Images used for Windows deployment, with the possibility to create folders for overview;
- Boot Images: Specific Images used for deploying and capturing new OS Images;
- Pending Devices: Once this setting is enabled, you can approve and reject computers in the pane;
- Multicast Transmissions: Once created, Windows Deployment Services will transmit the image to multiple clients using a single transmission, instead of one transmission for each client;
- Drivers: New folder for creating driver packages and driver groups;
- All Packages: You can use Windows Deployment Services to add driver packages to the server and configure them to be deployed to client computers along with the install image;
- DriverGroup1: You can use filters to map client computers to the packages in a driver group. The filters define which clients will install the drivers.
As mentioned before there are new features in this release. These are Multicast support and additional Driver packages for deployment. That way there's no need to create multiple OS Images for all kind off type devices. Just create multiple Driver packages and add them to the default image; with the use off a query. Let's have a look at all the new functionality.


There are also more possibilities with "Enable/Disable Driver Packages" and "Delete Driver Packages".


There are also more possibilities with "Modify Filters for this Group" and "Add Driver Packages to this Group".
With WDS on Server 2008 R2 there's better support for multiple devices now! No need to create multiple OS Images anymore; just create multiple driver packages for that. With Multicast support bandwidth can be saved, when multiple devices must be re-installed during working hours. It's good to see that WDS without the need of MDT and/or ConfigMgr is a goodworking solution for deployment.
Subscribe to:
Posts (Atom)