When deploying new systems with ConfigMgr you can choose between BIOS (Legacy) or UEFI mode. Since Windows 8 UEFI it's recommended because of security (SecureBoot) and faster OS loading. Therefore I prefer UEFI above of BIOS in Windows 8.x and Windows 10. When looking for UEFI setup have a look at this blogpost: PXE Boot files in RemoteInstall folder explained (UEFI)
When option 60 is missing in DHCP use the following commands:
-C:\WINDOWS\system32>netsh
-netsh>dhcp
-netsh dhcp>server \\<server_machine_name>
-netsh dhcp>add optiondef 60 PXEClient String 0 comment="PXE support"
-netsh dhcp>set optionvalue 60 STRING PXEClient
-netsh dhcp>exit
A Server Option is added after that, which is active on all scopes.
When the message Waiting for Approval is displayed after that do the following:
-Start Windows Deployment Services
-Start Properties on WDS server
-Go to the "PXE Response" tab
-Change PXE Response Policy to "Respond to all client computers"
After that UEFI deployment will be working fine :-)
Hope it helps!

Showing posts with label PXE. Show all posts
Showing posts with label PXE. Show all posts
Wednesday, January 6, 2016

Monday, November 10, 2014
How to deploy a Windows Image on UEFI-based Computers
In an earlier post I described how to deploy a Windows Image on UEFI-based Computers using PXE boot. This post can be found here: Blogpost. This time I want to deploy a Windows image on a Hyper-V Generation 2 VM using ConfigMgr boot media. Because Generation 2 is using UEFI and Secureboot, deployment is not working by default. Let's have a look at some errors I see when starting deployment from a 64-bit boot image.
 -Unable to find a raw disk that could be partitioned as the system disk.
-Failed to prepare the system partition for staging. The system cannot find the drive specified. (Error: 8007000F; Source: Windows)
-Failed to stage WinPE. Code(0x8007000F)
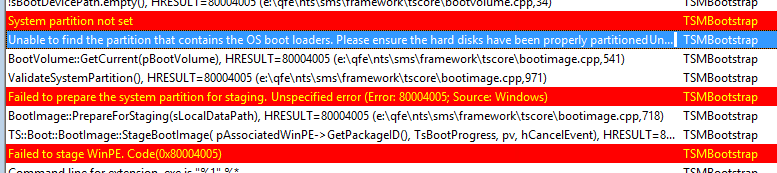 -System partition not set.
-Unable to find the partition that contains the OS boot loaders. Please ensure the hard disks have been properly partitioned.
-Failed to prepare the system partition for staging. Unspecified error (Error: 80004005; Source: Windows)
-Failed to stage WinPE. Code(0x80004005)
Trick is you must disable Secureboot and create UEFI partitions yourself. Just turn Secureboot off in properties and when ConfigMgr boot media is started press F8 and create partitions yourself.
Comment 8-4-2016: Create a diskpart script and add it into your USB/ISO (not PXE) media, if you don't want to type it manually. Press F8 and start your script with: diskpart /s filename.txt (Source)
More blogposts on this topic:
PXE Boot files in RemoteInstall folder explained (UEFI)
-Failed to prepare the system partition for staging. The system cannot find the drive specified. (Error: 8007000F; Source: Windows)
-Failed to stage WinPE. Code(0x8007000F)
-Unable to find the partition that contains the OS boot loaders. Please ensure the hard disks have been properly partitioned.
-Failed to prepare the system partition for staging. Unspecified error (Error: 80004005; Source: Windows)
-Failed to stage WinPE. Code(0x80004005)
Trick is you must disable Secureboot and create UEFI partitions yourself. Just turn Secureboot off in properties and when ConfigMgr boot media is started press F8 and create partitions yourself.
- Diskpart
- Select disk 0 (0 being the disk to setup)
- Clean (wipe the disk)
- Convert gpt (convert disk to GPT)
- Create partition efi size=200 (EFI system partition)
- Assign letter=s (Any allowable letter)
- Format quick fs=FAT32 (Format the ESP)
- Create partition msr size=128 (Create the MSR partition)
- Create partition primary (Create Windows partition)
- Assign letter=c
- Format quick fs=NTFS (Format primary partition)
- Exit
Comment 8-4-2016: Create a diskpart script and add it into your USB/ISO (not PXE) media, if you don't want to type it manually. Press F8 and start your script with: diskpart /s filename.txt (Source)
More blogposts on this topic:
PXE Boot files in RemoteInstall folder explained (UEFI)
Wednesday, September 17, 2014
How to boot a Hyper-V Virtual Machine from a PXE server
At customer location we're using multiple Hyper-V hosts, managed by a System Center Virtual Machine Manager (SCVMM) server. On multiple Virtual Machines (VM's) we like to deploy a server operating system with ConfigMgr. Trick is, when booting Hyper-V VM's from a PXE server, nothing seems to happen. Within Hyper-V Manager > BIOS config, the "Legacy Network adapter" is on top. Just have a look at the comment: "Use a legacy network adapter to perform a network-based installation of the guest operating system."

Because "Legacy Network adapter" is displayed here, we're thinking that the right network adapter is installed in the VM. Unfortunately this is not the case. Within VM properties in SCVMM there's a choice to use a network adapter or legacy network adapter. By default the network adapter is installed. With this network adapter no PXE boot can be done. Just delete this network adapter or choose "not connected" and add a new legacy network adapter.

After that PXE boot is working immediately. Just remember the following: Hyper-V supports booting a VM from the network using the F12 option. Trick is that you must use the legacy network adapter. The regular network adapter is synthetic and therefore not available at boot time. You have to remove the existing network adapter and add a new legacy network adapter. With that you're done!

Because "Legacy Network adapter" is displayed here, we're thinking that the right network adapter is installed in the VM. Unfortunately this is not the case. Within VM properties in SCVMM there's a choice to use a network adapter or legacy network adapter. By default the network adapter is installed. With this network adapter no PXE boot can be done. Just delete this network adapter or choose "not connected" and add a new legacy network adapter.
After that PXE boot is working immediately. Just remember the following: Hyper-V supports booting a VM from the network using the F12 option. Trick is that you must use the legacy network adapter. The regular network adapter is synthetic and therefore not available at boot time. You have to remove the existing network adapter and add a new legacy network adapter. With that you're done!
Thursday, March 6, 2014
PXE Boot files in RemoteInstall folder explained (UEFI)
2 years ago I published a blogpost about PXE Boot Files. Today this is the most read blogpost on Henk's blog. This time I want to update this blogpost for UEFI. The Unified Extensible Firmware Interface (UEFI) is meant to replace the Basic Input/Output System (BIOS) firmware interface. When using PXE boot or want to deploy an image some special configuration is needed. Let's have a look.
Recently I did a deployment on a new Lenovo Helix device with UEFI firmware. By default when using PXE boot in combination with DHCP Options this isn't working. This because some special configuration is needed in DHCP. When using IP-helpers, BIOS and UEFI can be used both together. No special configuration needed for that. But with DHCP Options PXE boot doesn't seems to work at all!
 As described before (PXE Boot files in RemoteInstall folder explained) there are multiple files in the RemoteInstall folder. These days there is however a new file added for UEFI support called wdsmgfw.efi. This file is a special NBP developed for use by Windows Deployment Services (WDS) UEFI usage.
When using DHCP Options for PXE Boot, Option 66 and 67 are needed. Option 66 must be the IP-address of your WDS or SCCM server, Option 67 must be SMSBoot\x86\wdsnbp.com (which is the first file needed during the PXE Boot process). This is working only on systems with a BIOS firmware, not a UEFI firmware. When using UEFI, Option 67 must be set to wdsmgfw.efi (No BIOS support)!

 When changing SMSBoot\x86\wdsnbp.com to SMSBoot\x86\wdsmgfw.efi an error message is displayed. This because my SCCM server (which is Windows 2008 R2) doesn't support an x86 UEFI boot file. Therefore x64 must be used instead. When using Windows 2012 (R2) both x86 and x64 are supported. After using x64 the device gets the wdsmgfw.efi file and tries to contact the WDS Server, but after some time I get error 0x102.
 Therefore another fix is needed. This time DHCP Option 60 must be added. DHCP Option 60 is used normally when DHCP and WDS are on the same box. In my situation this isn't the case, but still this fix is needed! Try to configure this one to PXEClient to get the job done. All seems fine now, but still an error message will be displayed. This time the error \Windows\System32\boot\winload.efi and 0xc0000359 is showed. Therefore a different boot image must be used.
When deploying Windows images I normally use an x86 boot image. For UEFI support (on Windows Server 2008 R2 only?) it's needed however to select an x64 boot image. When that's done OS deployment is working finally. Let's do a recap on all configuration needed when using Windows Server 2008 R2 for WDS in combination with UEFI firmware on endpoints.
1) DHCP Option 67: smsboot\x64\wdsmgfw.efi
2) DHCP Option 60: PXEClient
3) Task Sequence: Select x64 boot image
Multiple sources were used to get the job done:
PXE Boot with UEFI. WDS not sending WinPE wim
Black screen or trap error when booting EFI PXE client to Windows Server 2008 R2 WDS Server
SCCM OSD to UEFI laptop with PXE boot crashes - winload.efi
Recently I did a deployment on a new Lenovo Helix device with UEFI firmware. By default when using PXE boot in combination with DHCP Options this isn't working. This because some special configuration is needed in DHCP. When using IP-helpers, BIOS and UEFI can be used both together. No special configuration needed for that. But with DHCP Options PXE boot doesn't seems to work at all!
When using DHCP Options for PXE Boot, Option 66 and 67 are needed. Option 66 must be the IP-address of your WDS or SCCM server, Option 67 must be SMSBoot\x86\wdsnbp.com (which is the first file needed during the PXE Boot process). This is working only on systems with a BIOS firmware, not a UEFI firmware. When using UEFI, Option 67 must be set to wdsmgfw.efi (No BIOS support)!
When deploying Windows images I normally use an x86 boot image. For UEFI support (on Windows Server 2008 R2 only?) it's needed however to select an x64 boot image. When that's done OS deployment is working finally. Let's do a recap on all configuration needed when using Windows Server 2008 R2 for WDS in combination with UEFI firmware on endpoints.
1) DHCP Option 67: smsboot\x64\wdsmgfw.efi
2) DHCP Option 60: PXEClient
3) Task Sequence: Select x64 boot image
Multiple sources were used to get the job done:
PXE Boot with UEFI. WDS not sending WinPE wim
Black screen or trap error when booting EFI PXE client to Windows Server 2008 R2 WDS Server
SCCM OSD to UEFI laptop with PXE boot crashes - winload.efi
Thursday, February 23, 2012
PXE Boot files in RemoteInstall folder explained
When installing WDS for PXE Boot functionality a RemoteInstall folder will be created. Most of times I install this role on the SCCM/ConfigMgr server with MDT integration. It's also possible to use a different server for that, as long the ConfigMgr PXE service point is installed on that server also. In this post I will explain the PXE Boot files which are installed.
After installation, the following files and folders are available in the RemoteInstall folder:
SMSBoot
- abortpxe.com > Used when no advertisement is available
- bootmgfw.efi > (available in x64 folder only)
- bootmgr.exe > In Boot order this is file 3 needed
- pxeboot.com > In Boot order this is file 2 needed
- pxeboot.n12 > Can be used to skip the second F12 requirement (!)
- wdsnbp.com > In Boot order this is file 1 needed (!)
SMSIMAGES
- Boot.xxx00001.wim (WDS x86 boot image)
- Boot.xxx00002.wim (WDS x64 boot image)
SMSTemp
- A temporary folder for updating boot images
Stores
- This is the Drivers (Metadate) store
The following outlines the download process.
1. A client is directed (by using DHCP Options or the PXE Server response) to download Wdsnbp.com
2. Wdsnbp.com validates the DHCP/PXE response packet and proceeds to download PXEBoot.com.
Note: PXEBoot.com requires the client to press the F12 key to initiate PXE boot. One can rename one of the other PXE boot files (such as pxeboot.n12) to download Wdsnbp.com to a different file.
3. PXEBoot.com downloads Bootmgr.exe and the BCD store. The BCD store must reside in a \Boot directory in the TFTP root folder. Additionally, the BCD store must be called BCD.
4. Bootmgr.exe reads the BCD operating system entries and downloads Boot.sdi and the Windows PE image (Winpe.wim).
5. Bootmgr.exe begins booting Windows PE by calling into Winload.exe within the Windows PE image.
And some additional information also:
When using DHCP Options for PXE Boot, Option 66 and 67 are needed. Option 66 must be the IP-address of your WDS server, Option 67 must be SMSBoot\x86\wdsnbp.com (which is the first file needed during the PXE Boot process).
The default pxeboot.com triggers an F12 requirement. The first F12 requirement is needed when Network Service boot is not on top of list in the BIOS boot order. The second F12 requirement is needed because of pxeboot.com, which is only needed when using Lite Touch Installation (LTI).
The second F12 requirement can be skipped however when renaming the default pxeboot.com to pxeboot.f12 and pxeboot.n12 (which means no F12) to pxeboot.com. After that the second F12 requirement is not needed anymore, also not for Lite Touch Installation (LTI). This must be done in both the x86 and x64 folder to make it functional.
More information about "Troubleshooting the PXE Service Point and WDS in Configuration Manager 2007" can be found HERE
After installation, the following files and folders are available in the RemoteInstall folder:
SMSBoot
- abortpxe.com > Used when no advertisement is available
- bootmgfw.efi > (available in x64 folder only)
- bootmgr.exe > In Boot order this is file 3 needed
- pxeboot.com > In Boot order this is file 2 needed
- pxeboot.n12 > Can be used to skip the second F12 requirement (!)
- wdsnbp.com > In Boot order this is file 1 needed (!)
SMSIMAGES
- Boot.xxx00001.wim (WDS x86 boot image)
- Boot.xxx00002.wim (WDS x64 boot image)
SMSTemp
- A temporary folder for updating boot images
Stores
- This is the Drivers (Metadate) store
The following outlines the download process.
1. A client is directed (by using DHCP Options or the PXE Server response) to download Wdsnbp.com
2. Wdsnbp.com validates the DHCP/PXE response packet and proceeds to download PXEBoot.com.
Note: PXEBoot.com requires the client to press the F12 key to initiate PXE boot. One can rename one of the other PXE boot files (such as pxeboot.n12) to download Wdsnbp.com to a different file.
3. PXEBoot.com downloads Bootmgr.exe and the BCD store. The BCD store must reside in a \Boot directory in the TFTP root folder. Additionally, the BCD store must be called BCD.
4. Bootmgr.exe reads the BCD operating system entries and downloads Boot.sdi and the Windows PE image (Winpe.wim).
5. Bootmgr.exe begins booting Windows PE by calling into Winload.exe within the Windows PE image.
And some additional information also:
When using DHCP Options for PXE Boot, Option 66 and 67 are needed. Option 66 must be the IP-address of your WDS server, Option 67 must be SMSBoot\x86\wdsnbp.com (which is the first file needed during the PXE Boot process).
The default pxeboot.com triggers an F12 requirement. The first F12 requirement is needed when Network Service boot is not on top of list in the BIOS boot order. The second F12 requirement is needed because of pxeboot.com, which is only needed when using Lite Touch Installation (LTI).
The second F12 requirement can be skipped however when renaming the default pxeboot.com to pxeboot.f12 and pxeboot.n12 (which means no F12) to pxeboot.com. After that the second F12 requirement is not needed anymore, also not for Lite Touch Installation (LTI). This must be done in both the x86 and x64 folder to make it functional.
More information about "Troubleshooting the PXE Service Point and WDS in Configuration Manager 2007" can be found HERE
Subscribe to:
Posts (Atom)