Thursday, August 25, 2011

Troubleshooting Windows Deployment Services

When having ConfigMgr installed, Windows Deployment Services (WDS) will be used also. This is necessary for having PXE boot functionality available. But what to do if WDS is not working anymore, so no OS deployment is possible? Last week I had the oppurtunity to troubleshoot this myself. In this blog I will explain the error message and the solution for this also.

First, for having a look at WDS functionality have a look a this blogpost: http://henkhoogendoorn.blogspot.com/2011/06/windows-deployment-services-on-server.html

In this case the WDS service wasn't starting anymore. In Event Viewer the following error message was seen: 
  • Faulting application svchost.exe_WDSServer, version 6.0.6001.18000, time stamp 0x47919291, faulting module wimgapi.dll, version 6.1.7600.16385, time stamp 0x4a5bc365, exception code 0xc0000005, fault offset 0x0000000000032a8e, process id 0xc4c, application start time 0x01cc51b67426d7ba.

When looking at the error message different solutions are available. A few of them mentions the following: 
  • I had the same problem after adding a NIC driver to my boot image. The solution for me was to re-update the PXE distribution point. Then the WDS service starts. No need to re-install WDS and PXE service point.
  • Had exactly the same issue. Re-updated the distribution points for boot images and then WDS started without any issues.
  • I had to install the PXE Service Point and WDS. After that the WDS service started successfully.
 
Unfortunately this wasn't the solution here. There was also the possibility to install the PXE Service Point and WDS again. Then the following steps are needed:
  1. Uninstall the PXE Service Point. Monitor the PXESetup.log and make sure it uninstalls correctly.
  2. Once the PXE Service Point has successfully uninstalled, uninstall WDS. Once the WDS uninstall is complete, reboot the server.
  3. Once the server is rebooted, rename the RemoteInstall folder on the root level of all drives. Make sure to check all drives and to rename all of the RemoteInstall folders. Not all drives may contain a RemoteInstall folder and usually only one of the drives has a RemoteInstall folder. When renaming the folder, it may break an existing share. It is OK to go ahead and break this share.
  4. Reinstall WDS. Once WDS is finished reinstalling, reboot the server.
  5. Once the server has restarted, in the ConfigMgr 2007 Admin Console, add the PXE Service Point role.
  6. Monitor the PXESetup.log and make sure that installation was successfully. If the PXESetup.log prompts for the server to be rebooted, make sure to reboot the server.
  7. Once the PXE Service Point has been successfully installed (and if necessary, the server restarted), check to make sure that the WDS service has started. If it has not started, try to manually start it.
In my case I tried the following. That way it wasn't needed to install both PXE Service Point and WDS again:

Just add new Boot images after that when needed.
Remember the following here: To import a custom boot image, the boot image must already be finalized or the SMS Provider will reject it.

Thursday, August 11, 2011

Installing System Center Orchestator Beta release

On june 17th 2011 the System Center Orchestrator Beta release has become available for public download. System Center Orchestrator Beta (formerly known as Opalis) is a new member of the System Center suite, and provides automation of processes and workflows between the various System Center products.

Let's download the new Beta release first on Technet Downloads: http://www.microsoft.com/download/en/details.aspx?id=26503 

Before installing both DotNet Framework 3.5 SP1 and 4.0 are needed on the server. The installation is done on a Windows Server 2008 R2 Enterprise x64 server. After that the installation can start. Choose "Install Orchestrator" for this.

Next in line after this screen are:
  • Product registration - Product registration
  • Getting started - Select features to install (Management Server, Runbook Server, Runbook Designer, Orchestration console and web service)
  • Prerequisites - Setup will install these missing software prerequisites (Enable IIS role on this computer)
  • Configuration - Configure the service account
  • Configuration - Configure the database (SQL 2008 R2 server needed)
  • Configuration - Configure Orchestrator management group 
  • Configuration - Configure the port for the web service (default 81, 82)
  • Configuration - Select the installation location
  • Configuration - Installation summary
  • Processing - Installating features (Management Server, Runbook Server, Runbook Designer, Orchestration console and web service)
  • Finished - Setup completed successfully
After that the installation is done. In the start menu the following shortcuts are available for starting now:
  • Data Store Configuration - The data store is the Oracle or SQL Server database where configuration information, runbooks, and logs are stored
  • Deployment Manager - Is used to deploy runbook servers, Runbook Designers, and integration packs across your Orchestrator deployment
  • Orchestration Console - A web-based console in which you can see which runbooks are currently running, view their real-time status, and start or stop your runbooks
  • Runbook Designer - The tool that designers use to create, modify, and publish runbooks 
Finally a nice view of the Orchestration Console is seen. Next time I will explain what to do next and how to create and configure runbooks.

Wednesday, August 10, 2011

Troubleshooting Wake On LAN (WOL) in ConfigMgr

In my other blog about Wake On LAN (WOL): http://henkhoogendoorn.blogspot.com/2011/05/wake-on-lan-wol-functionality-in.html I explained which functionality becomes available in ConfigMgr 2007/2012. This can be used to schedule OS deployment, Software distribution and Patch management during non-working hours to wake-up devices. But what to do when it isn't working and you don't know what to do next? In this blog I will explain my best practices from the field, and how WOL will be functional (again).

Most of times using Unicast is the easiest one to configure. Then devices in the same subnet can be used for WOL functionality only. In the field however there are most of times different subnets for servers and clients. Then "Subnet-directed broadcasts" is the best way for configure WOL functionality. More about that in my other blog: "Wake On LAN (WOL) functionality in ConfigMgr".


First something about Site boundaries here. In ConfigMgr it's possible to create Site boundaries with IP-subnets, AD-sites and IP-address ranges. They all seems okay, but because ConfigMgr cannot handle supernetting, IP-address ranges is the only right choice here! A supernet is an Internet Protocol (IP) network that is formed from the combination of two or more networks (or subnets). WIKI page: http://en.wikipedia.org/wiki/Supernet

Because supernetting can be used in both IP-subnets and AD-sites, they are not the best choice for implementing Wake On LAN functionality. There's also a nice TechNet blog available about that: Known Issue: Supernets in Active Directory Sites Used as Site Boundaries: http://blogs.technet.com/b/configmgrteam/archive/2009/12/21/known-issue-supernets-in-active-directory-sites-used-as-site-boundaries.aspx

(after creating an IP-subnet, only the Subnet ID remains visible) 

(with IP-address ranges, the complete range remains visible) 

Now the best practices from the field, based on above suggestions: 
  • Remove any existing Site Boundaries based on both IP-subnets and AD-sites (write down there IP-address ranges, but don't use them anymore)
  • Create IP-address ranges based on formerly existing Site boundaries (only use complete ranges from 1-255 to get Wake On LAN working)
  • In Site properties > select "Use wake-up packets only" and "Subnet-directed broadcasts" (Power on commands are used only with Out of Band Management)
  • In Site properties > the UDP port can remains on port 9 (default), when there are issues with that use port 12287
  • Create a new advertisement now, and set an mandatory assignment on that (otherwise there is no WOL functionality possible)
After this WOL functionality must be available on "Subnet-directed broadcasts". Remember that WOL functionality is only available on OS deployment, Software distribution and Patch management in combination with an mandatory assignment. Good luck!

Thursday, August 4, 2011

The process is not in background processing mode

When trying to download Software Updates in ConfigMgr it is possible that the following error message is displayed: "The process is not in background processing mode". When trying again the error message stays. Rebooting the ConfigMgr server doesn't help, so what to do next?


The solution is not that hard I think. It's BITS that's malfunction here! Just follow these steps to make it functional again:
  • Logon to the ConfigMgr server (which in my case is also the WSUS server)
  • Stop the Background Intelligent Transfer Service (BITS) service
  • Stop the Windows Update (WUAUSERV) service
  • Browse to the "Documents and Settings\All Users\Application Data\Microsoft\Network\Downloader" folder and delete both files in here (qmgr0.dat and qmgr1.dat)
On Windows Server 2008 (R2) servers it's needed to give Everyone NTFS permissions to browse that folders. This because Everyone is by default on the deny list here.
  • Browse to the "C:\Windows" directory and delete the SoftwareDistribution folder in here
The SoftwareDistribution folder and qmgr0.dat/qmgr1.dat files will be created again after starting both services again.
  • Start the Windows Update (WUAUSERV) service again
  • Start the Background Intelligent Transfer Service (BITS) service again
  • Open the ConfigMgr console and start a "site wide software update synchronization" by right clicking on Software Updates > Software Repository and choose: Run Synchronization
After that downloading Software Updates will be functional again!


Note: When it's still not working after these steps, have a look at possible changes in the Proxy server configuration. Especially Authentication settings can do the trick here!

Update 28-2-2013: When Microsoft or third party updates are still not download after above change, just try the following: Edit Anonymous Authentication for the IIS website (by right clicking) and change it from a Specific User to Application pool identity.
Thanks to Kapil Dham for the solution on this.

Friday, July 29, 2011

Managing Group Policy for Windows 7

When implementing Windows 7 in your environment it's time to think about managing them too. For that new Group Policy templates are available which can be download at the following location:
Administrative Templates (ADMX) for Windows Server 2008 R2 and Windows 7
http://www.microsoft.com/download/en/details.aspx?displaylang=en&id=6243 

New in Windows 7 is that Administrative templates are in ADMX format. In earlier releases they were in ADM format only. Then it was possible to import them with Add/Remove templates. Because Administrative templates are in ADMX format now only, this is not functional anymore. In this blog I will explain how to use them.

Just download the MSI file from the above link and install it. The default location for install will be "C:\Program Files\Microsoft Group Policy\win72008r2\" which is just fine. After that many files are located in the PolicyDefinitions folder, which are 55 language folders with ADML files (language-specific) and 160 ADMX files (language-neutral). Because  they cannot be imported by Add//Remove templates additional steps are needed now.


To ensure that the new ADMX and ADML files are propagated throughout the domain, on the computer on which you downloaded the new ADMX and ADML files, copy the new PolicyDefinitions directory to the appropriate location under SYSVOL on the appropriate domain controller. Doing so will ensure that all language-specific subdirectories are also copied to SYSVOL.

This can also be found in the following TechNet post:
How to create a Central Store for Group Policy Administrative Templates in Window Vista/7

http://support.microsoft.com/kb/929841

It mentions: To create a Central Store for .admx and .adml files, create a folder that is named PolicyDefinitions in the following location:
\\FQDN\SYSVOL\FQDN\policies
Copy all files from the PolicyDefinitions folder on a Windows Vista/7-based client computer to the PolicyDefinitions folder on the domain controller.
Important: Updates to SYSVOL are replicated to all domain controllers in the domain, which results in increased network traffic and load placed on the domain controllers. Therefore, to minimize the impact of this operation in your domain, schedule the copying of updated ADMX and ADML files to SYSVOL outside core business hours.


After that it's possible that the following error message is displayed:
Administative Templates
Encountered an error while parsing.
Expected one of the following possible elements(s), <test>, <decimalTestBox>, <testBox>, <checkBox>, <comboBox>, <dropdownList>, <listBox>, but found <multiTextBox> instead.
File
\\mydomain\SysVol\mydomain...\terminalserver-Server.adml,
line 198, column 60

Alternatively, if the error is showing parsing issues with a particular ADMX/ADML file, you can simply remove that from the PolicyDefinitions folder. For example, the terminalserver-Server-ADML file is specific to Server 2008-R2 and you probably don't need it for now.

After these steps it's possible to manage Windows 7 with Group Policies. Because there are 160 different ADMX files, each file is used for a specific part of Windows. Just have a look at it for all possibilities.

Wednesday, July 27, 2011

Key Management Services (KMS) explained

When installing Windows Server 2008 (R2) or Windows Vista / 7 in your network you must think about volume activation. With volume activation there are two (2) different models for completing this. These are Key Management Service (KMS) and Multiple Activation Key (MAK). Both are working and has there own benefits.
  • Key Management Service (KMS) – KMS activates operating systems on the local network, so individual computers doesn't has to connect to Microsoft. KMS clients connects with a KMS host for activation.
  • Multiple Activation Key (MAK) - MAK requires computers to connect one time to a Microsoft activation server. Once computers are activated, no further communication with Microsoft is required.
Have a look at this page for more information about Volume License Keys:
http://www.microsoft.com/licensing/existing-customers/product-activation-faq.aspx

Because KMS becomes more and more implemented in projects I will explain it in detail. I will no further explain MAK in this blogpost, because it's known by most people.

KMS requires a minimum number of either physical or virtual computers in a network environment to become functional. These minimums, called activation thresholds, are set so that they are easily met by enterprise customers. For computers running:
  • Windows Server 2008 and Windows Server 2008 R2 you must have at least five (5) computers to activate.
  • Windows Vista or Windows 7 you must have at least twenty-five (25) computers to activate. These thresholds can be a mix of server and client machines to make up the threshold number.
  • Office 2010, Project 2010 and Visio 2010 you must have at least five (5) computers to activate. If you have deployed Microsoft Office 2010 products, including Project 2010 and Visio 2010, you must have at least five (5) computers running Office 2010, Project 2010 or Visio 2010.

The KMS service can be installed on a (existing) server or client!, and will place an record in DNS for recognition. The following commands are available to use in combination with a KMS host: 

When using Windows Server 2008 (R1) or Windows Vista systems an hotfix is needed. This will extend support for KMS to provide activation for Windows 7 and Windows Server 2008 R2. The KMS host will be upgraded from version 1.1 to 1.2 with this hotfix.

The command for installing KMS with a product key or updating an existing one is "cscript %windir%\system32\slmgr.vbs /ipk {product key}". After that restarting of the KMS service is needed. This can be done with the following commands: "net stop slsvc" and "net start slsvc". When it's functional it can be tested with the "slmgr.vbs /dli" (basic information) and "slmgr.vbs /dlv" (detailed information) commands.

Have a look at this TechNet post for more information about this: http://social.technet.microsoft.com/Forums/en/winservergen/thread/8edd0ece-7786-42d4-9a23-48e2c271b17d

It's possible to query the DNS server for License keys also. This can be done with the Nslookup –type=all _vlmcs._tcp command. With the "slmgr.vbs /ato" command it's also possible to force a activation renewal. That way it's easier to get the minum required systems activated. When no DNS record is created automatically, you must create one yourself. This can be done with the following guide: Manually Create SRV Records in DNS

During installation it's possible that the following error message is displayed:
Error: 0xC004F015. This can be solved with installing the KMS 1.2 patch or use the correct product key. Have a look at this TechNet post for more information about this: http://social.technet.microsoft.com/Forums/en-US/winservergen/thread/0ce4f1aa-94db-46e0-8d2c-1fb37961a873

On the client (when KMS is active already) it's possible that the following error is displayed: 0xC004F038. This can be solved with activating enough computers. When this is done (at least 5 servers and/or 25 computers) the error message will be gone. Then activation for all systems will be available!

One last note: When creating or deploying a Windows 7 image don't use a build-in product key. Otherwise there's the risk that every Windows 7 client behaves like a KMS host. No product key at all is needed on the Windows 7 client. Just activate them by the KMS host which resides on the Windows Server 2008 (R2) server or on a Windows Vista / 7 host.

Have a look at this TechNet post for more information about this:
http://social.technet.microsoft.com/Forums/en/mdt/thread/c9691329-702e-42e1-9593-c8c06618ff0f

For default KMS Client Setup Keys have a look at this TechNet post:
http://technet.microsoft.com/en-us/library/ff793421.aspx

Update 18-11-2011: On Windows Server 2008 R2 and/or Windows 7 the commands to restart the KMS service are now: "net stop sppsvc" and "net start sppsvc".

Just to clarify things:

The Software Licensing Service existed in Windows Vista, but was replaced in Windows 7. The service that handles the licensing is now called the Software Protection Service (SPPSVC). All of the same procedures and commands still work the same as they did in Windows Vista.

Also, the associated SL UI Notification Service (SLUINotify) in Vista was changed to the SPP Notification Service (SPPUINotify) in Windows 7. (SPP means Software Protection Platform)

TechNet source: Windows 7 Activation Issues

Tuesday, June 28, 2011

Microsoft Community Contributor Award

Today I received the following message:

Congratulations! We’re pleased to inform you that your contributions to Microsoft online technical communities have been recognized with the Microsoft Community Contributor Award.

The Microsoft Community Contributor Award is reserved for participants who have made notable contributions in Microsoft online community forums such as TechNet, MSDN and Answers. The value of these resources is greatly enhanced by participants like you, who voluntarily contribute your time and energy to improve the online community experience for others.


For more information about my contributions to Microsoft online technical communities check this site: http://social.technet.microsoft.com/profile/henk%20hoogendoorn/?type=forum

Thanks Microsoft!

Microsoft Deployment Toolkit (MDT) 2010 explained

Last week I used an existing Microsoft Deployment Toolkit (MDT) 2010 installation on a Windows Server 2008 server. This for creating a new Windows 7 SP1 image and deploying it also. Most of times I install MDT for ConfigMgr integration only. Now for me the change to see MDT features and functionality. In this blog we have a look at the setup and choices made during configuration.

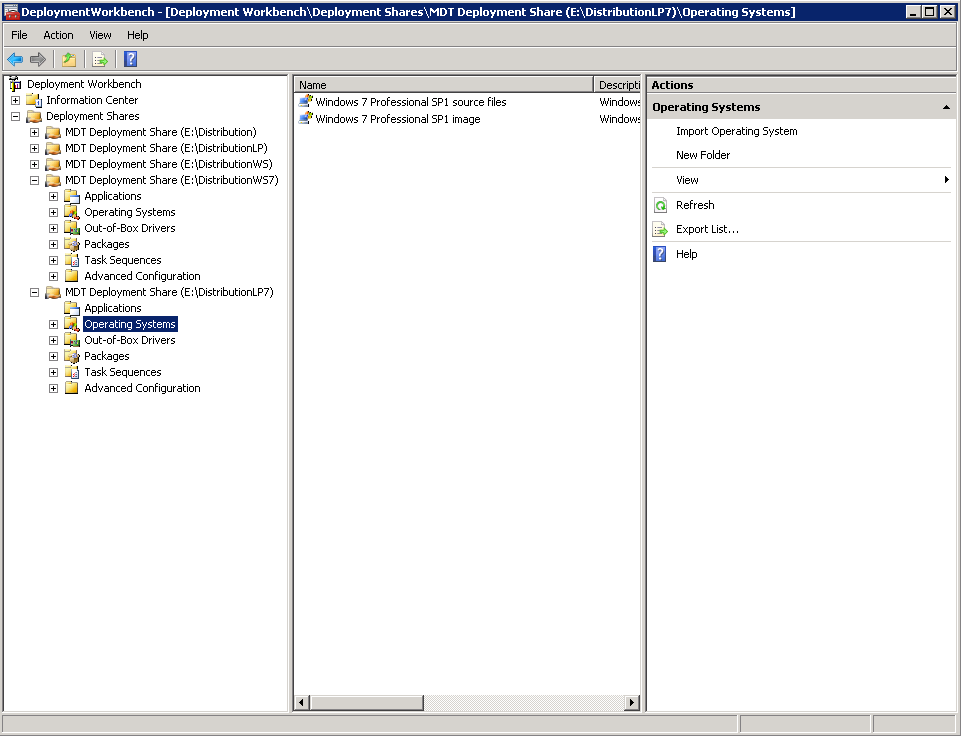
There was already an MDT installation present; this because of Windows XP deployment. Therefore I decided to create a new Deployment Share first. A Deployment Share is the place where packages, drivers and applications will be placed. This is a real share on the disk, so Deployment Share is a good chosen word here.

In MDT 2008 it was necessary to create an additional Deployment Point also. In MDT 2010 this is not needed anymore. All components are placed on a single Deployment Share now. There can be multiple Deployment Shares if you want. This for using different INI-files needed (for example). Multiple Deployment Shares can be opened at the same time in the MDT console. These can be linked, so that when content is changed, it will be updated on the other share(s) also.

After that importing an Operating System image is needed. This can be done with a "Full set of source files" from installation media. The best thing to do is to start a "Standard Client task sequence" to create a new OS image. Just make sure that an image capture is configured in the task sequence used for creating a OS image.

The OS image created can be imported again later to make it available in other task sequences. Select then the "Custom image file" in the "Standard Client task sequence". This task sequence (used for deployment) can be included applications, drivers and motifications also.

Best practice for the task sequence used for capturing, is not including an administator password and product key in it. Also the device used for capturing must be a workgroup member. The administator password and product key can be configured later during deployment.

Now have a look at the Deployment Share properties. These include the Bootstrap.ini and Rules (customsettings.ini) files. These settings will determine  the behaviour during Operating System Deployment. After that an update is needed on the Deployment Share, which will also create the necessary ISO and WIM files (again) needed for Boot functionality.

Make sure to update the Boot image files on Windows Deployment Services (WDS) when new settings are placed in the Bootstrap.ini file. Otherwise it will not be functional when starting a new image deployment.
Note: When using "_SMSTSORGNAME=" the IT Organization name can be changed during task sequence progress.

The ISO file can be used to burn on CD/DVD or USB device for booting from media. The WIM file can be used in Windows Deployment Services (WDS) for booting with PXE boot. Just press F12 during startup en see the magic happen. After choosing the right Boot image, the OS deployment can start without any other messages displayed. In this environment only the computername is needed. That's all needed!

It's nice to see that MDT 2010 is easy to setup and not that hard to use for OS deployment. Just configure the necessary steps needed, and OS deployment will be available. MDT 2010 is (without the usage of ConfigMgr) still a very good deployment solution!

The most common error during re-deployment was the following one:
Property LTISuspend is now = Litetouch has encountered an Environment Error (Boot into WinPE!).
If booting from a USB Flash Disk, please remove all drives before Retrying.
Otherwise, ensure the hard disk is selected first in the boot order of the BIOS.


This because after deployment there may be still C:\MININT or C:\_SMSTaskSequence folders left. When OS deployment is done these folders are not necessary anymore and can be deleted.

The best way for doing this is start from Windows PE and open a command shell. Type in the following commands then: (1) Diskpart (2) Select Disk 0 (3) clean. After that start over again in Windows PE and OS deployment will be functional then.

One last solution is using Johan Arwidmark's Final Configuration script. This script will clean out any Leftover MININT or Sysprep folders. Enable WindowsUpdate, Set a default domain value (read from the JOINDOMAIN environment variable), and then do a proper final reboot. It can be found here: http://www.deployvista.com/Blog/tabid/70/EntryID/61/language/en-US/Default.aspx

Note: You need to set SkipFinalSummary=YES in customsettings.ini (the script will check for it)

Thanks to Anton van Pelt, Twitter: @antonaustirol25 for sharing his knowledge on this!

Thursday, June 16, 2011

Windows Deployment Services on Server 2008 R2

Yesterday I installed Windows Deployment Services (WDS) on a Windows Server 2008 R2 server. A good possibility to see the new features available in this release. Most of times I install WDS needed for ConfigMgr installations. Then there's no need to configure WDS; this will be left unconfigured then. In this blog we have a look at the new features in this release.

First install the WDS role on a Windows Server 2008 R2 server. By default both Deployment Server and Transport Server will be installed. After that configuration must be done. Just import Boot Images, and create Capture Images from that. Then there's the possibility to add images for all kind of Windows editions. In this release there's no support available for RIS (Remote Installation Services) anymore. This was formerly known as "Legacy Images" in Windows Server 2003 editions.


Let's have a look at the console now. There will be default folders for Install Images, Boot Images, Pending Devices, Multicast Transmissions and Drivers in it. Drivers has default folders for All Packages and DriverGroup1 in it. What's the meaning of this folders?:
  • Install Images: All Images used for Windows deployment, with the possibility to create folders for overview;
  • Boot Images: Specific Images used for deploying and capturing new OS Images;
  • Pending Devices: Once this setting is enabled, you can approve and reject computers in the pane;
  • Multicast Transmissions: Once created, Windows Deployment Services will transmit the image to multiple clients using a single transmission, instead of one transmission for each client;
  • Drivers: New folder for creating driver packages and driver groups;
  • All Packages: You can use Windows Deployment Services to add driver packages to the server and configure them to be deployed to client computers along with the install image;
  • DriverGroup1: You can use filters to map client computers to the packages in a driver group. The filters define which clients will install the drivers.

As mentioned before there are new features in this release. These are Multicast support and additional Driver packages for deployment. That way there's no need to create multiple OS Images for all kind off type devices. Just create multiple Driver packages and add them to the default image; with the use off a query. Let's have a look at all the new functionality.

Multicast: Transmission Name: This wizard creates a multicast transmission for an image. Once created, Windows Deployment Services will transmit the image to multiple clients using a single transmission, instead of one transmission for eacht client. This can significantly reduce the amount of network bandwidth that is used.

Rightclick on Drivers will show these options.

"Add Driver Package" will let you choose between driver packages from an .inf file or a specific folder with drivers. Once the packages are on your server, you can define which client computers will install them using driver groups and you can add them to boot images.

"Add Driver Group" will create a new driver group which can be used to create a collection of driver packages. This wizard helps you define these clients based on the client's hardware and the install image that is selected during setup.

There are also more possibilities with "Enable/Disable Driver Packages" and "Delete Driver Packages".

Rightclick on DriverGroup1 will show these options.

Choose Properties to create new filters. You can use filters to define which clients install the driver packages in this group, based upon the hardware of the installing client and the install image that the client chooses.
When adding a new filter there is the choice between: Manufacturer, Bios Vendor, Bios Version, Chassis Type, UUID, OS Version, OS Edition and OS Language.

There are also more possibilities with "Modify Filters for this Group" and "Add Driver Packages to this Group".

With WDS on Server 2008 R2 there's better support for multiple devices now! No need to create multiple OS Images anymore; just create multiple driver packages for that. With Multicast support bandwidth can be saved, when multiple devices must be re-installed during working hours. It's good to see that WDS without the need of MDT and/or ConfigMgr is a goodworking solution for deployment.

Tuesday, June 7, 2011

ConfigMgr 2012 Beta 2 with App-V integration

In ConfigMgr 2007 with R2 it was possible to import App-V packages and stream them to the end user. There was also the possibility to choose between streaming or local delivery for that. Have a look at this blog for more information about ConfigMgr 2007 with App-V integration: http://henkhoogendoorn.blogspot.com/2010/12/configmgr-2007-with-app-v-integration.html


Because of multiple reasons there was the choice between App-V integration in ConfigMgr 2007 or using the stand-alone App-V solution. I have selected a few websites with more information about that:

Personally I think that the combination of ConfigMgr 2007 and App-V is quite good, only it's better to keep them seperate. This because it's a bit slower in ConfigMgr and there's no publishing functionality in it. That way you must decide where to put the shortcuts in the App-V package, during sequencing. Also all shortcuts will be displayed on the desktop or in the start menu after publishing; no changes on that possible.

The advantage of putting App-V packages in ConfigMgr 2007, and using a Distribution Point (DP) for streaming is integration. No need for having App-V Management and/or Streaming servers that way. Just configure the (existing) ConfigMgr server and deploy all your applications from one platform! The only App-V installation needed is the Sequencer for creating App-V packages. Instead of multiple App-V servers, more Distribution Points are recommended then.

Now have a look at the combination of ConfigMgr 2012 Beta 2 and App-V. In ConfigMgr 2012 things are quite different. Open the ConfigMgr console, Select Application Management, rightclick on that and choose Create Application. There are four (4) choices now, with Microsoft Application Virtualization in here also. Just import a already sequenced application here.

When looking in the Applications screen there are no orange App-V icons anymore. On every application there are tabs for Deployment Types and Deployment (first known as advertisement). On deployment types there are new Content settings seen:
  • Persist content in the client cache
  • Enable peer-to-peer content distribution
  • Load content into AppV cache before launch
Default settings for fast or slow/unreliable network boundary:
  • Fast > Download content (changed to Stream content in my environment)
  • Slow/unreliable > Do not download (changed to Download content in my environment)
On the Publishing tab, which is also new in ConfigMgr 2012, shortcuts can be selected. Keep in mind that the location (desktop and/or start menu) cannot be set, so still this must be decided during sequencing. The shortcuts that will be displayed on the desktop or in the start menu can be selected now!

For streaming App-V packages from Distribution Points no further configuration is needed in ConfigMgr 2012. Distribution Points have streaming functionality by default now. For App-V integration on the desktops an App-V 4.6 SP1 client is needed. No further configuration is needed on that also. Sometimes the Cache will be placed on another drive, and the Cache size will be enlarged. The file type extensions will be automatically associated to the new applications.

New applications available from ConfigMgr 2012

File type extensions are automatically associated

That's all you need to have for App-V integration in ConfigMgr 2012. Because off better user support in ConfigMgr 2012, App-V integration will be a more interesting choice now!

Thursday, May 26, 2011

High Availability (HA) in ConfigMgr 2007

In ConfigMgr 2007 it is difficult to have a true High Availability (HA) solution. This because it isn't supported yet in ConfigMgr 2007; we must wait for ConfigMgr 2012 for that. There are possibilities however with dividing roles on multiple servers, or install it on a Virtual Machine. Then there will be possibilities with VMware ESX (VMotion) or Microsoft Hyper-V (Live Migration) to create a HA environment. ConfigMgr 2007 is not HA then, but the platform on which it's running is.

First have a look at the roles/components available: 
  • SMS Provider: The interface between the Configuration Manager console and the site database;
  • Management Point (MP): The site system role that serves as the primary point of contact between Configuration Manager clients and the Configuration Manager site server;
  • Proxy Management Point (PMP): A management point residing in a secondary site that proxies most MP data between clients within that site and the primary site where they are assigned;
  • Server Locator Point (SLP): A site system role that locates management points for Configuration Manager clients;
  • Fallback Status Point (FSP): A site system role that gathers state messages from clients that cannot install properly, cannot assign to a Configuration Manager site, or cannot communicate securely with their assigned management point;
  • Reporting Point (RP): A site system role hosts the Report Viewer component for Web-based reporting functionality;
  • Reporting Services Point (RSP): A site system role assigned to a computer running SQL Server Reporting Services. It provides tools and resources that enable advanced report generation from the Configuration Manager console;
  • Software Update Point (SUP): A site system role that is used to integrate with Windows Server Update Services (WSUS);
  • Distribution Point (DP): A site system role that stores package source files for deployment to clients;
  • Protected Distribution Point (PDP): A Configuration Manager distribution point that has boundaries configured to prevent clients outside the boundaries from retrieving packages;
  • Branch Distribution Point (BDP): A Configuration Manager site system that stores package source files and is designed to be located in a distributed location with limited network bandwidth or a limited number of clients;
  • Asset Intelligence Synchronization Point (AISP): A site role that is used to connect to System Center Online to manage Asset Intelligence catalog information updates;
  • System Health Validator Point (SHV): Used with Network Access Protection to provide remediation;
  • Out of Band Service Point (OoBSP): A site system role that discovers, provisions, and manages desktop computers that have management controllers (Intel Active Management Technology (AMT)-based computers);
  • PXE Service Point (PSP): A site system role that has been configured to respond to and initiate operating system deployments from computers whose network adapter is configured to allow PXE boot requests;
  • State Migration Point (SMP): A site system role that stores user state data when a new system is built for that user.
  • Microsoft Deployment Toolkit (MDT): Have a look at this for the possibilities: MDT integration in ConfigMgr 2007

It's also good to know that large environments needs a Central Site for managing other ConfigMgr Sites:
  • A Central Site is a ConfigMgr Primary Site that resides at the top of the ConfigMgr hierarchy. All Database information rolls from the child to the parent and is collected by the Central Site’s ConfigMgr Database. The Central Site can administer any site below it in the hierarchy and can send data down to those sites as well.

When setting up a new ConfigMgr-HA environment, think about this:
  • If a Central Site is needed, then use it only for the SUP role and maybe the SLP role. It's a best practice not to use the Central Site server to manage clients. Rather, use the Central Site server as an empty root with a Child Primary beneath it to manage any clients within the same site location or site boundary;
  • If a Primary Site server is needed, devide the ConfigMgr setup and ConfigMgr database on different servers. Install the RSP role on the ConfigMgr database server then;
  • SMS Provider: Can be installed on the Central Site server and/or Primary Site server. It cannot be installed on a clustered SQL server database server or on the same computer as the SMS Provider for another site. There can be only one SMS Provider installed per site;
  • Management Point: Must be installed on the Primary Site server, not on the Central Site server. It is possible to use Network Load Balancing (NLB) for this role, if they are in the same subnet;
  • Reporting Services Point: Instead of installing the RP role on the ConfigMgr server, the RSP role can be installed on the (clustered) SQL server;
  • Software Update Point: Can be installed on the Central Site server and/or Primary Site server. It is possible to use NLB for this role, if they are in the same subnet;
  • Distribution Point: Can be installed on the Primary Site server, but don't use it on the Central Site server. Most of times installing multiple DP's is the best option, because NLB is not supported for this role;
  • PXE Service Point: Can be installed on the Primary Site server, but don't use it on the Central Site server. There can be only one PSP role installed per site.

For having ConfigMgr-HA I recommend this:  
  • 1 Primary Site server (on a Virtual Machine for HA) with the following roles/components: SMS Provider, SLP, FSB, (MDT);
  • 2 Distribution Points (minimum) with the following roles: DP, PSP (there can be only one PSP installed per site);
  • 2 servers in a NLB setup with the following roles: MP, SUP;
  • A (clustered) SQL Server with the ConfigMgr database and RSP role.

When dividing roles (without HA) I recommend this:

  • 1 Primary Site server (on a Virtual Machine) with the following roles/components: SMS Provider, SLP, FSB, MP, (MDT);
  • 2 Distribution Points (minimum) with the following roles: DP, PSP (there can be only one PSP installed per site), SUP;
  • A (clustered) SQL Server with the ConfigMgr database and RSP role.

Sites used, and handy information:

I hope things are clearer with this blog now. Please feel free to put comments on this blog and ask for additional questions!

Friday, May 20, 2011

Watch TechEd 2011 System Center sessions

During TechEd North America 2011 Atlanta, there are multiple great System Center sessions presented. They are available through the links below. The deployment sessions are mentioned separate in this blog.


All sessions on Channel 9 (with search option) http://channel9.msdn.com/Events/TechEd/NorthAmerica/2011

Keynote Address

Tech·Ed North America 2011 Keynote Address
http://channel9.msdn.com/Events/TechEd/NorthAmerica/2011/KEY01

Configuration Manager (ConfigMgr) 2012

Planning and Deploying Microsoft Forefront Endpoint Protection 2010 with Microsoft System Center Configuration Manager
http://channel9.msdn.com/Events/TechEd/NorthAmerica/2011/SIM317

Microsoft System Center Configuration Manager 2012: Deployment and Infrastructure Technical Overview
http://channel9.msdn.com/Events/TechEd/NorthAmerica/2011/SIM347

Microsoft System Center Configuration Manager 2012: Technical Overview
http://channel9.msdn.com/Events/TechEd/NorthAmerica/2011/SIM352

Microsoft System Center Configuration Manager 2012: Application Management
http://channel9.msdn.com/Events/TechEd/NorthAmerica/2011/SIM346

Configuration Manager (ConfigMgr) 2007

Deploying the Core Optimized Desktop with Microsoft Deployment Toolkit 2010 and Microsoft System Center Configuration Manager
http://channel9.msdn.com/Events/TechEd/NorthAmerica/2011/WCL305

Microsoft System Center Configuration Manager: Hints, Allegations and Other Things Left Unsaid
http://channel9.msdn.com/Events/TechEd/NorthAmerica/2011/SIM407

Microsoft Forefront Endpoint Protection 2010 and Microsoft System Center Deep Dive into Management and Reporting
http://channel9.msdn.com/Events/TechEd/NorthAmerica/2011/SIM311

Extending Microsoft System Center Configuration Manager to Specialized Devices with Windows Embedded Device Manager 2011
http://channel9.msdn.com/Events/TechEd/NorthAmerica/2011/SIM359

Microsoft Deployment Toolkit (MDT)

Redelivering a Users Old Windows XP Environment inside Their New Windows 7 PC via Microsoft Deployment Toolkit w/P2V
http://channel9.msdn.com/Events/TechEd/NorthAmerica/2011/WCL203

MDT,MAP,ACT,WDS,SCCM,AIS and P2V: You Can't Spell Deployment without Them
http://channel9.msdn.com/Events/TechEd/NorthAmerica/2011/WCL204

Zero to Hero in 75 minutes: Building a Fully Functioning Deployment Environment for Free
http://channel9.msdn.com/Events/TechEd/NorthAmerica/2011/OSP208

Troubleshooting Windows Deployment with Microsoft Deployment Toolkit 2010 Lite Touch
http://channel9.msdn.com/Events/TechEd/NorthAmerica/2011/WCL404

Windows Deployment Services (WDS)

Deployment Internals: Mastering Windows Deployment Services
http://channel9.msdn.com/Events/TechEd/NorthAmerica/2011/WSV303

Top 10 Windows Deployment Service (WDS) Common Issues and How to Resolve Them
http://channel9.msdn.com/Events/TechEd/NorthAmerica/2011/WCL313


Have fun watching them and take them to your advantage!