Thursday, July 23, 2015

The package list in content library doesn't match the one in WMI

When installing multiple distribution points, I received the following warning on some of them: Failed to retrieve the package list on the distribution point. Or the package list in content library doesn't match the one in WMI. Review smsdpmon.log for more information about this failure. Not that good when installing new distribution points.

Point is, during synchronization a few packages get removed. Therefore some warnings where displayed, but couldn't be deleted. Even after validation the warning still exists. On Microsoft TechNet there is feedback to open a Microsoft support case or run a PowerShell script. Let's have a look at the logfile first.

Within the logfile package ID's are found which causes the warning.

Within Distribution Point Configuration Status (Monitoring tab) the current. status is seen. Click on details to see more information.

I choose to run the PowerShell script instead of opening a Microsoft support case on this. I found two scripts which I start on the effected distribution points. These are found on TechNet Gallery and Liebensraum (extra script). 

$WMIPkgList = Get-WmiObject -Namespace Root\SCCMDP -Class SMS_PackagesInContLib | Select -ExpandProperty PackageID | Sort-Object
$ContentLib = (Get-ItemProperty -path HKLM:SOFTWARE\Microsoft\SMS\DP -Name ContentLibraryPath)
$PkgLibPath = ($ContentLib.ContentLibraryPath) + "\PkgLib"
$PkgLibList = (Get-ChildItem $PkgLibPath | Select -ExpandProperty Name | Sort-Object)
$PkgLibList = ($PKgLibList | ForEach-Object {$_.replace(".INI","")})
$PksinWMIButNotContentLib = Compare-Object -ReferenceObject $WMIPkgList -DifferenceObject $PKgLibList -PassThru | Where-Object { $_.SideIndicator -eq "<=" }
$PksinContentLibButNotWMI = Compare-Object -ReferenceObject $WMIPkgList -DifferenceObject $PKgLibList -PassThru | Where-Object { $_.SideIndicator -eq "=>" }
Write-Host Delete these items from WMI:
$PksinWMIButNotContentLib
Write-Host Delete .INI files of these packages from the PkgLib folder:
$PksinContentLibButNotWMI


After that (and another validation on the distribution points) everything was fine again. Happy with this easy solution, and scripts available! Hope it helps :-)

Have a look here for more information:
Troubleshooting Content Mismatch Warnings on a Distribution Point in System Center 2012 Configuration Manager
Powershell script to fix ContentLib inconsistency in WMI for ConfigMgr 2012 R2
Content validation issues in SCCM 2012
The package data in WMI is not consistent to Pkglib - missing package
SCCM 2012 - How to delete packages from WMI

Tuesday, July 21, 2015

No accessible source location found for the content (software packages)

After a ConfigMgr 2007 migration where many software packages are migrated, deployment is not working anymore. Every software package deployed gives the same error message in execmgr.log on the client: No accessible source location found for the content. No content is downloaded in ccmcache at all. Still content is available on multiple distribution points.

When looking in deployment properties of software packages, distribution point settings are wrong: Run program from distribution point. Within ConfigMgr 2007 every package can be installed from a distribution point directly. Within ConfigMgr 2012 this is possible only when using Package share settings. When doing this content will be twice on the server, which is not recommended.

Better is to change the distribution point setting to: Download content from distribution point and run locally. That way it will be installed fine after all. Problem solved :-)

Thursday, July 16, 2015

Fatal MSI Error - Management Point could not be installed (1603)

Recently I did a clean ConfigMgr 2012 SP2 installation at customer location. Because push installation was active, a ConfigMgr 2007 agent was installed on the new ConfgMgr 2012 server. During the prerequisite check an error was seen that the management point couldn't been installed: Client version on management point computer. After removing the ConfigMgr 2007 agent, the error message was gone, and installation went fine (I thought).
 
Bad part is, still no management point was installed after setup. The following lines were seen in mpsetup.log:
-mp.msi exited with return code: 1603
-Backing up C:\Program Files\Microsoft Configuration Manager\logs\mpMSI.log to C:\Program Files\Microsoft Configuration Manager\logs\mpMSI.log.LastError
-Fatal MSI Error - mp.msi could not be installed.

I did a manual installation with the comment mention in the logfile:
mp.msi CCMINSTALLDIR="C:\Program Files\SMS_CCM" CCMSERVERDATAROOT="P:\Program Files\Microsoft Configuration Manager" USESMSPORTS=TRUE SMSPORTS=80 USESMSSSLPORTS=TRUE SMSSSLPORTS=443 USESMSSSL=TRUE SMSSSLSTATE=0 CCMENABLELOGGING=TRUE CCMLOGLEVEL=1 CCMLOGMAXSIZE=1000000 CCMLOGMAXHISTORY=1
but this failed to compile on "CcmExec_Global.mof".

After running ccmclean.exe (SMS 2003 toolkit) a WMI repair was done. After that (manual) installation went fine again! The following lines were seen in mpsetup.log now:
-SMSMP already installed. Upgrading/Reinstalling SMSMP
-New SMSMP is the same product code. This is a minor upgrade.

-mp.msi exited with return code: 0
-Installation was succesful.


Happy with this easy solution! :-)

Overview: Technical Reference for the Prerequisite Checker in Configuration Manager

Tuesday, July 14, 2015

Using AfterBackup.bat within the ConfigMgr backup process

System Center Configuration Manager provides a backup maintenance task called 'Backup Site Server' that runs on a schedule and backs up the site database, specific registry keys, and specific folders and files. This task is intended to backup key elements of the Configuration Manager site that require synchronization, or other special attention. These are however not all files needed. Microsoft advises to backup other SQL databases and ConfigMgr files as well, making sure nothing is missing. This is described here:
Backup and Recovery in Configuration Manager


You can create a AfterBackup.bat file to perform post-backup actions automatically after the backup maintenance task runs successfully. The AfterBackup.bat file is most frequently used to archive the backup snapshot to a secure location. However, you can also use the AfterBackup.bat file to copy files to your backup folder and start other supplemental backup tasks. This file must be created manually and placed in the <ConfigMgr>\Inboxes\Smsbkup folder.

The following code can be added to the file (example):
- REM @echo off
- setlocal enabledelayedexpansion
- set target=\\SCCM01\C$\AfterBackup\%date:~0,3%
- If not exist %target% goto datacopy
- RD %target% /s /q
- :datacopy
- xcopy "\\SCCM01\Backup\*" "%target%\" /E /-Y


All this does is move the backup folder to a folder named the day of the week. If the destination already exists, then it is deleted first. Resulting in 7 days of backup. I recommend using a remote location for this, not on the local server. Better safe than sorry :-)

For testing purpose, you can start: SMS_SITE_BACKUP (in services or Configuration Manager Service Manager) manually.

More information can be found on the following websites:
Step-By-Step: Testing System Center 2012 Configuration Manager Backups for Restoration
SCCM ConfigMgr 2012 Primary Site Server and Database Recovery Part 1

Update 16-7:
For it seems above information is outdated and SQL Backup is the way to do it. No ConfigMgr backup and AfterBackup.bat is needed, but it works fine if you prefer. Just make sure you have a backup plan! :)


@jarwidmark - Use SQL Backup instead for SCCM 2012.
@henkhoogendoorn - The SCCM job synchronize between DB and Site control files, which seems to be better?
@jarwidmark - Nope, that's not correct, those are not used anyway. Never, ever use the built-in SCCM backup :)
@henkhoogendoorn - FYI Step-By-Step: Testing System Center 2012 Configuration Manager Backups for Restoration
@jarwidmark - I don't agree with that post, use SQL backup instead.
@NickolajA - Since ConfigMgr 2012 SP1 was released, SQL backups would be the prefered way.
@Steve_TSQL - Yes - read this :) SQL Server Backup Recommendations for Configuration Manager
@Steve_TSQL - While that post will work, using native SQL is better. With CM 2012 SP1 and later ConfigMgr 2012 Site Backup and Recovery Overview
@ccmexec - Agreed!! SQL backup is the way to do it!

Friday, July 10, 2015

Failed to download updates to the WUAgent datastore. Error = 0x800b0109

With Shavlik Patch it's possible to download and publish third-party updates within the ConfigMgr console. Other products with comparable functionality are Secunia and Lumension. During a Shavlik Patch implementation, third-party updates on Adobe Reader and Mozilla Firefox didn't want to install. Updates were published without issue but they fail to install on the client. The following error was shown in WUAHandler.log: Failed to download updates to the WUAgent datastore. Error = 0x800b0109

Trick is, you must publish Self signed certificates in the local computer Trusted Publishers and Trusted Root Certification Authorities store and you will need to enable 'Allow signed updates from an intranet Microsoft update service location' as well.

Import the WSUS self signed certificate to the client computer's Trusted Publishers and Trusted Root Certification Authorities and to change this setting in GPO.

Create a GPO which will import this certificate and enable 'Allow signed updates from an intranet Microsoft update service location'.

After creating the GPO and make the necessary changes, both Adobe Reader and Mozilla Firefox updates were installed successfully.

Just great to use ConfigMgr for both Microsoft and third-party updates, within the same console! As you can see Adobe Reader (11.0.11) and Mozilla Firefox (38.0.5) are installed successfully now.

Thursday, July 9, 2015

What’s new in ConfigMgr and SCEP Technical Preview 2

Today, ConfigMgr and SCEP Technical Preview 2 became available. Technical Preview 2 provides you with an early glimpse of the functionality that is planned for Q4 2015 (close to Windows 10), bringing with it full support for client deployment, upgrade, and management of Windows 10.

New features available in Technical Preview 2 include: 
-Universal Windows apps support for Windows 10 – Side-load internally developed Universal Windows apps to Windows 10 devices.
-Peer cache support for Windows PE – Includes OS deployment scenarios for Windows PE, extending our existing Configuration Manager peer cache content management.
-Ability to manage Windows 10 PCs and mobile devices via MDM with on-premises ConfigMgr infrastructure – Manage Windows 10 devices using ConfigMgr integrated with Microsoft Intune (hybrid) without the need to store your data in the cloud. This is especially helpful for managing devices that are unable to connect to the Internet such as Windows IoT/Embedded devices. (Intune subscription required)


Also included are features that were previously released in the first Technical Preview in May:
-Support for Windows 10 upgrade with OS deployment task sequence – In addition to providing support for existing wipe-and-load (refresh) scenarios, the ConfigMgr Technical Preview includes enhanced upgrade support with in-place upgrade to Windows 10.
-Support for installing ConfigMgr on Azure Virtual Machines – Similar to how you can install ConfigMgr on Hyper-V today, you can now run ConfigMgr in Azure VMs. This provides flexibility to move some or all of your datacenter server workloads to the cloud with Azure.


For more information and download have a look on:
TechNet Evaluation Center


Also, if you have a feature request, make sure to share your ideas on the new ConfigMgr UserVoice site.

Just download and enjoy this second Technical Preview!

Tuesday, July 7, 2015

Learn PowerShell basics free tutorial course - Veeam

Sponsor post

LEARN POWERSHELL - From Basics To A Coding Star
With the release of Windows 2012, Microsoft's PowerShell has moved toward automation. Our courses are designed to help you become familiar with the powerful PS scripts. And it’s FREE! 


Kickstart your PowerShell experience
The first episode we will focus on taking your first steps into the PowerShell world (
Understanding CMDlets, Storing Values, Looping, The Pipeline)
 
Getting stuff done with PowerShell
The second episode we will focus on some simple scripts and useful available options unique to PowerShell (
Reporting, Job Scheduler, Creating your Own Scripts, Remote Execution)
 
Automate your Veeam Experience
The last episode we will focus on Veeam integration with PowerShell (
Custom Reporting, Creating Jobs, Mass Job Updates, Custom Scheduling)

Join the FREE courses now!

This summer's hottest deal! 40% OFF - Jalasoft

Sponsor post 


We’re feeling very festive this month, so for a limited period of time we’re dropping our prices by an eye popping 40% OFF!! During the entire month of July, our customers and future customers can take advantage of this amazing promotion. There’s never been a better time to give our software a test drive and see what it can do for you. Give us a call at 1-888-402-6717 or click here and we’ll gladly prepare a Quote for you without any purchasing commitment which will include our July Discount. 

Or contact by e-mail: sales@jalasoft.com

Monday, July 6, 2015

Microsoft Surface Pro 3 experience after Windows 10 Build 10159 installation

Recently I upgraded my Surface Pro 3 to Windows 10 Build 10159. With Windows 8.1 Update 1 (which is default installed) the device was making a lot of noise when plugged in. Also with multiple programs open (most of time Internet Explorer and/or Adobe Reader) it was making a lot of noise too. After many firmware updates the issues was still not gone. In March this year, I wrote the following about this behavior:

As mentioned in the links below, this is being caused by the Windows Installer Module and the Windows Installer Module Worker, which start in the background at random times and cause the CPU to work at higher speeds. This causes the heat and the fans to kick into overdrive. When stopping these processes in Task Manager, my Surface is as quiet as on battery in seconds! Hope that this issue is fixed when moving to Windows 10 in a few months. Otherwise a hardware replacement may be needed to resolve this.

Last week I updated my device to Windows 10 Build 10159. After the update the issue is gone indeed. Even during a stress test (screenshot) at almost 100% CPU the fan makes less noise than before. Happy that this issue seems to be gone now! :-)

Downside is, Out of sleep (when in sleep mode, it will wake up. for it seems because of the keyboard?) is back again. This issue was solved on Windows 8.1 after installing a system firmware update.
Sometimes my device will go out-of-sleep, which is annoying because all open programs will be gone afterwards. Strange thing that no hibernation is used for this? For it seems the device stays on, till battery power is reached a critical state. After that the device turns down. Lucky me this happens around rarely and not always.


Furthermore I really like Windows 10, and hope to implement it many times this year already! Windows 10 (a.k.a. Windows as a service) is the new generation of Windows. No specials (issues or other things) to mention on Surface Pro 3.

Update 7-7: Still during installing updates (Windows 10 Build 10159 to 10162) my device makes a lot of noise. Next device will be a fanless one :-)

More information about the fan blowing:
Fix found for Microsoft's Surface 3 overheating issues
Excessively loud fan, constant overheating during idle and light tasks
Tools To Simulate CPU / Memory / Disk Load (for testing purpose)

More blogposts on this topic:

Microsoft Surface Pro 3 first experience
Microsoft Surface Pro 3 second experience
Microsoft Surface Pro 3 experience after 5 months

Friday, July 3, 2015

Deployment error on Apply Driver Package (DISM) step

Recently deployment went wrong on a few system types, part of a lot different system types. At every deployment it went wrong on the Apply Driver Package step. At earlier deployments all went fine, but now it stops working. Both were heavy HP workstations with 16GB and 32GB memory onboard. A lot of errors in SMSTS.log and DISM.log were seen.

SMSTS.log
-Dism failed with return code -2147467259
-Failed to add driver to driver store. Code 0x80004005
-Failed to provision driver. Code 0x80004005
-Exiting with return code 0x80004005
-Failed to find a matching version


DISM.log
Failed to find a matching version for servicing stack: E:\Windows\WinSxS\x86_microsoft-windows-servicingstack_31bf3856ad364e35_6.1.7601.17592_none_0b0e4b4025cf4049\ [HRESULT = 0x80070490 - ERROR_NOT_FOUND]
Failed to find servicing stack directory in online store. [HRESULT = 0x80070490 - ERROR_NOT_FOUND]
Failed to open the registry root: n/a, key: Microsoft\Windows NT\CurrentVersion\ProfileList. [HRESULT = 0x80070002 - ERROR_FILE_NOT_FOUND]
Failed to query for path to user profiles directory. [HRESULT = 0x80070002 - ERROR_FILE_NOT_FOUND]
Failed to load the default user profile registry hive. [HRESULT = 0x80070002 - ERROR_FILE_NOT_FOUND]
Failed to unload offline registry: {bf1a281b-ad7b-4476-ac95-f47682990ce7}E:/Windows/System32/config/SOFTWARE, the client may still need it open. [HRESULT = 0x80070005 - E_ACCESSDENIED]
Failed to load offline store from boot directory: '\\?\E:\' and windows directory: '\\?\E:\Windows\' [HRESULT = 0x80070002 - ERROR_FILE_NOT_FOUND]
Failed to initialize store parameters with boot drive: E:\ and windows directory: E:\Windows [HRESULT = 0x80070002 - ERROR_FILE_NOT_FOUND]


After some digging I found the following solution:
Deployment failures with Precision systems
Win2008R2/Win7: STOP 0xF4 during Task Sequence / OS Deployment
Corrupt Segoe UI font and .NET framework after OSD with 2012 R2 CU1

It mentions:
The issue in this case occurs because WinPE tries to compact the offline registry and fails to commit the registry hives back to disk. This problem only happen when you deploy Windows 7 and use WinPE 5.x 32-bit to deploy the image. Resolution is to set this registry value in the boot.wim using DISM or using a 64-bit boot image.

In my case I changed to use the 64-bit boot image, because of Windows 7 x64 deployment. Otherwise you need to edit the 32-bit boot image with the regkey. Very easy solution and no errors seen anymore :-)

Tuesday, June 30, 2015

Include ConfigMgr Client Cumulative Update during OSD

During deployment in ConfigMgr, you can install the ConfigMgr Client Cumulative Update immediately. There are multiple posts found where the PATCH= parameter is used. The Cumulative Update needs to be in a package or reference image (included for installation) for this. I see lots of times the PATCH= parameter is skipped, for different reasons. Let's have a look at another way to install the Cumulative Update. This one is not hard at all. It just works :-)

Just create ClientPatch folders in both ConfigMgr Client locations:
-Program Files\Microsoft Configuration Manager\Client\x64
-Program Files\Microsoft Configuration Manager\Client\i386
and copy the appropriate architecture (x64 and/or i386) from your hotfix to one of this folders. Do not forget to update your ConfigMgr Client Package to be sure using the Files with the Hotfixes.


That's it! No PATCH= parameter needed at all. It did work on my first try (CU4), so very easy to use if you ask me :-)

When using Client Push Installation it will be helpfull either. No need to apply the CU client update afterwards. It will be detected automatically:
-Detected 1 client patch files. Will apply them after client installation.
-Adding file 'configmgr2012ac-r2-kb3026739-x64.msp' to BITS job, saving as 'C:\Windows\ccmsetup\configmgr2012ac-r2-kb3026739-x64.msp'.
-C:\Windows\ccmsetup\configmgr2012ac-r2-kb3026739-x64.msp is Microsoft trusted.
-File C:\Windows\ccmsetup\configmgr2012ac-r2-kb3026739-x64.msp installation succeeded.
-Params to send FSP message '5.0.7958.1501 Deployment [DP]


Why this is a hidden/undocumented feature suprised me.
Can't be easier if you ask me :-)

Source: SCCMfaq.ch
Source: Systems Management and Automation

Update 6-7:
@jarwidmark - That method works for some, breaks for some, but either way, it is totally unsupported by Microsoft.
@rsjulsen - This method has totally worked for me :) But ofc.. Totally unsupported.. and totally, totally awsome :)


Update 24-8:
With Cumulative Update 1 for ConfigMgr 2012 R2 SP1 and 2012 SP2 this isn't needed anymore. Source: Automatically updating the Configuration Manager client

Friday, June 26, 2015

No usage data found to generate software metering report

At customer location we want to implement software metering. This component in ConfigMgr tracks how many times an executable is started per user. You can access reporting to see how many times a program is started for multiple users. Peter Daalmans has a blogpost available on how to configure software metering in your organization. Problem is, it wasn't working in my installation because of multiple reasons. Looking in "mtrmgr.log" and "SWMTEReportGen.log" the following errors and warnings are shown:
 
-OpenProcess failed for process 4, error 80070005
-No usage will be tracked for proces 4, as failed to get owner info or executable file name 80070005
-GetShortPathName failed for \SystemRoot\System32\smss.exe, error 3
-GetFileVersionInfoSize failed for file \Systemroot\System32\smss.exe, error 2
-Program might not match metering rules, as version header was not read
 
-No usage data found to generate software metering report

We did the following changes to implement software metering successfully:
-Disable User Account Control (UAC) on the client(s)
-Remove existing files in <ConfigMgr>\Inboxes\Policypv.box folder
-Start runmetersumm.exe <Site code> on the SQL server where the ConfigMgr database is found. This tool is part of the ConfigMgr 2012 R2 Toolkit

The purpose of this tool is to run the metering summarization task to analyze raw metering data. (runmetersumm.exe)

After that you will see that reports will be filled with information!

Sources used:
Clients not receiving new Software Metering Rules
Software Metering Reports Not Working
System Center 2012 R2 Configuration Manager Toolkit

Wednesday, June 24, 2015

HP Client Integration Kit for ConfigMgr 2012 R2 (update)

Recently I did another ConfigMgr 2012 implementation. To import driver packages easily I like to use additional Dell and/or HP tools to import driver packages. This time however the HP tool has some new functionality. Let's have a look at this first.

The HP Client Integration Kit for ConfigMgr 2012 R2 has an update on 05/15/2015 with the following changes:
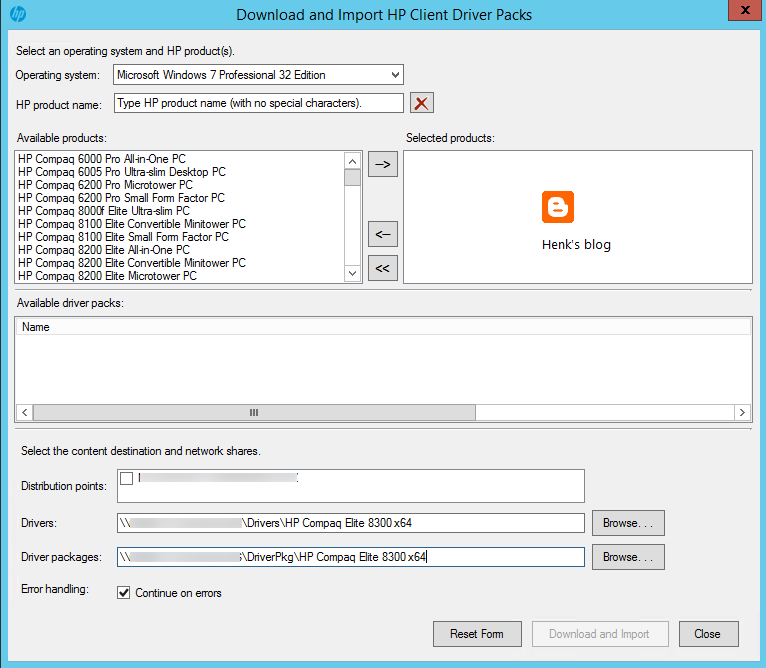
- New feature: Software Library > Overview > Operating Systems > Driver Packages > Download and Import HP Client Driver Packs - The ability to select products to download and import HP built driver packs in ConfigMgr.
- The ability to select distribution points in the following operations:
      + Download and Import HP Client Driver Packs
      + Import Downloaded HP Client Driver Packs
      + Create HP Client Boot Image
- Software Library > Overview > Application Management > Packages > HP Client Support Packages > HP Client BIOS Configuration Utility includes the new versions of BCU 4.0.11.1 and HPQPswd 1.1.18.1.
- The Windows XP task sequence example is removed.

Let's have a look in the ConfigMgr console now:
There are 2 buttons in the ribbon now, one for 'Download and import driver packs' and one to 'Import downloaded driver packs'.

When choosing 'Download and import driver packs' you can search on types/models and download/import driver packs right away! Just a great improvement on this ConfigMgr add-on!

When choosing 'Import downloaded driver packs' you must download them manually and import them afterwards (as usual).

Download HP CIK right away!

More blogposts about importing driver packs:
Download Driver packages for Dell, HP and Lenovo systems
HP Client Integration Kit for ConfigMgr 2012 R2

Tuesday, June 23, 2015

Configuration Manager did not find a site to manage this client

Using Client Push installation on multiple systems in a ConfigMgr site, gives the following result: "Configuration Manager did not find a site to manage this client". Whatever you are trying, no ConfigMgr site is found. Everything else seems to be in good order, you can ping the ConfigMgr server, the system is within the boundary which is part of a boundary group, and ipconfig /all shows all information with a valid IP-address and DNS server. What's wrong here?

Looking in ClientLocation.log shows the following error: "Attempting to assign client to site *** that does not match assignment requirements". Now let's have a look at that.

Lucky me I found the following post: Microsoft TechNet
It mentions: At some point in the organization someone had implemented a GPO (admin template) to assign the CM site. This GPO was also at some time before me removed; however the registry settings remained tattooed on the client. HKLM\ Software\ Microsoft\ SMS\ Mobile Client\ GPSiteAssignmentCode - Changing this value from the old site to the new fixed the issue.

In my case I deleted all three keys starting with GP and the problem was solved immediately. Just make sure to delete GPRequestedSiteAssignmentCode key at minimum. You will see that AssignedSiteCode key will change automatically after that.

Just great to have it working now!

Thursday, June 18, 2015

Failed to run the action: Setup Windows and ConfigMgr. The system cannot find the file specified.

Let's have a look at the following situation, where I'm using a Primary Site server and remote Site server with Distribution point role. During deployment on a system we get the following error message(s): Failed to run the action: Setup Windows and ConfigMgr. The system cannot find the file specified.
-SendResourceRequest() failed. 80190191
-Download() failed. 80190191
-DownloadContentAndVerifyHash() failed. 80070002
-Failed to resolve package source ""
-Failed to configure OSD setup hook (0x80070002)
-Configure hook failed with error code (80070002)
-Failed to install setup hook (80070002)


I did setup the remote Site server with Distribution point role. I did select the "Install and configure IIS if required by Configuration Manager" button. A forum post was mentioning you need to check permissions on the Network Access account and make sure it isn't locked. That did however not the trick! After checking manually IIS configuration on the remote Site server, both Request Filtering and Windows Authentication were not enabled. After installing both IIS components, deployment was running fine finally!

Source: Microsoft TechNet
Examine the IIS logfiles and double check if IIS is configured according to the docs: Site System Requirements (especially Windows Authentication)

Wednesday, June 17, 2015

Setup could not install SQL RMO, ConfigMgr installation cannot be completed

During a new ConfigMgr installation, I get the following error: "Setup could not install SQL RMO, ConfigMgr installation cannot be completed". I did a lot of ConfigMgr installations before, and thought everything was set right. A forum post was mentioning you need to download Client setup files again, instead of using existing ones. That did however not the trick! Let's have a look at this strange error.

On Gerry Hampson Device Management the following solution is mentioned: 1. Go to your download prerequisites folder. Uninstall the SQL Management Object by executing SharedManagementObjects.msi. Run the ConfigMgr setup again. or 2. Go to your download prerequisites folder. Install sqlncli.msi and SQLSysClrTypes.msi manually. Run the ConfigMgr setup again.

In my case it wasn't possible to install or uninstall SharedManagementObjects.msi. Installing sqlncli.msi wasn't possible either because a reboot of the server was needed. So I did a reboot on the ConfigMgr server and installation went fine after all. Still strange the message mentioned in the wizard doesn't look like you need to restart the server before starting setup again! ;)

Hope it helps!

Friday, June 12, 2015

Doing a ConfigMgr 2012 R2 SP1 fresh installation

Recently I did a blogpost about doing a ConfigMgr 2012 R2 SP1 upgrade. This because it will result in different behavior, and running tasks in the background after the upgrade. This time I started a ConfigMgr 2012 R2 SP1 fresh installation, which is something different really. Installation is doing fine with no running tasks in the background after installation. Much better this way!

And I needed both installation media this time as well :-)

This because starting with this release, Microsoft has merged the 2012 and 2012 R2 codebase. This means form this point forward both 2012 and 2012 R2 use the exact same files. The ONLY difference is a setting that blocks 2012 users from certain features to R2 because they've not paid for it. This is where the two files come in:

SC2012_SP2_ConfigMgr_SCEP.exe is the actual install/upgrade binary that everyone needs to run.
SC2012_R2_SP1.exe is the file which serves one purpose only: an upgrade path for people from 2012 to 2012 R2, if they upgrade their license to unlock the locked-out features. That's why it's so small. Remember it will NOT upgrade your ConfigMgr infrastructure.

More about that here: System Center Configuration Manager Team Blog (in comments)

Installation progress in short:

Installation is done within 35 minutes, with no running tasks left. Use the file 'SC2012_SP2_Configmgr_SCEP.exe' for that.

After installation you have System Center 2012 Configuration Manager SP2 in-place, with no R2 features available.

After that start the file 'SC2012_R2_SP1_Configmgr.exe' to continue. This file unlocks R2 features missing in the other installation. You will need a R2 license for that officially.

Installation is done in a blink of an eye. This because it's used only to unlock R2 features in the ConfigMgr console.

When starting the console again, you have System Center 2012 R2 Configuration Manager SP1 now. Very nice indeed :-)

From now on this will be the way for fresh ConfigMgr installation. Stay tuned for more ConfigMgr news soon!

More blogposts about ConfigMgr 2012 R2 SP1:
ConfigMgr 2012 R2 SP1 and ConfigMgr 2012 SP2 released
Upgrade ConfigMgr 2012 R2 to SP1 with SP2 media (confusing)
New functionality in System Center 2012 R2 Configuration Manager SP1

Wednesday, June 10, 2015

Downgrading Windows 7 or 8.x from Enterprise to Pro

Because of the free Windows 10 upgrade coming for Starter, Home Basic, Home Premium, Professional and Ultimate Windows 7 and Windows 8.1 editions, I did a downgrade from Windows 8.1 Enterprise to Professional, keeping all my files, applications and settings.
Let's have a look how to do that. Just remember, it's probably not a valid downgrade, but it works perfectly. As long you have a valid product key, nothing illegally is done.

The following Windows versions can upgrade free to Windows 10 Home: Windows 7 Starter, Windows 7 Home Basic, Windows 7 Home Premium and Windows 8.1 editions
The following Windows versions can upgrade free to Windows 10 Pro: Windows 7 Professional, Windows 7 Ultimate, Windows 8.1 Pro and Windows 8.1 Pro For Students editions
The following Windows versions can upgrade free to Windows 10 Mobile: Windows Phone 8.1 only

Guide to downgrade Windows 8.1 Enterprise to Professional:
1. Open regedit.exe and navigate to HKLM\Software\Microsoft\Windows NT\CurrentVersion
2. Change ProductName to Windows 8.1 Professional
3. Change EditionID to Professional
4. Navigate now to HKLM\Software\Wow6432Node\Microsoft\Windows NT\CurrentVersion
5. Change ProductName to Windows 8.1 Professional

6. Change EditionID to Professional
7. Close regedit.exe (no need to restart)
8. Start the Windows 8.1 Pro installation


With that you're done and a free upgrade to Windows 10 Pro is possible! Features missing are Enterprise options like Direct Access and language packs, but I don't miss them on my home PC. Happy upgrading to Windows 10 :-)

Note: This guide will work for Windows 7 and 8 as well.

Update 6-7: When people may experience issues when downgrading, maybe this will help? Windows 7 Downgrader: http://answers.microsoft.com/en-us/windows/forum/windows_7-windows_install/downgrade-win-7-ultimate-to-win-7-professional/cfebbc77-683a-4d32-bf3a-e897619a82f7
Otherwise it's possible to become an Windows Insider too (without the need to have an official product key): http://blogs.windows.com/bloggingwindows/2015/06/19/upcoming-changes-to-windows-10-insider-preview-builds/

Update 2-8: Joe Donkor mentions:
I ran through this today. I just couldn't get step 8 to work and got the message that the computer was being rolled back to the previous configuration. In desperation after a few tries, I just ran the Win 10 pro install and it worked without issue. So if you get stuck at the same point I did, give it a try. > Just great to hear that! Good try :)
Update: Dirk van Gelderen mentions:
It works (at least in my case) !! Did the regedit tweaks and run the Windows 10 installer and have now an up-and-running Windows 10 (with legal license) computer with all apps, data & settings from Windows 8.1. > Thanks for comment and testing!


Update 14-8: Alessio mentions:
I was facing the same error (Keep only files or nothing). I was able to get around it following the instructions above PLUS this: change ProductName and EditionID respectively to "Windows 8.1 Professional" and to "Professional" in this registry key HKLM\Software\Microsoft\Windows NT\CurrentVersion
You should be able to do the in-place upgrade now :) > Thanks for feedback.


Update 14-8: Mahomed mentions:
This worked for Windows 10 Enterprise down to Windows 10 Pro. I just edited the keys and ran the setup for Windows 10 Pro (without rebooting after changing the registry). Also make sure you've installed all updated and rebooted BEFORE making the registry changes. > Always good to know :) Thanks for comment!

Update 24-8: Anonymous mentions:
I finally had time to use the app to update to windows 10, and want everyone to know it worked flawlessly. I edited the registry, the app showed up the next day, and I used it. > Another way to update!

Note: Thanks for comments everyone! Love it :)

Update 8-9: With the Media creation tool available, free Windows 10 upgrade is still possible. You can download it from HERE.

Friday, June 5, 2015

Object Replication errors after a ConfigMgr 2012 R2 SP1 upgrade

Right after a ConfigMgr 2012 R2 SP1 upgrade, you may have Object Replication errors in the SMS_Object_Replication_Manager. After 7 upgrades this is the first one having this kind of errors.

The errors will looks like this:
Microsoft SQL Server reported SQL message 547, severity 16: [23000][547][Microsoft][SQL Server Native Client 11.0][SQL Server]The DELETE statement conflicted with the REFERENCE constraint "CI_CurrentRuleDetail_CIID_FK". The conflict occurred in database "CM_***", table "dbo.CI_CurrentRuleDetail", column 'Setting_
Please refer to your Configuration Manager documentation, SQL Server documentation, or the Microsoft Knowledge Base for further troubleshooting information.

When looking in objreplmgr.log you will see the following errors:
*** delete vCI_ConfigurationItems where CI_ID=16835455
*** [23000][547][Microsoft][SQL Server Native Client 11.0][SQL Server]The DELETE statement conflicted with the REFERENCE constraint "CI_CurrentRuleDetail_CIID_FK". The conflict occurred in database "CM_***", table "dbo.CI_CurrentRuleDetail", column 'Setting_CI_ID'.
Failed to delete Deployment Type ScopeId_5D63A272-7854-4697-8F30-AF7069C4E611/DeploymentType_00b65bce-7f88-467a-8e5a-10c1755d3b8a/4

These errors will come back every 30 minutes!

The solution for this can be found on the ConfigMgr database, starting the query:
delete from dbo.CI_CurrentRuleDetail where Setting_CI_ID='16835455'

When restarting SMS_Object_Replication Manager within Configuration Manager Service Manager, you see the lines:
Successfully deleted Deployment Type ScopeId_5D63A272-7854-4697-8F30-AF7069C4E611/DeploymentType_00b65bce-7f88-467a-8e5a-10c1755d3b8a/4
*** delete vCI_ConfigurationItems where CI_ID=16835455

Very good, but another error came back immediately with another ID!

In my situation I did a query 6 (!) times on the ConfigMgr database:
delete from dbo.CI_CurrentRuleDetail where Setting_CI_ID='16835455'
delete from dbo.CI_CurrentRuleDetail where Setting_CI_ID='16835731'
delete from dbo.CI_CurrentRuleDetail where Setting_CI_ID='16846410'
delete from dbo.CI_CurrentRuleDetail where Setting_CI_ID='16847715'
delete from dbo.CI_CurrentRuleDetail where Setting_CI_ID='16857770'
delete from dbo.CI_CurrentRuleDetail where Setting_CI_ID='16857778'


After that everything went fine again. Is it supported? No, i guess not! Is it working? Yes, the errors are gone now! More information can be found on Microsoft TechNet: After R2 SP1 installation: Object Replication manager has errors. Hope it helps!

More blogposts about ConfigMgr 2012 R2 SP1:
ConfigMgr 2012 R2 SP1 and ConfigMgr 2012 SP2 released
Upgrade ConfigMgr 2012 R2 to SP1 with SP2 media (confusing)
New functionality in System Center 2012 R2 Configuration Manager SP1
Doing a ConfigMgr 2012 R2 SP1 upgrade (Notes from the field)
Check the database before doing a ConfigMgr 2012 R2 SP1 upgrade

Wednesday, June 3, 2015

Check the database before doing a ConfigMgr 2012 R2 SP1 upgrade

When doing a ConfigMgr upgrade (like ConfigMgr 2012 R2 SP1), it's good to check the database first. When upgrading a production environment, you want to make sure that everything went fine, and no error is given on the database. This can be done with the following command(s), which are recommended before upgrade.

When you want to start a Database Consistency Check against the ConfigMgr database, run the command: DBCC CHECKDB
This performs the following operations:
-Runs DBCC CHECKALLOC on the database.
-Runs DBCC CHECKTABLE on every table and view in the database.
-Runs DBCC CHECKCATALOG on the database.
-Validates the contents of every indexed view in the database.
-Validates the Service Broker data in the database.


After that build a new server with the same SQL installation (version and configuration like collation) and import a copy of the ConfigMgr database on that server. This because you cannot test a database upgrade on a active ConfigMgr Site server! To test the database upgrade before doing it in production environment, just run the command: SMSSETUP\BIN\X64\Setup.exe /TESTDBUPGRADE <database> (from new ConfigMgr installation media)

Start Begin TestDBUpgrade

Yes, I'm sure about it :-)

TestDBUpgrade is done

After some time (22 minutes in my case) the following message is displayed in ConfigMgrSetup.log: Configuration Manager Setup has successfully upgraded the database. With that it's time to start the upgrade in production environment as well. Don't forget to have a good backup (as mentioned earlier) all times.

Happy upgrading! :-)

More blogposts about ConfigMgr 2012 R2 SP1:
ConfigMgr 2012 R2 SP1 and ConfigMgr 2012 SP2 released
Upgrade ConfigMgr 2012 R2 to SP1 with SP2 media (confusing)
New functionality in System Center 2012 R2 Configuration Manager SP1
Doing a ConfigMgr 2012 R2 SP1 upgrade (Notes from the field)

Tuesday, June 2, 2015

Microsoft Antimalware has 100% CPU load on the Primary Site server

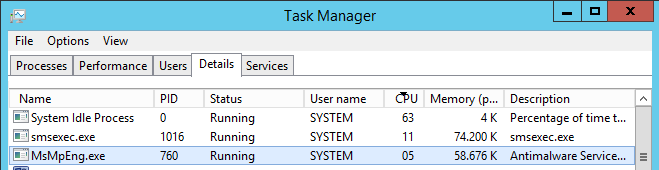
Recently I did some maintenance on a existing ConfigMgr 2012 R2 environment. On the Primary Site server, which was very slow, I started task manager and see a 100% CPU usage. This because of the MsMpEng.exe proces which is the Antimalware Service. Strange because there are already some exceptions in place.


After adding some additional exclusions everthing went fine again. Just add the following exclusions for that:
Excluded files and folders:
-C:\Program Files\Microsoft Security Client\MsMpEng.exe
-C:\ProgramData\Microsoft\Microsoft Antimalware

Excluded processes:
-C:\Program Files\Microsoft Security Client\MsMpEng.exe


Much better this way. Still strange I didn't see this behavior before! When you have 100% CPU load on the Primary Site server (or other systems) too, just add this exclusions. Hope it helps!

Update: After one day the server is still in responsive state.