Yesterday (February 25th) Cumulative Update (CU) 3 for ConfigMgr 2012 R2 SP1 and 2012 SP2 is released. This update contains 23 (!) fixes for various issues including an update version of the SCEP client, and contains all of the changes from prior cumulative updates.
Here's a list of issues that are fixed, there are quite a lot of them:
-Administrator Console (4 fixes)
-Operating system deployment (3 fixes)
-Configuration Manager client (1 fix)
-Microsoft Intune and mobile device management (3 fixes)
-Site systems (6 fixes)
-Software distribution and content management (4 fixes)
-Settings management (2 fixes)
Additional changes that are included in this update:
-Endpoint Protection - Revised February 2015 anti-malware platform update for Endpoint Protection clients
-Supported operating systems - Mac OS X 10.11 can be targeted as a client platform for the following features: Application Management & Settings Management
-Software updates management on operating system deployment - A new optional task sequence variable, SMSTSWaitForSecondReboot, is available to better control client behavior when a software update installation requires two restarts. This variable should be set before the "Install Software Updates" step to prevent a task sequence from failing because of a "double reboot" of a software update. This can be useful when hundreds of updates are being applied in a single "Install Software Updates" task sequence step. (like on Windows 7 images)
-Reporting - Windows 10 is now available in the Upgrade Assessment Report (Upgrade Assessment Tool required)
Just install it in your environment when experiencing problems described in this article. When not affected by these problems, Microsoft recommends to wait for the next service pack that contains this update. Great that CU3 is available now!
This update replaces Cumulative Update 2 for System Center 2012 Configuration Manager R2 SP1 and 2012 SP2
For more information or download the update have a look here:
Microsoft Support

Friday, February 26, 2016

Thursday, February 25, 2016
Windows 10 Servicing options in ConfigMgr Current Branch
Within ConfigMgr Current Branch you can configure Windows 10 servicing. Microsoft added a nice new dashboard for that. Within the dashboard you can see the following functionality:
-Windows 10 Servicing (new dashboard)
-All Windows 10 Updates (upgrades available)
-Servicing Plans (ADR for CB and CBB, where CB means Current Branch, and CBB means Current Branch for Business)
On the dashboard you will see information like this:
 This will tell you which Windows 10 versions are in use, and in which branch they are. There is also information about which versions will expire and when, and needs to be updated.
 Just make sure to enable "Defer upgrades and updates" when you want to move systems from Release ready (CB) to Business ready (CBB). Business ready has a delay of 4 months on Release ready, which means one build. You can set a delay of 8 months on CBB, which means 12 months after CB release.
 When creating a servicing plan (ADR for new Windows 10 builds) however, you need a lot of free disk space. In that case 256 builds are downloaded, which are around 2GB in size per build. That means approximately 512GB of space! They will be downloaded for Education, Enterprise and Professional. Just useless if you ask me :-)
 For it seems it's better to download new Windows 10 builds yourself, and use the new upgrade task sequence with upgrade media to do the job. Hopefully (and I guess it will be) this functionality (decide which Windows 10 builds and versions are downloaded) will be available in a new ConfigMgr build. Otherwise the feature is useless..
Stay tuned for more information on this.
Source: Manage Windows as a service using System Center Configuration Manager
Update: get mentioned on twitter: That GPO setting (Defer upgrades and updates) is only for systems getting feature upgrades directly from WSUS or Windows Update, not when ConfigMgr is used.
On Microsoft TechNet however the following is mentioned: To see data in the Windows 10 servicing dashboard, you must do the following: Specify the group policy setting, Defer Upgrades and Updates, to determine whether a computer is CB or CBB. So I guess the GPO is needed as posted ;)
Update: 17-3 The following improvements were added in Configuration Manager 1602:
-New filter options are available for servicing plans that allow you to filter for Language, Required, and Title. Only upgrades that meet the specified criteria will be added to the associated deployment.
-When you select the Upgrades classification for software updates synchronization, a warning dialog is displayed to let you know that hotfix 3095113 for WSUS 4.0 is required before you can successfully synchronize software updates and for the Windows 10 Servicing to work properly. From the dialog, you can go to the associated knowledge base article.
-Available Windows 10 upgrades now only display in the Windows 10 Servicing \ All Windows 10 Updates node of the ConfigMgr console. These updates no longer display in the Software Updates \ All Software Updates node of the console.
-A servicing plan is considered a high-risk deployment, and the Select Collection window displays only the custom collections that meet the deployment verification settings that are configured in the site’s properties.
-End-users that start a Windows 10 Upgrade package will be prompted with a dialog that lets them know they will be upgrading their operating system.
So yes, Windows 10 Servicing is useful now ;)
Source: What's new in version 1602 of Configuration Manager
-Windows 10 Servicing (new dashboard)
-All Windows 10 Updates (upgrades available)
-Servicing Plans (ADR for CB and CBB, where CB means Current Branch, and CBB means Current Branch for Business)
On the dashboard you will see information like this:


Stay tuned for more information on this.
Source: Manage Windows as a service using System Center Configuration Manager
Update: get mentioned on twitter: That GPO setting (Defer upgrades and updates) is only for systems getting feature upgrades directly from WSUS or Windows Update, not when ConfigMgr is used.
On Microsoft TechNet however the following is mentioned: To see data in the Windows 10 servicing dashboard, you must do the following: Specify the group policy setting, Defer Upgrades and Updates, to determine whether a computer is CB or CBB. So I guess the GPO is needed as posted ;)
Update: 17-3 The following improvements were added in Configuration Manager 1602:
-New filter options are available for servicing plans that allow you to filter for Language, Required, and Title. Only upgrades that meet the specified criteria will be added to the associated deployment.
-When you select the Upgrades classification for software updates synchronization, a warning dialog is displayed to let you know that hotfix 3095113 for WSUS 4.0 is required before you can successfully synchronize software updates and for the Windows 10 Servicing to work properly. From the dialog, you can go to the associated knowledge base article.
-Available Windows 10 upgrades now only display in the Windows 10 Servicing \ All Windows 10 Updates node of the ConfigMgr console. These updates no longer display in the Software Updates \ All Software Updates node of the console.
-A servicing plan is considered a high-risk deployment, and the Select Collection window displays only the custom collections that meet the deployment verification settings that are configured in the site’s properties.
-End-users that start a Windows 10 Upgrade package will be prompted with a dialog that lets them know they will be upgrading their operating system.
So yes, Windows 10 Servicing is useful now ;)
Source: What's new in version 1602 of Configuration Manager
Tuesday, February 23, 2016
Site Component Manager failed to install SMS_DMAPPSVC_CONTROL_MANAGER
When installing ConfigMgr 1511 or upgrading to ConfigMgr 1511, the following (known) issue may appear: Site Component Manager failed to install this SMS_DMAPPSVC_CONTROL_MANAGER.


Site Component Manager could not copy file "D:\Program Files\Microsoft Configuration Manager\bin\x64\InformationService\Config\srvboot.exe" to "<ConfigMgr> \SMS\bin\x64\InformationService\Config\srvboot.exe". The operating system reported error 2: The system cannot find the file specified.
This because a line is missing in the install.map file in the ConfigMgr\root folder. Just add the following line, and place it into the SMS_DMAPPSVC_CONTROL_MANAGER component of the file, to install it successfully: FILE <srvboot.exe><0><3667640>

After that the component will be installed succesfully!
Comment Jason Sandys: This is a known, but completely benign issue. It is annoying but ignorable in 1511. The product group are aware though and *may* issue a fix.
Source: Microsoft TechNet


Site Component Manager could not copy file "D:\Program Files\Microsoft Configuration Manager\bin\x64\InformationService\Config\srvboot.exe" to "<ConfigMgr> \SMS\bin\x64\InformationService\Config\srvboot.exe". The operating system reported error 2: The system cannot find the file specified.
This because a line is missing in the install.map file in the ConfigMgr\root folder. Just add the following line, and place it into the SMS_DMAPPSVC_CONTROL_MANAGER component of the file, to install it successfully: FILE <srvboot.exe><0><3667640>

After that the component will be installed succesfully!
Comment Jason Sandys: This is a known, but completely benign issue. It is annoying but ignorable in 1511. The product group are aware though and *may* issue a fix.
Source: Microsoft TechNet
Monday, February 22, 2016
Veeam Availability Suite v9 - Watch the webinar
Sponsor post
It’s here! Veeam Availability Suite v9 delivers Availability for the Always-On Enterprise by providing recovery time and point objectives (RTPO) of less than 15 minutes for ALL applications and data.

Watch the webinar to see what’s new in Veeam Availability Suite v9. We’ll show you how v9 helps you leverage modern storage and the cloud, and we’ll explore v9’s top features, including the following:
-EMC VNX and VNXe hybrid storage array integration
-Veeam Cloud Connect with replication
-Veeam Explorer for Oracle
-Unlimited Scale-out Backup Repository
-On-Demand Sandbox for Storage Snapshots
Duration: 53:59 / View slides
It’s here! Veeam Availability Suite v9 delivers Availability for the Always-On Enterprise by providing recovery time and point objectives (RTPO) of less than 15 minutes for ALL applications and data.

Watch the webinar to see what’s new in Veeam Availability Suite v9. We’ll show you how v9 helps you leverage modern storage and the cloud, and we’ll explore v9’s top features, including the following:
-EMC VNX and VNXe hybrid storage array integration
-Veeam Cloud Connect with replication
-Veeam Explorer for Oracle
-Unlimited Scale-out Backup Repository
-On-Demand Sandbox for Storage Snapshots
Duration: 53:59 / View slides
Friday, February 19, 2016
ConfigMgr 1602 for Technical Preview is available now!
Great news! as mentioned earlier this week, ConfigMgr 1602 for Technical Preview is available now!
New features that are available in this update include:
-Windows 10 Team configuration settings
-Automatic creation of Microsoft Office mobile apps for iOS and Android - Microsoft Office mobile apps for iOS and Android are pre-created for customers using ConfigMgr integrated with Microsoft Intune
-Sync Policy button – The new Sync Policy button lets you run the Machine Policy Retrieval & Evaluation Cycle and User Policy Retrieval & Evaluation Cycle with a click of a button. Find it in the Software Center options tab under Computer Maintenance
-In-place upgrade of ConfigMgr Site Server’s operating system – Support for ConfigMgr Site Server’s in-place upgrade of operating system from Windows Server 2008 R2 to Windows Server 2012 R2
-iOS Activation Lock management – Capabilities including enabling, querying for the status, retrieving bypass codes, and performing an Activation Lock bypass on corporate-owned iOS devices
Just install it in your LAB environment for testing purpose!
Source: ConfigMgr Team Blog
Other blogposts about this topic:
ConfigMgr 1602 tech preview and production release coming soon!
New features that are available in this update include:
-Windows 10 Team configuration settings
-Automatic creation of Microsoft Office mobile apps for iOS and Android - Microsoft Office mobile apps for iOS and Android are pre-created for customers using ConfigMgr integrated with Microsoft Intune
-Sync Policy button – The new Sync Policy button lets you run the Machine Policy Retrieval & Evaluation Cycle and User Policy Retrieval & Evaluation Cycle with a click of a button. Find it in the Software Center options tab under Computer Maintenance
-In-place upgrade of ConfigMgr Site Server’s operating system – Support for ConfigMgr Site Server’s in-place upgrade of operating system from Windows Server 2008 R2 to Windows Server 2012 R2
-iOS Activation Lock management – Capabilities including enabling, querying for the status, retrieving bypass codes, and performing an Activation Lock bypass on corporate-owned iOS devices
Just install it in your LAB environment for testing purpose!
Source: ConfigMgr Team Blog
Other blogposts about this topic:
ConfigMgr 1602 tech preview and production release coming soon!
Thursday, February 18, 2016
ConfigMgr 1602 tech preview and production release coming soon!
A few months ago ConfigMgr Current Branch (1511) is released, which is ConfigMgr-as-a-service. There will be new updates available for it multiple times a year. This the same as Windows 10, which is Window-as-a-service. Microsoft is doing a great job here!
When using ConfigMgr Technical Preview 4 there will be new updates already. This for the 1512 and 1601 update. More about this here:
Update 1512 now available in System Center Configuration Manager Technical Preview
Update 1601 now available in System Center Configuration Manager Technical Preview
 On twitter I received some great news too! There will be a ConfigMgr 1602 tech preview release soon. This followed by a 1602 production release next month. Sounds great to me :-)
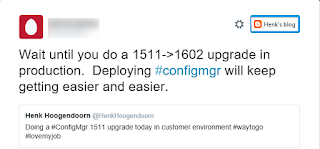 Hope that updates went better in future also. This because of some negative experience with ConfigMgr 2012 R2 SP1 and 1511 updates. On twitter I received another great message: Deploying ConfigMgr will keep getting easier and easier :-)
Let's say: I'm very curious about upcoming releases!
Other blogposts about this topic:
Doing a ConfigMgr 1511 upgrade (Notes from the field)
Doing a ConfigMgr 2012 R2 SP1 upgrade (Notes from the field)
When using ConfigMgr Technical Preview 4 there will be new updates already. This for the 1512 and 1601 update. More about this here:
Update 1512 now available in System Center Configuration Manager Technical Preview
Update 1601 now available in System Center Configuration Manager Technical Preview


Let's say: I'm very curious about upcoming releases!
Other blogposts about this topic:
Doing a ConfigMgr 1511 upgrade (Notes from the field)
Doing a ConfigMgr 2012 R2 SP1 upgrade (Notes from the field)
Tuesday, February 16, 2016
Issue: Management Point not responding to HTTP requests (error 500)
Recently I did an upgrade of a ConfigMgr 2012 R2 SP1 environment to ConfigMgr Current Branch (1511). I did the following upgrades during the day (with some time and checks between them):
ConfigMgr server (1):
-Windows Server 2012 to Windows Server 2012 R2
SQL server (1):
-Windows Server 2012 to Windows Server 2012 R2
-SQL server 2008 R2 SP2 CU4 to SQL Server 2014 SP1
Site systems (3):
-Windows Server 2012 to Windows Server 2012 R2
ConfigMgr server (1):
ConfigMgr 2012 R2 SP1 to ConfigMgr Current Branch (1511)
This based on the following recommendations:
-ConfigMgr supports an in-place upgrade of the Operating System of the site server in the following situations: In-place upgrade from Windows Server 2012 to Windows Server 2012 R2
-When your version of ConfigMgr supports SQL Server 2014, ConfigMgr supports the in-place upgrade of SQL Server to SQL Server 2014 with the following limitations: Each ConfigMgr site must run a version of ConfigMgr that supports using SQL Server 2014 before you can upgrade to SQL Server 2014 at any site.
Source: Supported Upgrade Paths for Configuration Manager
 After this upgrade(s), where everything did go fine, the default management wouldn't start anymore. This because of the error: HttpSendRequestSync failed for port 80 with status code 500 (mpcontrol.log).
 Furthermore the Application Catalog didn't function also anymore. This because of the error: Component file list item in the install map for component SMS_DMAPPSVC_CONTROL_MANAGER does not contain srvboot.exe (sitecomp.log).
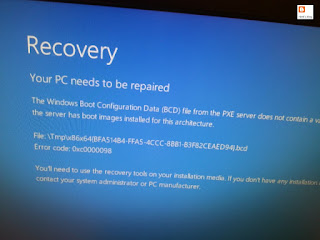 I did also get a error message during deployment: The Windows Boot configuration data file does not contain a valid OS Entry. Error code: 0xc0000098. Let's say: I wasn't amused here :-)
I did the following actions on the site system:
-Removed the management point and install it again
-Restarted MP component(s) in ConfigMgr Service Manager
-Restarted DP component(s) in ConfigMgr Service Manager
-Removed ASP.NET 4.5 (IIS) and install it again
-Checked if "Enable 32-Bit Applications" (IIS) was set to FALSE
-Removed both Application Catalog roles (still uninstalled)
-Checked if MP computer account is a member of MP Role (msdbrole_MP) in the SQL database.
-Restarted both ConfigMgr and SQL servers
But what I did, the error message came back everytime. In the end I removed the management point, and installed a new one on another server. This one was working immediately. Does anyone has a clue to resolve this at later time? Hope that the management point can be restored to the original location later!
This drives my crazy for multiple days now..
More websites about this topic:
The Windows Boot configuration data file does not contain a valid OS Entry
MP Control Manager detected management point is not responding to HTTP requests
SCCM MP Internal Server Error ISS Call to HttpSendRequestSync failed for port 80 with status code 500
Update 17-2: Thanks for comments already!
-The management point can be fixed when both MP and IIS role are removed. Reinstall them should be the solution. (to be continued)
-The application catalog can be fixed when copying the line "FILE <srvboot.exe><0><3667640>" and placed it into the SMS_DMAPPSVC_CONTROL_MANAGER component of install.map.
 Update 2-3: After removing both roles (management point and application catalog) I removed IIS (and BITS) completely for the ConfigMgr server. After a required reboot I installed IIS (and BITS) again. After that both roles were installed successfully at first try. IIS re-install did it again :-)
ConfigMgr server (1):
-Windows Server 2012 to Windows Server 2012 R2
SQL server (1):
-Windows Server 2012 to Windows Server 2012 R2
-SQL server 2008 R2 SP2 CU4 to SQL Server 2014 SP1
Site systems (3):
-Windows Server 2012 to Windows Server 2012 R2
ConfigMgr server (1):
ConfigMgr 2012 R2 SP1 to ConfigMgr Current Branch (1511)
This based on the following recommendations:
-ConfigMgr supports an in-place upgrade of the Operating System of the site server in the following situations: In-place upgrade from Windows Server 2012 to Windows Server 2012 R2
-When your version of ConfigMgr supports SQL Server 2014, ConfigMgr supports the in-place upgrade of SQL Server to SQL Server 2014 with the following limitations: Each ConfigMgr site must run a version of ConfigMgr that supports using SQL Server 2014 before you can upgrade to SQL Server 2014 at any site.
Source: Supported Upgrade Paths for Configuration Manager


I did the following actions on the site system:
-Removed the management point and install it again
-Restarted MP component(s) in ConfigMgr Service Manager
-Restarted DP component(s) in ConfigMgr Service Manager
-Removed ASP.NET 4.5 (IIS) and install it again
-Checked if "Enable 32-Bit Applications" (IIS) was set to FALSE
-Removed both Application Catalog roles (still uninstalled)
-Checked if MP computer account is a member of MP Role (msdbrole_MP) in the SQL database.
-Restarted both ConfigMgr and SQL servers
But what I did, the error message came back everytime. In the end I removed the management point, and installed a new one on another server. This one was working immediately. Does anyone has a clue to resolve this at later time? Hope that the management point can be restored to the original location later!
This drives my crazy for multiple days now..
More websites about this topic:
The Windows Boot configuration data file does not contain a valid OS Entry
MP Control Manager detected management point is not responding to HTTP requests
SCCM MP Internal Server Error ISS Call to HttpSendRequestSync failed for port 80 with status code 500
Update 17-2: Thanks for comments already!
-The management point can be fixed when both MP and IIS role are removed. Reinstall them should be the solution. (to be continued)
-The application catalog can be fixed when copying the line "FILE <srvboot.exe><0><3667640>" and placed it into the SMS_DMAPPSVC_CONTROL_MANAGER component of install.map.

Tuesday, February 9, 2016
Remove default Apps from Windows 10 during deployment
After a clean Windows 10 deployment, the image contains a lot of default apps. Within the Enterprise edition you can think about Solitaire, Candy Crush and Minecraft. You can remove them (per user) when combining them in a PowerShell script and execute it during user logon. The following cmdlets can be used to remove them:
 Get-AppxPackage | select packagefullname (This will generate a list of all apps installed)
Get-AppxPackage *<APPX package name>* | Remove-AppxPackage (This will remove apps installed for the current user)
Get-AppxPackage -User <user> *<APPX package name>* | Remove-AppxPackage (This will remove apps installed for a specific user)
Get-AppxPackage -AllUsers <user> *<APPX package name>* | Remove-AppxPackage (This will remove apps installed for all users)
 Create a PowerShell script with all lines needed and put it in Group Policy. Then default apps will be removed when the user logons. Nice too see that Windows 10 can be fully managed this way.
There's a PowerShell script available too, which can remove default apps from the WIM image, instead of using it during a task sequence. You can find it in the Microsoft TechNet Gallery.

Get-AppxPackage *<APPX package name>* | Remove-AppxPackage (This will remove apps installed for the current user)
Get-AppxPackage -User <user> *<APPX package name>* | Remove-AppxPackage (This will remove apps installed for a specific user)
Get-AppxPackage -AllUsers <user> *<APPX package name>* | Remove-AppxPackage (This will remove apps installed for all users)

There's a PowerShell script available too, which can remove default apps from the WIM image, instead of using it during a task sequence. You can find it in the Microsoft TechNet Gallery.
Thursday, February 4, 2016
New Veeam Availability Suite v9 is here
Sponsor post
Veeam is happy to announce that Veeam Availability Suite v9 is now generally available (GA) and ready for download! This latest version is packed with so many new features that it's difficult to talk about them all on this blog, but I highly recommend you check out the What's New in Veeam Backup & Replication v9 document because it's packed with details about all the new things we've up into v9 (read also What's New in Veeam ONE v9).

Veeam Availability Suite delivers something fundamentally different — Availability for the Always-On Enterprise — leveraging IT investments in server virtualization, modern storage and the cloud.
Veeam Availability Suite combines the industry-leading backup, restore and replication capabilities of Veeam Backup & Replication with the advanced monitoring, reporting and capacity planning functionality of Veeam ONE. It delivers everything you need to reliably ensure and manage your VMware vSphere and Microsoft Hyper-V environments, providing you with a high Availability data center.
For more have a look at there posts:
Veeam products: Availability for the Always-On Enterprise
Veeam Backup & Replication. What’s New in v9? (PDF)
Veeam Availability Suite blog: v9 is HERE!
Happy reading!
Veeam is happy to announce that Veeam Availability Suite v9 is now generally available (GA) and ready for download! This latest version is packed with so many new features that it's difficult to talk about them all on this blog, but I highly recommend you check out the What's New in Veeam Backup & Replication v9 document because it's packed with details about all the new things we've up into v9 (read also What's New in Veeam ONE v9).

Veeam Availability Suite delivers something fundamentally different — Availability for the Always-On Enterprise — leveraging IT investments in server virtualization, modern storage and the cloud.
Veeam Availability Suite combines the industry-leading backup, restore and replication capabilities of Veeam Backup & Replication with the advanced monitoring, reporting and capacity planning functionality of Veeam ONE. It delivers everything you need to reliably ensure and manage your VMware vSphere and Microsoft Hyper-V environments, providing you with a high Availability data center.
For more have a look at there posts:
Veeam products: Availability for the Always-On Enterprise
Veeam Backup & Replication. What’s New in v9? (PDF)
Veeam Availability Suite blog: v9 is HERE!
Happy reading!
Wednesday, February 3, 2016
Doing a ConfigMgr 1511 upgrade (Notes from the field)
Recently I did an ConfigMgr 1511 upgrade, where earlier upgrades and clean installs went fine. But this one was a bit different; more like the ConfigMgr 2012 R2 SP1 upgrade before. Before you begin just make sure you have a good backup! Most of time I start with a ConfigMgr backup and snapshot of ConfigMgr and SQL VM's. Better safe then sorry :-)
Then start the 1511 media, it will be finished in around 30 minutes. The crazy part is starting after that. ConfigMgr isn't done with the upgrade (like the 2012 R2 SP1 upgrade before), but running tasks in the background. Strange enough it's hard to see what's the status of that, and sometime it's stuck too and a reboot (or multiple reboots) are needed. Let's have a look again.
When the upgrade wizard is finished and you start the ConfigMgr console, have a look at Site & System status. The MP will be down for almost one hour. When looking at Software Library the ConfigMgr client package and boot images are not updated yet. Because of that OS deployment isn't possible too. Sometimes it will be started automatically within one hour, sometimes a reboot is needed to start processing again. A nasty situation for sure.
Installation progress in short:
As I sayed earlier, it can take on hour before the Management point is healthy again and Site Components are back in business. It may help to reboot the Primary server once (or twice), when there's no progress seen (recommended only when nothing changed after one hour). After the reboot you will see that functionality is restored soon! When looking at Software Library the ConfigMgr client package and boot images will be updated now. Still it's a nasty upgrade, because you think it's done in 30 minutes, and not one hour after that.
Have a look in mpsetup.log for successful status:
-Installing the SMSMP
-Passed OS version check.
-IIS Service is installed.
-SMSMP already installed (Product Code: {861C35CB-8117-469B-A847-D948AEE1F507}). Upgrading/Reinstalling SMSMP
-New SMSMP is a new product code {{2627B2A8-5D52-4AE0-87D1-0CCF0145FB3F}}. This is a major upgrade.
-Enabling MSI logging. mp.msi will log to D:\Program Files\Microsoft Configuration Manager\logs\mpMSI.log
-Installing D:\Program Files\Microsoft Configuration Manager\bin\x64\mp.msi <parameters>
-mp.msi exited with return code: 0
-Installation was successful.
-~RoleSetup().
After successful management point setup, the client package couldn't be updated: No action specified for the package <?>, however there may be package server changes for this package.
Therefore I did another update on the package as well. This time it went fine: Successfully created/updated the package server in the data source. After that deployment is possible again.
Why not mention in the wizard, installation is not finished and will take another hour? Or count another hour on the wizard and finish it in 60-90 minutes, instead of running tasks in the background? I guess this can be better with future releases. Hope it helps!
Update 11-2: As Torsten mentioned in comments: This has always been the case: "ConfigMgr isn't done with the upgrade ... but running tasks in the background" - even for CUs or SPs. Just monitor sitecomp.log instead of rebooting the server.
Once the UI is done, in the background the Site Component Manager is kicking off and re-installing all components, and Site systems needs to be re-installed. This can take multiple hours, so prepare for that. Check sitecomp.log for progress on this.
It's preferred to Check the database before doing a ConfigMgr upgrade as well. Happy upgrading! :-)
Then start the 1511 media, it will be finished in around 30 minutes. The crazy part is starting after that. ConfigMgr isn't done with the upgrade (like the 2012 R2 SP1 upgrade before), but running tasks in the background. Strange enough it's hard to see what's the status of that, and sometime it's stuck too and a reboot (or multiple reboots) are needed. Let's have a look again.
When the upgrade wizard is finished and you start the ConfigMgr console, have a look at Site & System status. The MP will be down for almost one hour. When looking at Software Library the ConfigMgr client package and boot images are not updated yet. Because of that OS deployment isn't possible too. Sometimes it will be started automatically within one hour, sometimes a reboot is needed to start processing again. A nasty situation for sure.
Installation progress in short:
 |
| Management point in critical state |
 |
| No Site Components available |
 |
| SMS Replication Configuration Monitor |
 |
| Management Point installed after reboot |
Have a look in mpsetup.log for successful status:
-Installing the SMSMP
-Passed OS version check.
-IIS Service is installed.
-SMSMP already installed (Product Code: {861C35CB-8117-469B-A847-D948AEE1F507}). Upgrading/Reinstalling SMSMP
-New SMSMP is a new product code {{2627B2A8-5D52-4AE0-87D1-0CCF0145FB3F}}. This is a major upgrade.
-Enabling MSI logging. mp.msi will log to D:\Program Files\Microsoft Configuration Manager\logs\mpMSI.log
-Installing D:\Program Files\Microsoft Configuration Manager\bin\x64\mp.msi <parameters>
-mp.msi exited with return code: 0
-Installation was successful.
-~RoleSetup().
 |
| Site Components back again |
 |
| CM Client package cannot be updated |
After successful management point setup, the client package couldn't be updated: No action specified for the package <?>, however there may be package server changes for this package.
 |
| CM Client package updated manually |
Therefore I did another update on the package as well. This time it went fine: Successfully created/updated the package server in the data source. After that deployment is possible again.
Update 11-2: As Torsten mentioned in comments: This has always been the case: "ConfigMgr isn't done with the upgrade ... but running tasks in the background" - even for CUs or SPs. Just monitor sitecomp.log instead of rebooting the server.
Once the UI is done, in the background the Site Component Manager is kicking off and re-installing all components, and Site systems needs to be re-installed. This can take multiple hours, so prepare for that. Check sitecomp.log for progress on this.
It's preferred to Check the database before doing a ConfigMgr upgrade as well. Happy upgrading! :-)
Thursday, January 28, 2016
Shrink your Windows server and client images
When creating Windows images with lot's of updates, it's possible to shrink them before or after capturing the image. When deploying systems with less free disk space (like thin clients) this may be needed to fit. The DISM tool contains multiple servicing commands related to the component store (or the WINSXS directory). This location is used during servicing operations within Windows installations. Servicing operations include, but are not limited to, Windows Update, service pack, and hotfix installations.
The component store contains all the files that are required for a Windows installation. And, any updates to those files are also held within the component store as the updates are installed. This causes the component store to grow over time as more updates, features, or roles are added to the installation. The component store uses NTFS hard links between itself and other Windows directories to increase the robustness of the Windows platform.
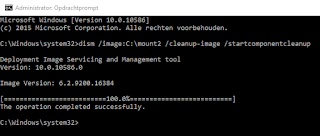 The following commands can be used to shrink Windows installations and/or WIM images:
When creating a reference image use the online command:
Dism.exe /online /Cleanup-Image /StartComponentCleanup
Dism.exe /online /Cleanup-Image /StartComponentCleanup /ResetBase
Dism.exe /online /Cleanup-Image /SPSuperseded
When the image is already created, mount it and use the offline command:
Dism /image:<path> /Cleanup-Image /StartComponentCleanup
You can also run the following command to check the status of the Component Store:
Dims.exe /Online /Cleanup-Image /AnalyzeComponentStore
This can save multiple gigabytes on the image size!
For more information:
Clean Up the WinSxS Folder
How to address disk space issues that are caused by a large Windows component store (WinSxS) directory
How to Clean up the WinSxS Directory and Free Up Disk Space on Windows Server 2008 R2 with New Update
The component store contains all the files that are required for a Windows installation. And, any updates to those files are also held within the component store as the updates are installed. This causes the component store to grow over time as more updates, features, or roles are added to the installation. The component store uses NTFS hard links between itself and other Windows directories to increase the robustness of the Windows platform.

When creating a reference image use the online command:
Dism.exe /online /Cleanup-Image /StartComponentCleanup
Dism.exe /online /Cleanup-Image /StartComponentCleanup /ResetBase
Dism.exe /online /Cleanup-Image /SPSuperseded
When the image is already created, mount it and use the offline command:
Dism /image:<path> /Cleanup-Image /StartComponentCleanup
You can also run the following command to check the status of the Component Store:
Dims.exe /Online /Cleanup-Image /AnalyzeComponentStore
This can save multiple gigabytes on the image size!
For more information:
Clean Up the WinSxS Folder
How to address disk space issues that are caused by a large Windows component store (WinSxS) directory
How to Clean up the WinSxS Directory and Free Up Disk Space on Windows Server 2008 R2 with New Update
Friday, January 22, 2016
Managing Group Policy for Windows 10
With every new Operating System, there will be new policy definitions available. With Windows 10 however, there may be new policies coming with a new build too. For example, when looking at Administrative Templates (.admx) for Windows 10, you can download the RTM version and 1511 version as well. There is a Windows 10 ADMX spreadsheet available too.
Just download the new ADMX files, install them on a server and copy the files (including language files) to your local or central Sysvol - PolicyDefinitions location. All existing files may be overwritten, older files will still be available. For more details on central store: Have a look at this post.
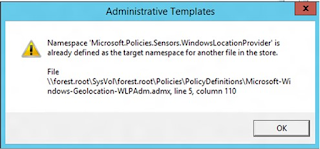 Just be aware of the following issue: Namespace is already defined error when you edit a policy in Windows.
This issue occurs because the LocationProviderADM.admx file was renamed as Microsoft-Windows-Geolocation-WLPAdm.admx in Windows 10. After you copy the .admx files from Windows 10 to a central store that contains a LocationProviderADM.ADMX file that is from an earlier release of Windows, there are two .admx files that contain the same settings but have different names. Therefore, the "namespace is already defined" error is received.
The solution for this is really easy:
1. Delete (or rename!) the LocationProviderADM.admx and LocationProviderADM.adml files from the central store.
2. Rename Microsoft-Windows-Geolocation-WLPAdm.admx to LocationProviderADM.admx
3. Rename Microsoft-Windows-Geolocation-WLPAdm.adml to LocationProviderADM.adml
After implementing new policy definitions, and using above solution, everything works fine! Just remember: With every new Windows 10 build, there may be new policies as well.
Happy configuring!
Just download the new ADMX files, install them on a server and copy the files (including language files) to your local or central Sysvol - PolicyDefinitions location. All existing files may be overwritten, older files will still be available. For more details on central store: Have a look at this post.

This issue occurs because the LocationProviderADM.admx file was renamed as Microsoft-Windows-Geolocation-WLPAdm.admx in Windows 10. After you copy the .admx files from Windows 10 to a central store that contains a LocationProviderADM.ADMX file that is from an earlier release of Windows, there are two .admx files that contain the same settings but have different names. Therefore, the "namespace is already defined" error is received.
The solution for this is really easy:
1. Delete (or rename!) the LocationProviderADM.admx and LocationProviderADM.adml files from the central store.
2. Rename Microsoft-Windows-Geolocation-WLPAdm.admx to LocationProviderADM.admx
3. Rename Microsoft-Windows-Geolocation-WLPAdm.adml to LocationProviderADM.adml
After implementing new policy definitions, and using above solution, everything works fine! Just remember: With every new Windows 10 build, there may be new policies as well.
Happy configuring!
Thursday, January 14, 2016
Jalasoft announces Xian Network Manager v7
Sponsor post
For more than ten years Jalasoft has been supporting Microsoft System Center Operations Manager (SCOM). Today this is coming to an end. Jalasoft decided to disconnect their flagship product, Xian Network Manager.
The next version Xian NM v7, will no longer connect with SCOM, will run on Linux Ubuntu and use PostgreSQL as the main repository. This all with the goal to make System Monitoring affordable for the home market Jalasoft is located, Bolivia and Latin America.
Xian NM v7 will contain all the monitoring power for network devices that the previous versions had and on top of that it will monitor now also other parts of your infrastructure such as desktops, servers, generators. The big thing now is that you do not need SCOM anymore, Xian NM v7 works completely on its own. It is the perfect tool to start monitoring your environment.
Jalasoft has grown in the past 15 years from a small 6 person company to over 600 people, making it the biggest software company in its kind in South America. With customer all over the world, we feel it is time that South American businesses have access to qualitative and affordable IT solutions.
Have a look here for more information.
For more than ten years Jalasoft has been supporting Microsoft System Center Operations Manager (SCOM). Today this is coming to an end. Jalasoft decided to disconnect their flagship product, Xian Network Manager.
The next version Xian NM v7, will no longer connect with SCOM, will run on Linux Ubuntu and use PostgreSQL as the main repository. This all with the goal to make System Monitoring affordable for the home market Jalasoft is located, Bolivia and Latin America.
Xian NM v7 will contain all the monitoring power for network devices that the previous versions had and on top of that it will monitor now also other parts of your infrastructure such as desktops, servers, generators. The big thing now is that you do not need SCOM anymore, Xian NM v7 works completely on its own. It is the perfect tool to start monitoring your environment.
Jalasoft has grown in the past 15 years from a small 6 person company to over 600 people, making it the biggest software company in its kind in South America. With customer all over the world, we feel it is time that South American businesses have access to qualitative and affordable IT solutions.
Have a look here for more information.
Monday, January 11, 2016
New projects coming with lots off cool stuff

Expect multiple blogposts about my experiences soon. Azure cloud and Enterprise mobility Suite is the way to go! Microsoft is bringing cool features here :) #lovemyjob
Thursday, January 7, 2016
Why there is no free Display Dock offer for Lumia 950 owners?
Why would Microsoft offer a new Display Dock to 950XL owners and not for people like me who purchased the 950 model. I don't want to hold a 5.7" Phone daily, just because of the free Display Dock offer. (I guess most people ordered the 950XL for that one?)

The Lumia 950XL has benefits enough for $100 extra:
-5.7" display
-Gorilla Glass 4
-Qualcomm Snapdragon 810
-3340mAh battery
Still pity because I don’t want to spend another $99 just to try the Continuum feature. Colleagues asking me about the feature a lot, but cannot show it to them. A missed oppurtunity if you ask me!
Expect a personal review for the Lumia 950 soon. (and hopefully for the Continuum feature at a later time)

-5.7" display
-Gorilla Glass 4
-Qualcomm Snapdragon 810
-3340mAh battery
Still pity because I don’t want to spend another $99 just to try the Continuum feature. Colleagues asking me about the feature a lot, but cannot show it to them. A missed oppurtunity if you ask me!
Expect a personal review for the Lumia 950 soon. (and hopefully for the Continuum feature at a later time)
Wednesday, January 6, 2016
Choosing between BIOS (Legacy) or UEFI during deployment
When deploying new systems with ConfigMgr you can choose between BIOS (Legacy) or UEFI mode. Since Windows 8 UEFI it's recommended because of security (SecureBoot) and faster OS loading. Therefore I prefer UEFI above of BIOS in Windows 8.x and Windows 10. When looking for UEFI setup have a look at this blogpost: PXE Boot files in RemoteInstall folder explained (UEFI)
When option 60 is missing in DHCP use the following commands:
-C:\WINDOWS\system32>netsh
-netsh>dhcp
-netsh dhcp>server \\<server_machine_name>
-netsh dhcp>add optiondef 60 PXEClient String 0 comment="PXE support"
-netsh dhcp>set optionvalue 60 STRING PXEClient
-netsh dhcp>exit
A Server Option is added after that, which is active on all scopes.
When the message Waiting for Approval is displayed after that do the following:
-Start Windows Deployment Services
-Start Properties on WDS server
-Go to the "PXE Response" tab
-Change PXE Response Policy to "Respond to all client computers"
After that UEFI deployment will be working fine :-)
Hope it helps!
When option 60 is missing in DHCP use the following commands:
-C:\WINDOWS\system32>netsh
-netsh>dhcp
-netsh dhcp>server \\<server_machine_name>
-netsh dhcp>add optiondef 60 PXEClient String 0 comment="PXE support"
-netsh dhcp>set optionvalue 60 STRING PXEClient
-netsh dhcp>exit
A Server Option is added after that, which is active on all scopes.
When the message Waiting for Approval is displayed after that do the following:
-Start Windows Deployment Services
-Start Properties on WDS server
-Go to the "PXE Response" tab
-Change PXE Response Policy to "Respond to all client computers"
After that UEFI deployment will be working fine :-)
Hope it helps!
Monday, January 4, 2016
The Windows Boot configuration data file does not contain a valid OS Entry
When starting OS deployment from ConfigMgr you get the following error message: The Windows Boot configuration data file does not contain a valid OS Entry. This because Windows Deployment Services (WDS) has been manually configured at some point. The best course of action at this point is to reset the installation of WDS by reinstalling the PXE Service Point and WDS.
 What also can be the cause is that deployment is started on an unknown system, and Enable Unknown computer support isn't checked at the Distribution Point settings. Just select this option and deploy a task sequence to All Unknown Computers collection too. After that your headache will be gone :-)
Source: Gerry Hampson Device Management (comments)

Source: Gerry Hampson Device Management (comments)
Wednesday, December 30, 2015
Happy New Year (2016)
From Henk's blog (and sponsors) we wish you all a Happy New Year! Thanks for visiting my blog, and hope you liked all information last year about Microsoft System Center and Microsoft Intune.


Expect more to come in 2016 again!
#HappyHolidays


Expect more to come in 2016 again!
#HappyHolidays
Wednesday, December 23, 2015
Doing a ConfigMgr 2012 R2 to 1511 migration on another server
Recently I did a ConfigMgr 2012 R2 to 1511 migration. Case is, it was needed to be installed on a new server. This new server has a different computername and IP-address and different partitions as well. When you want to recover an existing ConfigMgr installation, you need to have a server with the same computername, IP-address and partitions too. Therefore I have choosen not to re-use the ConfigMgr back-up, but using migrations tools.
Let's have a look at current situation first. The existing server is build on Windows Server 2008 R2, SQL Server 2008 R2 and ConfigMgr 2012 R2, where the Primary server installation is separated from SQL installation. You may upgrade SQL Server in-place with Microsoft support, but an in-place Windows Server upgrade is not supported. Therefore a new server with a current (2012 R2) server installation is needed. When using Windows Server 2012 an in-place upgrade to 2012 R2 is supported. Otherwise not!
When building a new server, and there's a need to use the existing ConfigMgr database, the computername, IP-address and partitions must be same. Because I want to change the name and partition both, recovery is not possible. Therefore I used a new server build on Windows Server 2012 R2, SQL Server 2014 SP1 and and ConfigMgr 1511. During installation a new Site code and name is requested. The existing name cannot be re-used.
After installation start the migration tools, and migrate all objects needed to the new server.Remember you cannot migrate collections when coming from ConfigMgr 2012. For some reason that is possible only from ConfigMgr 2007 environments. Other objects migrate fine indeed. After migration remember to update ConfigMgr client too, so management can be done from the new server.
 All went fine during this migration. Hope it helps!
Update 28-12-2015: Within the Object migration task, collections can be selected as well. As asked by Conor O'Farrell within the comments, both deployments and collections can be migrated successfully. On my software package however the program was disabled after migration, without the possibility to enable it during migration. So yes, you can migrate all stuff needed from ConfigMgr 2012 R2 to 1511. Just great!
Sources used:
Backup and Recovery in Configuration Manager
How to move the ConfigMgr 2012 site database to a new SQL server
Supported configurations for System Center Configuration Manager
Planning a Migration Job Strategy in System Center 2012 Configuration Manager
Let's have a look at current situation first. The existing server is build on Windows Server 2008 R2, SQL Server 2008 R2 and ConfigMgr 2012 R2, where the Primary server installation is separated from SQL installation. You may upgrade SQL Server in-place with Microsoft support, but an in-place Windows Server upgrade is not supported. Therefore a new server with a current (2012 R2) server installation is needed. When using Windows Server 2012 an in-place upgrade to 2012 R2 is supported. Otherwise not!
When building a new server, and there's a need to use the existing ConfigMgr database, the computername, IP-address and partitions must be same. Because I want to change the name and partition both, recovery is not possible. Therefore I used a new server build on Windows Server 2012 R2, SQL Server 2014 SP1 and and ConfigMgr 1511. During installation a new Site code and name is requested. The existing name cannot be re-used.
After installation start the migration tools, and migrate all objects needed to the new server.

Update 28-12-2015: Within the Object migration task, collections can be selected as well. As asked by Conor O'Farrell within the comments, both deployments and collections can be migrated successfully. On my software package however the program was disabled after migration, without the possibility to enable it during migration. So yes, you can migrate all stuff needed from ConfigMgr 2012 R2 to 1511. Just great!
Sources used:
Backup and Recovery in Configuration Manager
How to move the ConfigMgr 2012 site database to a new SQL server
Supported configurations for System Center Configuration Manager
Planning a Migration Job Strategy in System Center 2012 Configuration Manager
Thursday, December 17, 2015
How to remove Windows and Office updates with ConfigMgr
I'm using ConfigMgr for patch management a lot, however sometimes there are updates that needs to be removed as well. Within ConfigMgr you can use 'Edit membership' to remove already deployed updates from existing Software Update Groups, but what to do when updates are installed on systems already? Interesting question and there is a solution for this as well.
When Windows updates are deployed already, do the following:
-Create a new custom task sequence
-Add a Run command line step in it
-Use the command: C:\Windows\System32\wusa.exe /uninstall /kb:<kb number>/quiet /norestart in it
-Deploy the task sequence to your systems
 When Office updates are deployed however, the proces will be a little different:
-Create a new custom task sequence
-Add a Run command line step in it
-But now it comes:
Start regedit and do a search on the kb number. This can be found in HKLM\ Software\ Microsoft\ Windows\ CurrentVersion\ Uninstall\ for x86 systems and HKLM\ Software\ WOW6432Node\ Microsoft\ Windows\ CurrentVersion\ Uninstall\ for x64 systems.
Have a look for the Uninstallstring there, which is like: "C:\Program Files (x86)\Common Files\Microsoft Shared\OFFICE15\Oarpmany.exe" /removereleaseinpatch "{GUID1}" "{GUID2}" "1033" "0"
-Use both GUIDs and use them in the following command line: msiexec /package {GUID1} MSIPATCHREMOVE={GUID2} /qb /norestart
-Deploy the task sequence to your systems
After that the Windows and/or Office update will be removed succesfully!
Source: Teh Wei King
When Windows updates are deployed already, do the following:
-Create a new custom task sequence
-Add a Run command line step in it
-Use the command: C:\Windows\System32\wusa.exe /uninstall /kb:<kb number>/quiet /norestart in it
-Deploy the task sequence to your systems

-Create a new custom task sequence
-Add a Run command line step in it
-But now it comes:
Start regedit and do a search on the kb number. This can be found in HKLM\ Software\ Microsoft\ Windows\ CurrentVersion\ Uninstall\ for x86 systems and HKLM\ Software\ WOW6432Node\ Microsoft\ Windows\ CurrentVersion\ Uninstall\ for x64 systems.
Have a look for the Uninstallstring there, which is like: "C:\Program Files (x86)\Common Files\Microsoft Shared\OFFICE15\Oarpmany.exe" /removereleaseinpatch "{GUID1}" "{GUID2}" "1033" "0"
-Use both GUIDs and use them in the following command line: msiexec /package {GUID1} MSIPATCHREMOVE={GUID2} /qb /norestart
-Deploy the task sequence to your systems
After that the Windows and/or Office update will be removed succesfully!
Source: Teh Wei King
Subscribe to:
Posts (Atom)