When deploying Windows 8.x with MDT or ConfigMgr, deployment may stop at the network selection screen. When press Connect in the selection screen, deployment will continue. Within this blogpost I show you how to skip network selection.
Within MDT:
The CustomSettings.ini (which can be found on Properties, Rules on the Deployment Share) needs to be changed as follows:
<OOBE>
<HideEULAPage>true</HideEULAPage>
<NetworkLocation>Work</NetworkLocation>
<ProtectYourPC>1</ProtectYourPC>
<HideLocalAccountScreen>true</HideLocalAccountScreen>
<HideOnlineAccountScreens>true</HideOnlineAccountScreens>
<HideWirelessSetupInOOBE>true</HideWirelessSetupInOOBE>
</OOBE>
Within ConfigMgr:
The unattend file (additional file which can be used in the Apply Operating System step) needs to be changed as follows:
<?xml version="1.0" encoding="utf-8"?>
<unattend xmlns="urn:schemas-microsoft-com:unattend"> <settings pass="oobeSystem">
<component name="Microsoft-Windows-Shell-Setup" processorArchitecture="amd64" publicKeyToken="31bf3856ad364e35" language="neutral" versionScope="nonSxS" xmlns:wcm="http://schemas.microsoft.com/WMIConfig/2002/State" xmlns:xsi="http://www.w3.org/2001/XMLSchema-instance">
<OOBE>
<HideEULAPage>true</HideEULAPage>
<HideWirelessSetupInOOBE>true</HideWirelessSetupInOOBE>
<NetworkLocation>Work</NetworkLocation>
<HideOnlineAccountScreens>true</HideOnlineAccountScreens>
<HideOEMRegistrationScreen>true</HideOEMRegistrationScreen>
<HideLocalAccountScreen>true</HideLocalAccountScreen>
</OOBE>
<RegisteredOwner>Microsoft</RegisteredOwner>
</component>
</settings>
<cpi:offlineImage cpi:source="" xmlns:cpi="urn:schemas-microsoft-com:cpi" />
</unattend>
For x86 systems, change "amd64" in "x86" to get the job done.
Source locations:
Windows 8.1 deployment in MDT 2013
Windows 8.1 prompting for network (some lines missing)
When using the script from TechNet, the red lines are missing. Therefore an error message is displayed during mini-setup (about /unattend) and deployment stops on that point. Now way you can pass a deployment error during mini-setup, so just use the unattend file mentioned here. Hope it helps!
Friday, March 6, 2015
Network selection during Windows 8.x deployment in MDT and ConfigMgr
Labels:
ConfigMgr,
CustomSettings.ini,
Deployment,
MDT,
Network,
Network selection,
OOBE,
Unattend.xml,
Windows 8,
Windows 8.1
Wednesday, March 4, 2015
Deploy multiple packages using Dynamic Variables in a Task Sequence
When deploying packages within a task sequence you can add multiple steps with a single package in every step. When deploying lots of packages, the task sequence will be very large. There is however an alternative, using "Install software packages according to dynamic variable list". That way you can use a single step for as many packages you want. Just configure the following steps:
-Create a collection and add Collection Variables on it. Name must be APP001, APP002, APP003 (for example) and so on. Value must be the package ID value and Program installation name (which is Install in my case). Add as many packages needed.
-In the task sequence add a "Install package" step and choose for "Install software packages according to dynamic variable list": APP (for example). Mark "If installation of a software package fails, continue installing other packages in the list" when needed.
-Just make sure that on every package used, "Allow this program to be installed from the install package task without being deployed" is checked. Otherwise a 80004005 error will follow during deployment.
(instead of APP you can use any name you want, as long as numbers are used. The name used in task sequence must be same.)
Deploy the task sequence on the created collection. All packages will get deployed in a sequence based on the numbering of the collection variables choosed. Just another way for installing packages ;)
In my case I'm installing multiple packages in a single step. Not a problem at all, and very easy to configure.
More blogposts on this topic:
Deploy multiple applications using Dynamic Variables in a Task Sequence
-Create a collection and add Collection Variables on it. Name must be APP001, APP002, APP003 (for example) and so on. Value must be the package ID value and Program installation name (which is Install in my case). Add as many packages needed.
-In the task sequence add a "Install package" step and choose for "Install software packages according to dynamic variable list": APP (for example). Mark "If installation of a software package fails, continue installing other packages in the list" when needed.
-Just make sure that on every package used, "Allow this program to be installed from the install package task without being deployed" is checked. Otherwise a 80004005 error will follow during deployment.
(instead of APP you can use any name you want, as long as numbers are used. The name used in task sequence must be same.)
Deploy the task sequence on the created collection. All packages will get deployed in a sequence based on the numbering of the collection variables choosed. Just another way for installing packages ;)
In my case I'm installing multiple packages in a single step. Not a problem at all, and very easy to configure.
More blogposts on this topic:
Deploy multiple applications using Dynamic Variables in a Task Sequence
Friday, February 27, 2015
How to use the same external ethernet adapter for multiple systems
When doing deployment on modern ultrabooks or devices like Microsoft Surface, no ethernet adapter is build in. You must use external adapters by using USB connected to have the same behavior. When using multiple cables however, or using the same ethernet adapter for multiple devices, ConfigMgr is going crazy. When that happens it's good to know that SMBIOS GUID's can be used as well instead of using a MAC address. Let's have a read on that one.
The MAC address of a network interface is its unique identifier. Think of it as the serial number of that network interface. When switching network interfaces between devices, MAC addresses wil change also. Therefore we need a SMBIOS GUID. ConfigMgr 2012 uses SMBIOS to identify computers, and falls back to MAC addresses if SMBIOS information is not available. SMBIOS is the GUID that is stored in the Device’s BIOS or UEFI. It’s unique to the device and ConfigMgr uses it to recognize prestaged computers.
When importing systems in ConfigMgr, a computer name and MAC address or SMBIOS GUID must be filled in. MAC addresses can be found in command prompt when typing in "ipconfig /all". SMBIOS can be found in BIOS or by typing in "wmic csproduct get uuid". After re-deployment, where I switched network interfaces, the correct computer name was still used. So when using SMBIOS instead of MAC, it's allowed to switch network interfaces. Good news!
When importing of many new systems is needed, just ask your hardware vendor for a list of SMBIOS GUID's. That way it's easy to import them in ConfigMgr, and prevent MAC address isues. For example: SurfacePro3, 00:1E:8C:17:F0:E5, 3164B0C0-AB47-11DC-A63B-001E8C17F0E5 (for usage in a CSV file). The future is bright, ConfigMgr is still in lead on this one ;)
For more information, have a look on: Microsoft blogs
The MAC address of a network interface is its unique identifier. Think of it as the serial number of that network interface. When switching network interfaces between devices, MAC addresses wil change also. Therefore we need a SMBIOS GUID. ConfigMgr 2012 uses SMBIOS to identify computers, and falls back to MAC addresses if SMBIOS information is not available. SMBIOS is the GUID that is stored in the Device’s BIOS or UEFI. It’s unique to the device and ConfigMgr uses it to recognize prestaged computers.
When importing systems in ConfigMgr, a computer name and MAC address or SMBIOS GUID must be filled in. MAC addresses can be found in command prompt when typing in "ipconfig /all". SMBIOS can be found in BIOS or by typing in "wmic csproduct get uuid". After re-deployment, where I switched network interfaces, the correct computer name was still used. So when using SMBIOS instead of MAC, it's allowed to switch network interfaces. Good news!
When importing of many new systems is needed, just ask your hardware vendor for a list of SMBIOS GUID's. That way it's easy to import them in ConfigMgr, and prevent MAC address isues. For example: SurfacePro3, 00:1E:8C:17:F0:E5, 3164B0C0-AB47-11DC-A63B-001E8C17F0E5 (for usage in a CSV file). The future is bright, ConfigMgr is still in lead on this one ;)
For more information, have a look on: Microsoft blogs
Labels:
BIOS,
CSV,
CSV file,
Ethernet adapter,
GUID,
MAC,
MAC address,
NIC,
SMBIOS,
SMBIOS GUID,
UEFI
Tuesday, February 24, 2015
Install ConfigMgr 2012 Clients on DMZ workgroup servers
Last week I did some ConfigMgr client installation on DMZ workgroup servers. Installation of the client went fine, but they went on internet mode after that. There was no possibility to add them to a Site either. Looking in locationservices.log the following lines were showed:
-Failed to resolve 'SMS_SLP' from WINS
-Unable to find lookup MP(s) in Registry , AD, DNS and Wins
-LSIsSIteCompatible: Failed to get Site version from all directories.
-failed to get dp locations as the expected version from mp
The installation line used was as follows:
Ccmsetup.exe /mp:<FQDN> /logon SMSSITECODE=XXX FSP=<FQDN>
After a few installations I found the following website:
About Client Installation Properties in Configuration Manager 2012
It mentions:
/source:<Path> = Specifies the location from which to download installation files. You can use a local or UNC installation path. Files are downloaded by using the server message block (SMB) protocol.
/mp:<Computer> = Specifies the source management point for downloading installation files. Files are downloaded over an HTTP or HTTPS connection, depending on the management configuration for client connections. This download uses BITS throttling, if BITS throttling is configured. If the management point is configured for HTTPS client connections only, you must verify that the client computer has a valid PKI client certificate.
/logon = Specifies that the client installation should stop if any version of the Configuration Manager 2012 or SMS client is already installed.
SMSMP = Associates the Configuration Manager 2012 client with the specified management point. You can specify a fully qualified domain name as this property.
In the end I used the following installation line to install ConfigMgr 2012 Clients on DMZ workgroups servers successfully:
Ccmsetup.exe /source:<path> SMSSITECODE=XXX FSP=<FQDN> SMSMP=<FQDN>
Hope it helps!
Source:
Install SCCM 2012 Client on DMZ workgroup servers
Managing workgroup clients in Configuration Manager 2012
-Failed to resolve 'SMS_SLP' from WINS
-Unable to find lookup MP(s) in Registry , AD, DNS and Wins
-LSIsSIteCompatible: Failed to get Site version from all directories.
-failed to get dp locations as the expected version from mp
The installation line used was as follows:
Ccmsetup.exe /mp:<FQDN> /logon SMSSITECODE=XXX FSP=<FQDN>
After a few installations I found the following website:
About Client Installation Properties in Configuration Manager 2012
It mentions:
/source:<Path> = Specifies the location from which to download installation files. You can use a local or UNC installation path. Files are downloaded by using the server message block (SMB) protocol.
/mp:<Computer> = Specifies the source management point for downloading installation files. Files are downloaded over an HTTP or HTTPS connection, depending on the management configuration for client connections. This download uses BITS throttling, if BITS throttling is configured. If the management point is configured for HTTPS client connections only, you must verify that the client computer has a valid PKI client certificate.
/logon = Specifies that the client installation should stop if any version of the Configuration Manager 2012 or SMS client is already installed.
SMSMP = Associates the Configuration Manager 2012 client with the specified management point. You can specify a fully qualified domain name as this property.
In the end I used the following installation line to install ConfigMgr 2012 Clients on DMZ workgroups servers successfully:
Ccmsetup.exe /source:<path> SMSSITECODE=XXX FSP=<FQDN> SMSMP=<FQDN>
Hope it helps!
Source:
Install SCCM 2012 Client on DMZ workgroup servers
Managing workgroup clients in Configuration Manager 2012
Friday, February 20, 2015
ConfigMgr migration, PXE Provider shutdown (SMSPXE)
Today I did another ConfigMgr upgrade from SP1 to R2 with 3 remote Distribution points (DPs). Nothing to worry you will say. After the upgrade (which was 100% fine) the Primary server and 1 remote DP was working fine. Deployment could be done, everything okay. Nothing to see in Site and System status. The other 2 remote DP's however didn't want to PXE boot because of error "PXE-E53: No boot filename received". Last line in SMSPXE.log was ================= PXE Provider shutdown. =====================
I did a lot of things after that:
-Restart WDS services
-Update both boot images and checked properties
-Restart multiple Site servers
-Checked logfiles (On primary and Site servers)
-Checked DHCP scope options
-Checked local security
-Checked SMS Component Manager
-Checked firewall status
-Checked no antivirus in place
SMSPXE.log was showing me the following lines:
-RequestMPKeyInformation: Send() failed.
-Failed to get information for MP: http://FQDN. 80004005
-PXE::MP_InitializeTransport failed; 0x80004005
-PXE::MP_LookupDevice failed; 0x80004005
-RequestMPKeyInformation: Send() failed.
-Failed to get information for MP: http://FQDN. 80004005
-PXE::MP_InitializeTransport failed; 0x80004005
-PXE::MP_ReportStatus failed; 0x80004005
-PXE Provider failed to process message.
-Unspecified error (Error: 80004005; Source: Windows)
-98:4B:E1:7E:6D:89, 39C6D000-9BED-11E0-0000-984BE17E6D89: Not serviced.
-Cannot read the registry value of MACIgnoreListFile (00000000)
-MAC Ignore List Filename in registry is empty
Nothing didn't work here! When looking on MS TechNet they say you must reinstall WDS, PXE, DP all over again. Not exactly what I had in mind here. Long story short, after a few hours checking I rebooted the Primary Site server, restarted WDS services on both DPs again, and everything was working in a few minutes. First line in SMSPXE.log was now ================= PXE Provider loaded. =====================
Very happy with the (easy) solution, but very strange ConfigMgr didn't gave me an error. There's no mentioning of rebooting a Primary Site server after the upgrade also. Lessons learned: Reboot the Primary Site server and Site servers after an migration always.
Source:
Upgrade ConfigMgr 2012 SP1 to 2012 R2 Preview
Management Point PXE Boot Error 80004005 After SP1 Upgrade
SCCM 2012 R2 upgrade broken WDS/PXE
PXE-E53: No boot filename received
I did a lot of things after that:
-Restart WDS services
-Update both boot images and checked properties
-Restart multiple Site servers
-Checked logfiles (On primary and Site servers)
-Checked DHCP scope options
-Checked local security
-Checked SMS Component Manager
-Checked firewall status
-Checked no antivirus in place
SMSPXE.log was showing me the following lines:
-RequestMPKeyInformation: Send() failed.
-Failed to get information for MP: http://FQDN. 80004005
-PXE::MP_InitializeTransport failed; 0x80004005
-PXE::MP_LookupDevice failed; 0x80004005
-RequestMPKeyInformation: Send() failed.
-Failed to get information for MP: http://FQDN. 80004005
-PXE::MP_InitializeTransport failed; 0x80004005
-PXE::MP_ReportStatus failed; 0x80004005
-PXE Provider failed to process message.
-Unspecified error (Error: 80004005; Source: Windows)
-98:4B:E1:7E:6D:89, 39C6D000-9BED-11E0-0000-984BE17E6D89: Not serviced.
-Cannot read the registry value of MACIgnoreListFile (00000000)
-MAC Ignore List Filename in registry is empty
Nothing didn't work here! When looking on MS TechNet they say you must reinstall WDS, PXE, DP all over again. Not exactly what I had in mind here. Long story short, after a few hours checking I rebooted the Primary Site server, restarted WDS services on both DPs again, and everything was working in a few minutes. First line in SMSPXE.log was now ================= PXE Provider loaded. =====================
Very happy with the (easy) solution, but very strange ConfigMgr didn't gave me an error. There's no mentioning of rebooting a Primary Site server after the upgrade also. Lessons learned: Reboot the Primary Site server and Site servers after an migration always.
Source:
Upgrade ConfigMgr 2012 SP1 to 2012 R2 Preview
Management Point PXE Boot Error 80004005 After SP1 Upgrade
SCCM 2012 R2 upgrade broken WDS/PXE
PXE-E53: No boot filename received
Monday, February 16, 2015
Windows 10 Technical Preview for phones is available now
Microsoft has announced the first build of Windows 10 Technical Preview for Phones. I used Windows 8.1 Technical Preview several months on my device. After using my Samsung Ativ S for almost 2 years now, i'm still very happy with my choice. My next Phone will run Windows 10 for sure, no doubt about that. The reason that multiple favorite apps are missing, is no obstacle for me. Microsoft rocks!
When you want to run Windows 10 Technical Preview, just make sure to follow the next steps:
-Join the Windows Insider Program
-Register your device to receive builds as over the air updates
-Builds will come to you automatically as they are ready, after being validated by engineers at Microsoft and used on their own phones
-Use the built-in Windows Feedback app to send us problem reports and suggestions
-Updates will continue all the way up to the final build that goes out to all customers
-You can roll your phone back to the previous OS any time you’d like
If you’re a Windows Phone customer and love to try the latest stuff before anyone else, or a Developer or IT Pro who works with Windows Phones, joining the Windows Insider program and trying out this build may be right for you. You’ll be getting an insider’s view and getting builds that normally would have only been available to Microsoft engineers in the past. Same as on Windows 10 Technical Preview.
There are a lot of known issues mentioned already. Just have a look at them to see what to expect. Still great to have the opportunity to try the earliest publicly available preview for Windows 10 Technical Preview. Do you take the risk or not, that's the question.
Source: Blogging Windows
When you want to run Windows 10 Technical Preview, just make sure to follow the next steps:
-Join the Windows Insider Program
-Register your device to receive builds as over the air updates
-Builds will come to you automatically as they are ready, after being validated by engineers at Microsoft and used on their own phones
-Use the built-in Windows Feedback app to send us problem reports and suggestions
-Updates will continue all the way up to the final build that goes out to all customers
-You can roll your phone back to the previous OS any time you’d like
If you’re a Windows Phone customer and love to try the latest stuff before anyone else, or a Developer or IT Pro who works with Windows Phones, joining the Windows Insider program and trying out this build may be right for you. You’ll be getting an insider’s view and getting builds that normally would have only been available to Microsoft engineers in the past. Same as on Windows 10 Technical Preview.
There are a lot of known issues mentioned already. Just have a look at them to see what to expect. Still great to have the opportunity to try the earliest publicly available preview for Windows 10 Technical Preview. Do you take the risk or not, that's the question.
Source: Blogging Windows
Thursday, February 12, 2015
The Report Builder click-once application does not exist on the report server
When creating a new report on the ConfigMgr server, the following error message is displayed: "The Report Builder click-once application does not exist on the report server. Ensure that the report builder application manifest exists on the server and try again." Point is Report Builder 3.0 must be installed first. In my situation I use a single ConfigMgr server and a remote SQL server with Reporting database. After installation however the error message displayed is still the same. What's going on here!?
Lucky me I found the following website: TechNet blogs
It mentions: On the computer running the ConfigMgr console, open the Windows Registry Editor. Browse to HKLM/ SOFTWARE/ Wow6432Node/ Microsoft/ ConfigMgr10/ AdminUI/ Reporting. Double-click the ReportBuilderApplicationManifestName value to edit the value data. Change ReportBuilder_2_0_0_0.application to ReportBuilder_3_0_0_0.application, and then click OK.
After that additional steps were needed also:
Use Notepad or any text editor to open the file: *Note Open Notepad as Administrator, otherwise you won’t be able to save the edits.
"C:\ Program Files (x86)\ Microsoft Configuration Manager\ AdminConsole\ bin\ Microsoft.ConfigurationManagement.exe.config"
Scroll down to the <ReportBuilderMapping> section.
In my case it originally contained
<ReportBuilderMapping>
<add key="11.0" value="ReportBuilder_3_0_0_0.application"/>
<add key="10.50" value="ReportBuilder_3_0_0_0.application" />
<add key="10.0" value="ReportBuilder_2_0_0_0.application"/>
<add key="DEFAULT" value="ReportBuilder_2_0_0_0.application"/>
</ReportBuilderMapping>
We want to replace the 2's in those last two lines with 3's, so it looks like this:
<ReportBuilderMapping>
<add key="11.0" value="ReportBuilder_3_0_0_0.application" />
<add key="10.50" value="ReportBuilder_3_0_0_0.application" />
<add key="10.0" value="ReportBuilder_3_0_0_0.application"/>
<add key="DEFAULT" value="ReportBuilder_3_0_0_0.application"/>
</ReportBuilderMapping>
After that it was finally possible to open the SQL Report Wizard.
Lucky me I found the following website: TechNet blogs
It mentions: On the computer running the ConfigMgr console, open the Windows Registry Editor. Browse to HKLM/ SOFTWARE/ Wow6432Node/ Microsoft/ ConfigMgr10/ AdminUI/ Reporting. Double-click the ReportBuilderApplicationManifestName value to edit the value data. Change ReportBuilder_2_0_0_0.application to ReportBuilder_3_0_0_0.application, and then click OK.
After that additional steps were needed also:
Use Notepad or any text editor to open the file: *Note Open Notepad as Administrator, otherwise you won’t be able to save the edits.
"C:\ Program Files (x86)\ Microsoft Configuration Manager\ AdminConsole\ bin\ Microsoft.ConfigurationManagement.exe.config"
Scroll down to the <ReportBuilderMapping> section.
In my case it originally contained
<ReportBuilderMapping>
<add key="11.0" value="ReportBuilder_3_0_0_0.application"/>
<add key="10.50" value="ReportBuilder_3_0_0_0.application" />
<add key="10.0" value="ReportBuilder_2_0_0_0.application"/>
<add key="DEFAULT" value="ReportBuilder_2_0_0_0.application"/>
</ReportBuilderMapping>
We want to replace the 2's in those last two lines with 3's, so it looks like this:
<ReportBuilderMapping>
<add key="11.0" value="ReportBuilder_3_0_0_0.application" />
<add key="10.50" value="ReportBuilder_3_0_0_0.application" />
<add key="10.0" value="ReportBuilder_3_0_0_0.application"/>
<add key="DEFAULT" value="ReportBuilder_3_0_0_0.application"/>
</ReportBuilderMapping>
After that it was finally possible to open the SQL Report Wizard.
Monday, February 9, 2015
Management Point Affinity in ConfigMgr 2012 R2 CU3
Sometimes there are multiple Management points installed for high availability or communication reasons. With Distribution points you set boundary groups to decide with one to use. With Management points they will be randomly selected. This can be seen in ClientLocation and LocationServices logfiles. With Cumulative Update (CU) 3 however there's a possibility to set the Management point also. In this scenario you have MP1 and MP2, where MP1 is forced (for example). Let's have a look at the logfiles after applying the key:
Key: HKLM\SOFTWARE\Microsoft\CCM:AllowedMPs
Type: Reg_Multi_SZ
Value Data: <Management point>
ClientLocation.log
-Rotating assigned management point, new management point is: 'MP1'
-Assigned MP changed from 'MP2' to 'MP1'
This will be applied daily. (every 25 hours)
LocationServices.log
-The MP name retrieved is 'MP1'. MP 'MP1' is compatible
-The MP name retrieved is 'MP2'. MP 'MP2' is compatible
-Retrieved MP 'MP1' from Registry
-Attempting to retrieve lookup MP(s) from AD. Lookup Management Points from AD: 'MP1' and 'MP2'
-Not persisting assigned management point 'MP2' because it is not in the list of allowed MP's
-MP list is forced, ignoring MP 'MP2'
-Default Management Points from MP: 'MP1'
This can be handy when you want to enforce Management points for static systems. For roaming systems this is not recommended, because it will still be communicate with the Management point, even when on another location. Still great to see that Management point can be enforced, when no use of a Secondary site is made.
More information: MS TechNet Blog
Key: HKLM\SOFTWARE\Microsoft\CCM:AllowedMPs
Type: Reg_Multi_SZ
Value Data: <Management point>
ClientLocation.log
-Rotating assigned management point, new management point is: 'MP1'
-Assigned MP changed from 'MP2' to 'MP1'
This will be applied daily. (every 25 hours)
LocationServices.log
-The MP name retrieved is 'MP1'. MP 'MP1' is compatible
-The MP name retrieved is 'MP2'. MP 'MP2' is compatible
-Retrieved MP 'MP1' from Registry
-Attempting to retrieve lookup MP(s) from AD. Lookup Management Points from AD: 'MP1' and 'MP2'
-Not persisting assigned management point 'MP2' because it is not in the list of allowed MP's
-MP list is forced, ignoring MP 'MP2'
-Default Management Points from MP: 'MP1'
This can be handy when you want to enforce Management points for static systems. For roaming systems this is not recommended, because it will still be communicate with the Management point, even when on another location. Still great to see that Management point can be enforced, when no use of a Secondary site is made.
More information: MS TechNet Blog
Thursday, February 5, 2015
Send Ctrl-Alt-Del Key not working in Remote Tools
This week I had a strange issue in Remote Tools. Everything was working fine on the ConfigMgr client, and Remote Tools for it seems also. But when starting the "Send Ctrl-Alt-Del Key" nothing was happening. Strange issue, never seen that before! The solution for this is not that hard, because other people has already found a solution for it. As far as I know a GPO is blocking this functionality.
Just create or edit a Group Policy, browse to Computer Configuration, Policies, Administrative Templates, Windows Components, Windows Logon Options. In there enable the setting "Disable or enable software Secure Attention Sequence" and configure it on "Services and Ease of Access applications". After a GPupdate you will see the "Send Ctrl-Alt-Del Key" is working (again)! Happy again :-)
Source: Microsoft TechNet
Just create or edit a Group Policy, browse to Computer Configuration, Policies, Administrative Templates, Windows Components, Windows Logon Options. In there enable the setting "Disable or enable software Secure Attention Sequence" and configure it on "Services and Ease of Access applications". After a GPupdate you will see the "Send Ctrl-Alt-Del Key" is working (again)! Happy again :-)
Source: Microsoft TechNet
Tuesday, February 3, 2015
Cumulative Update 4 for ConfigMgr 2012 R2 released
Today Cumulative Update (CU) 4 for ConfigMgr 2012 R2 is released. It fixes 27 issues and 4 additional changes are included. No need to install CU3 anymore when using this one.
Here's a list of issues that are fixed, there are quite a lot of them:
- Client (2 fixes)
- Software distribution and application management (6 fixes)
- Network Access Protection (1 fix)
- Operating system deploymenjt (2 fixes)
- Administrator Console (1 fix)
- Site servers and site systems (6 fixes)
- Mobile devices (5 fixes)
- Migration (1 fix)
- Reporting (2 fixes)
- Software updates (1 fix)
Additional changes that are included in this update:
- Windows PowerShell (lot of changes)
- Data replication (performance replications)
- Endpoint Protection (anti-malware platform update)
- Operating systems other than Windows (Mac OSX 10.10, Suse Linux Enterprise Server 12 (x64)
Just install it in your environment when experiencing problems described in this article. When not affected by these problems, Microsoft recommends to wait for the next service pack that contains this update. The version that is displayed in the About System Center Configuration Manager dialog box is 5.0.7958.1501.
This update replaces Cumulative Update 3 for System Center 2012 Configuration Manager R2
For more information or download the update have a look here: Microsoft Support
Here's a list of issues that are fixed, there are quite a lot of them:
- Client (2 fixes)
- Software distribution and application management (6 fixes)
- Network Access Protection (1 fix)
- Operating system deploymenjt (2 fixes)
- Administrator Console (1 fix)
- Site servers and site systems (6 fixes)
- Mobile devices (5 fixes)
- Migration (1 fix)
- Reporting (2 fixes)
- Software updates (1 fix)
Additional changes that are included in this update:
- Windows PowerShell (lot of changes)
- Data replication (performance replications)
- Endpoint Protection (anti-malware platform update)
- Operating systems other than Windows (Mac OSX 10.10, Suse Linux Enterprise Server 12 (x64)
Just install it in your environment when experiencing problems described in this article. When not affected by these problems, Microsoft recommends to wait for the next service pack that contains this update. The version that is displayed in the About System Center Configuration Manager dialog box is 5.0.7958.1501.
This update replaces Cumulative Update 3 for System Center 2012 Configuration Manager R2
For more information or download the update have a look here: Microsoft Support
Labels:
ConfigMgr 2012 R2,
CU4,
Cumulative Update 4,
SCCM 2012 R2
Monday, February 2, 2015
Can't update SCEP 2012 definitions?
When System Center Endpoint Protection (SCEP) updates are not applying and the following errors are mentioned, Windows Update is not configured right. Let's first have a look at the errors:
WindowsUpdate.log
-CNetworkCostChangeHandler: RegisterForCostChangeNotifications: CoCreateInstance failed with error 80004002
-RegisterNetworkCostChangeNotification: Error 80004002
-Failed to get Network Cost info from NLM, assuming network is NOT metered, error = 0x80240037
-Network Cost is assumed to be not supported as something failed with trying to handls to wcmapi.dll
-CSerializationHelper: InitSerialize failed: 0x80070002
UpdatesDeployment.log
-Job error (0x87d00692) received for assignment
WUAHandler.log
-Failed to Add Update Source for WUAgent of type (2) and id {}. Error = 0x87d00692
Long story short, there was an unknown WSUS policy in-place! After changing few settings everything was working immediately.
Just make sure "Allow Automatic Updates immediate installation" is enabled, and "Specify intranet Microsoft update service location" is pointing to the ConfigMgr SUP server on port 8530/8531. Then you will be fine after all. Hope it helps!

Source: SCEP updates pushed out to clients through SCCM 2012
WindowsUpdate.log
-CNetworkCostChangeHandler: RegisterForCostChangeNotifications: CoCreateInstance failed with error 80004002
-RegisterNetworkCostChangeNotification: Error 80004002
-Failed to get Network Cost info from NLM, assuming network is NOT metered, error = 0x80240037
-Network Cost is assumed to be not supported as something failed with trying to handls to wcmapi.dll
-CSerializationHelper: InitSerialize failed: 0x80070002
UpdatesDeployment.log
-Job error (0x87d00692) received for assignment
WUAHandler.log
-Failed to Add Update Source for WUAgent of type (2) and id {}. Error = 0x87d00692
Long story short, there was an unknown WSUS policy in-place! After changing few settings everything was working immediately.
Just make sure "Allow Automatic Updates immediate installation" is enabled, and "Specify intranet Microsoft update service location" is pointing to the ConfigMgr SUP server on port 8530/8531. Then you will be fine after all. Hope it helps!

Source: SCEP updates pushed out to clients through SCCM 2012
Labels:
0x80004002,
0x80070002,
0x80240037,
0x87d00692,
80004002,
80070002,
80240037,
87d00692,
SUP,
WSUS
Friday, January 30, 2015
Failed to query BITS 2.5 interface with error 0x8004002
When installing the ConfigMgr client on Windows Server 2003 (R2) systems, there may be an error message in ccmsetup.log (Windows\ ccmsetup\ Logs folder). This because prerequisites are not in place to succesfully install the client.
-Failed to query BITS 2.5 interface with error 0x8004002
-This operating system does not contain the correct version of BITS. BITS 2.5 or later is required.
-CcmSetup failed with error code 0x80004002
Just install Background Intelligent Transfer Service (BITS) 2.5 for Windows Server 2003 (KB923845) to solve the issue. The hotfix can be found on the following location: Download Center
After that install the ConfigMgr client will be fine.
-Failed to query BITS 2.5 interface with error 0x8004002
-This operating system does not contain the correct version of BITS. BITS 2.5 or later is required.
-CcmSetup failed with error code 0x80004002
Just install Background Intelligent Transfer Service (BITS) 2.5 for Windows Server 2003 (KB923845) to solve the issue. The hotfix can be found on the following location: Download Center
After that install the ConfigMgr client will be fine.
Tuesday, January 27, 2015
ConfigMgr 2007 Standard distribution point migration
During a ConfigMgr 2007 distribution point migration IIS must be installed (if it isn't installed yet) and content can be converted. Because of IIS installation (which ConfigMgr will do for you, if you select this in the wizard) a restart may be triggered. In my case an unexpected restart was done on a Windows Server 2008 R2 system. This because of an "unknown" MSI installation. As far as I can see only the "Remote Differential Compression" (RDC) feature is installed and the "Microsoft Visual C++ 2010 x64 redistributable".
When distribution points are not "eligible for upgrade", which they were in my case, just make sure no other roles (eg PXE service point) then distribution point are installed. Just make sure there is enough available disk space also - need 100% free space in order to carry out conversion to ConfigMgr 2012 content library. When removing PXE service point, clean up disk space, and wait a while (or reboot the server), distribution points are finally eligible for upgrade.
Source: Microsoft TechNet
When looking in SMS_DP$\SMS\BIN\vcredist.log-MSI_vc_red.msi on the server the following lines are displayed:
MSI (s) (68:4C) [10:55:25:452]: Note: 1: 1707 MSI (s) (68:4C) [10:55:25:452]: Product: Microsoft Visual C++ 2010 x64 Redistributable - 10.0.40219 -- Installation completed successfully.
MSI (s) (68:4C) [10:55:25:452]: Windows Installer installed the product. Product Name: Microsoft Visual C++ 2010 x64 Redistributable - 10.0.40219. Product Version: 10.0.40219. Product Language: 0. Manufacturer: Microsoft Corporation. Installation success or error status: 0.
MSI (s) (68:4C) [10:55:25:452]: Value of RebootAction property is MSI (s) (68:4C) [10:55:25:452]: Windows Installer requires a system restart. Product Name: Microsoft Visual C++ 2010 x64 Redistributable - 10.0.40219. Product Version: 10.0.40219. Product Language: 0. Manufacturer: Microsoft Corporation. Type of System Restart: 2. Reason for Restart: 1.
MSI (s) (68:4C) [10:55:25:452]: Product: Microsoft Visual C++ 2010 x64 Redistributable - 10.0.40219. Restart required. The installation or update for the product required a restart for all changes to take effect. The restart was deferred to a later time.
MSI (s) (68:4C) [10:55:25:468]: Deferring clean up of packages/files, if any exist MSI (s) (68:4C) [10:55:25:468]: MainEngineThread is returning 3010 MSI (s) (68:34) [10:55:25:468]: RESTART MANAGER: Session closed.
MSI (s) (68:34) [10:55:25:468]: No System Restore sequence number for this installation.
When looking in Event Viewer the server is rebooted a second afterwards (on 10:55:26 exactly):
The process f:\06ce98a1da047515c72afeca1f47e3\Setup.exe (########) has initiated the restart of computer ######## on behalf of user ######## for the following reason: Other (Planned) Reason Code: 0x80000000 Shutdown Type: restart
So yes, "Microsoft Visual C++ 2010 x64 redistributable" did need a restart, and your server will be down for a few moments.
Furthermore Microsoft TechNet mentions that the ConfigMgr 2007 client must be removed on Branch distribution points only. During migration on a Standard distribution point however the following message is displayed "Failed to update binaries". After removing the ConfigMgr 2007 client, converting content was done successfully without any problem. When migrating packages is done, the following message is displayed: "Completed reassign distribution point". So next time, I will remove the ConfigMgr 2007 client on Standard distribution points before migration also.
Be aware that only packages which are migrated to ConfigMgr 2012 will be converted to the SCCMContentLib folder. Other old packages will still be left in the old package share folder and can be removed afterwards manually. Just make sure that packages migrated does not have the "Copy the content in this package to a package share on distribution points" have selected in properties. Otherwise they will be on your new ConfigMgr 2012 server in package share folder also. After that you will have new distribution points running!
Source: Microsoft TechNet
When distribution points are not "eligible for upgrade", which they were in my case, just make sure no other roles (eg PXE service point) then distribution point are installed. Just make sure there is enough available disk space also - need 100% free space in order to carry out conversion to ConfigMgr 2012 content library. When removing PXE service point, clean up disk space, and wait a while (or reboot the server), distribution points are finally eligible for upgrade.
Source: Microsoft TechNet
When looking in SMS_DP$\SMS\BIN\vcredist.log-MSI_vc_red.msi on the server the following lines are displayed:
MSI (s) (68:4C) [10:55:25:452]: Note: 1: 1707 MSI (s) (68:4C) [10:55:25:452]: Product: Microsoft Visual C++ 2010 x64 Redistributable - 10.0.40219 -- Installation completed successfully.
MSI (s) (68:4C) [10:55:25:452]: Windows Installer installed the product. Product Name: Microsoft Visual C++ 2010 x64 Redistributable - 10.0.40219. Product Version: 10.0.40219. Product Language: 0. Manufacturer: Microsoft Corporation. Installation success or error status: 0.
MSI (s) (68:4C) [10:55:25:452]: Value of RebootAction property is MSI (s) (68:4C) [10:55:25:452]: Windows Installer requires a system restart. Product Name: Microsoft Visual C++ 2010 x64 Redistributable - 10.0.40219. Product Version: 10.0.40219. Product Language: 0. Manufacturer: Microsoft Corporation. Type of System Restart: 2. Reason for Restart: 1.
MSI (s) (68:4C) [10:55:25:452]: Product: Microsoft Visual C++ 2010 x64 Redistributable - 10.0.40219. Restart required. The installation or update for the product required a restart for all changes to take effect. The restart was deferred to a later time.
MSI (s) (68:4C) [10:55:25:468]: Deferring clean up of packages/files, if any exist MSI (s) (68:4C) [10:55:25:468]: MainEngineThread is returning 3010 MSI (s) (68:34) [10:55:25:468]: RESTART MANAGER: Session closed.
MSI (s) (68:34) [10:55:25:468]: No System Restore sequence number for this installation.
When looking in Event Viewer the server is rebooted a second afterwards (on 10:55:26 exactly):
The process f:\06ce98a1da047515c72afeca1f47e3\Setup.exe (########) has initiated the restart of computer ######## on behalf of user ######## for the following reason: Other (Planned) Reason Code: 0x80000000 Shutdown Type: restart
So yes, "Microsoft Visual C++ 2010 x64 redistributable" did need a restart, and your server will be down for a few moments.
Furthermore Microsoft TechNet mentions that the ConfigMgr 2007 client must be removed on Branch distribution points only. During migration on a Standard distribution point however the following message is displayed "Failed to update binaries". After removing the ConfigMgr 2007 client, converting content was done successfully without any problem. When migrating packages is done, the following message is displayed: "Completed reassign distribution point". So next time, I will remove the ConfigMgr 2007 client on Standard distribution points before migration also.
Be aware that only packages which are migrated to ConfigMgr 2012 will be converted to the SCCMContentLib folder. Other old packages will still be left in the old package share folder and can be removed afterwards manually. Just make sure that packages migrated does not have the "Copy the content in this package to a package share on distribution points" have selected in properties. Otherwise they will be on your new ConfigMgr 2012 server in package share folder also. After that you will have new distribution points running!
Source: Microsoft TechNet
Thursday, January 22, 2015
Meet Windows 10: The New Generation of Windows
Yesterday I watched Windows 10: The Next Chapter. A great 2 hour during show with information on Windows 10, Office, Project Spartan, Xbox One, Surface Hub, HoloLens and many more. Let's have a look at some information I have gathered so far.
As you can see great features and functionality are coming our way! Just enjoy the new Windows 10 build next week and stay connected for more information. Hope to experience the new version soon on my Surface Pro 3. Microsoft has done a great job here!
- Windows 10 is free for all Windows 7, 8.1 and Phone 8.1 devices as a upgrade (first year only);
- Windows 10 is called "Windows as a service", with new functionality coming every year;
- Windows 10 is so much more then a new version of Windows, it's a new generation of Windows;
- Cortana (digital assistant) is running on Windows 10 PC's now also (not available in NL yet);
- New Office for Windows 10 will be included on small devices like smartphones and tablets;
- New Office is optimized for smartphones and tablets with full desktop functionality;
- Universal Apps like the new photo app and photo album is running on same code on PC's and phones;
- A new web browser is included in Windows 10 called Project Spartan, with many new features;
- Internet Explorer will still be available (next to Project Spartan) for compatibility reasons;
- Cortana is build-in the Project Spartan browser to expand browser experience, making it even better;
- Xbox One games can be played on Windows 10 PC's as well with the Xbox app. Xbox One is running Windows 10 also;
- New builds available for PC's in the next week, First build for phones coming in February;
- Microsoft Surface Hub is a 84-inch 4k display with multi-touch, sensors and pen support;
- Microsoft HoloLens makes holographics possible with special glasses (see-through lenses) > cool!;
- Microsoft HoloLens will be available in the same timeframe as Windows 10;
- Windows 10 is build for a world with lots of data and devices, with new experiences;
- Skype for Windows 10 will be built-in by default, with new features making it easier to use;
- No Windows 10 for Windows RT devices, like Surface RT and Surface 2 RT. Windows RT is no longer.
As you can see great features and functionality are coming our way! Just enjoy the new Windows 10 build next week and stay connected for more information. Hope to experience the new version soon on my Surface Pro 3. Microsoft has done a great job here!
Labels:
Cortana,
HoloLens,
New Office,
Office,
Spartan,
Surface Hub,
Universal Apps,
Windows 10,
Windows Phone 10,
Xbox One
Tuesday, January 20, 2015
Savision has been named National Champion of the Netherlands
Sponsor post
Savision has been named National Champion of the Netherlands and they are competing for Public National Champion. In order to obtain this title and keep running in the competition, they need to obtain as many votes as possible from the public. It would be great if you could help Savision with that! The voting consists of entering your email on their video page, then you receive an email through which you must confirm your vote. Thanks for your help!
Video page: European Business Awards
Savision has been named National Champion of the Netherlands and they are competing for Public National Champion. In order to obtain this title and keep running in the competition, they need to obtain as many votes as possible from the public. It would be great if you could help Savision with that! The voting consists of entering your email on their video page, then you receive an email through which you must confirm your vote. Thanks for your help!
Video page: European Business Awards
Labels:
European Business Awards,
Savision,
Sponsor post
Enable automatic site-wide client push installation not working
Note to myself: When "Enable automatic site-wide client push installation" is not working, just check if boundaries and boundary groups are in place. And even more important, just check "Use this boundary group for site assignment". When manual installation is working and Client Push installation not, this will do the trick!
After that Client Push installation will be doing fine! Progress can be seen in ccm.log in the ConfigMgr Logs folder. Happy! ;)
Tuesday, January 6, 2015
How to increase the ConfigMgr client cache on existing and new systems
By default the ConfigMgr client cache on systems is 5120MB, which is 5GB. When deploying lot of packages this isn't enough for sure. Because content remains in the cache for at least 24 hours, it cannot be overwritten by new content if it requires the space. When it's needed to deploy more then 5GB within 24 hours, the client cache must be expanded (or cleaned up). When the client must download new packages, you can either increase the client cache size or choose the delete option within the control panel applet of the client to delete contents of the cache. Let's have a look at the possibilities.
Expand the ConfigMgr client cache manually:
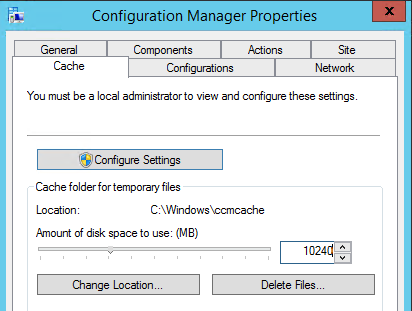
-You can change this setting directly on the client itself using the Control Panel applet > Cache > Configure Settings.
Expand the ConfigMgr client cache on existing systems:
-Just create a package with VBS file to change cache size:
====================
On Error Resume Next
Dim UIResManager
Dim Cache
Dim CacheSize
CacheSize=10240
Set UIResManager = createobject("UIResource.UIResourceMgr")
Set Cache=UIResManager.GetCacheInfo()
Cache.TotalSize=CacheSize
====================
Expand the ConfigMgr client cache on new systems:
-Use SMSCACHESIZE=10240 to the "Setup Windows and ConfigMgr" step in the task sequence used for deployment.
-Use CCMSetup.exe SMSCACHESIZE=10240 when starting the ConfigMgr client installation manually.
Sources:
-Microsoft TechNet
-TechNet Blogs
Expand the ConfigMgr client cache manually:
-You can change this setting directly on the client itself using the Control Panel applet > Cache > Configure Settings.
Expand the ConfigMgr client cache on existing systems:
-Just create a package with VBS file to change cache size:
====================
On Error Resume Next
Dim UIResManager
Dim Cache
Dim CacheSize
CacheSize=10240
Set UIResManager = createobject("UIResource.UIResourceMgr")
Set Cache=UIResManager.GetCacheInfo()
Cache.TotalSize=CacheSize
====================
Expand the ConfigMgr client cache on new systems:
-Use SMSCACHESIZE=10240 to the "Setup Windows and ConfigMgr" step in the task sequence used for deployment.
-Use CCMSetup.exe SMSCACHESIZE=10240 when starting the ConfigMgr client installation manually.
Sources:
-Microsoft TechNet
-TechNet Blogs
Labels:
5120,
5120MB,
Cache,
Client,
Client Cache,
ConfigMgr client,
SCCM client,
SMSCACHESIZE
Monday, January 5, 2015
System Center Endpoint Protection Policy Templates
On Microsoft TechNet you can find System Center Endpoint Protection (SCEP)Policy Templates. At the moment there's v4 which is from 11/3/2014. These templates can be used to import in ConfigMgr 2012 (R2) easily. You can choose to create multiple server collections to deploy them, or merge them to a single server policy. Best thing is to copy them to the default folder, which is: <ConfigMgr folder>\AdminConsole\XmlStorage\EPTemplates.
The following SCEP policies are enclosed:
The queries to decide which server is a member in which collection is enclosed also:
-----
SCEP Server CLUSTER
select * from SMS_R_System inner join SMS_G_System_SERVICE on SMS_G_System_SERVICE.ResourceID = SMS_R_System.ResourceId where SMS_G_System_SERVICE.Name like "ClusSvc"
-----
SCEP Server EXCHANGE
select * from SMS_R_System inner join SMS_G_System_SERVICE on SMS_G_System_SERVICE.ResourceID = SMS_R_System.ResourceId where SMS_G_System_SERVICE.Name like "MSExchange%"
-----
SCEP Server HYPER-V
select * from SMS_R_System inner join SMS_G_System_SERVICE on SMS_G_System_SERVICE.ResourceID = SMS_R_System.ResourceId where SMS_G_System_SERVICE.Name like "vmms"
-----
SCEP Server IIS
select * from SMS_R_System inner join SMS_G_System_SERVICE on SMS_G_System_SERVICE.ResourceID = SMS_R_System.ResourceId where SMS_G_System_SERVICE.Name like "W3SVC"
-----
SCEP Server RDS
select * from SMS_R_System inner join SMS_G_System_SERVER_FEATURE on SMS_G_System_SERVER_FEATURE.ResourceID = SMS_R_System.ResourceId where SMS_G_System_SERVER_FEATURE.ID = 18
-----
SCEP Server SCCM
select * from SMS_R_System inner join SMS_G_System_SERVICE on SMS_G_System_SERVICE.ResourceID = SMS_R_System.ResourceId where SMS_G_System_SERVICE.Name like "SMS_SITE_COMPONENT_MANAGER"
-----
SCEP Server SCDPM
select * from SMS_R_System inner join SMS_G_System_SERVICE on SMS_G_System_SERVICE.ResourceId = SMS_R_System.ResourceId where SMS_G_System_SERVICE.Name like "MSDPM"
-----
SCEP Server SCO
select * from SMS_R_System inner join SMS_G_System_SERVICE on SMS_G_System_SERVICE.ResourceID = SMS_R_System.ResourceId where SMS_G_System_SERVICE.Name like "orunbook"
-----
SCEP Server SCOM
select * from SMS_R_System inner join SMS_G_System_SERVICE on SMS_G_System_SERVICE.ResourceID = SMS_R_System.ResourceId where SMS_G_System_SERVICE.Name like "cshost"
-----
SCEP Server SCSM
select * from SMS_R_System inner join SMS_G_System_SERVICE on SMS_G_System_SERVICE.ResourceID = SMS_R_System.ResourceId where SMS_G_System_SERVICE.Name like "OMCFG"
-----
SCEP Server SCVMM
select * from SMS_R_System inner join SMS_G_System_SERVICE on SMS_G_System_SERVICE.ResourceId = SMS_R_System.ResourceId where SMS_G_System_SERVICE.Name like "SCVMMService"
-----
SCEP Server SHAREPOINT
select * from SMS_R_System inner join SMS_G_System_SERVICE on SMS_G_System_SERVICE.ResourceId = SMS_R_System.ResourceId where SMS_G_System_SERVICE.Name like "SPTimer%"
-----
SCEP Server SQL
select * from SMS_R_System inner join SMS_G_System_SERVICE on SMS_G_System_SERVICE.ResourceID = SMS_R_System.ResourceId where SMS_G_System_SERVICE.Name like "MSSQL$%"
-----
SCEP Server WSUS
select * from SMS_R_System inner join SMS_G_System_SERVICE on SMS_G_System_SERVICE.ResourceId = SMS_R_System.ResourceId where SMS_G_System_SERVICE.Name like "WsusService"
-----
Source: Microsoft TechNet
Just great to have many SCEP templates to build on!
The following SCEP policies are enclosed:
The queries to decide which server is a member in which collection is enclosed also:
-----
SCEP Server CLUSTER
select * from SMS_R_System inner join SMS_G_System_SERVICE on SMS_G_System_SERVICE.ResourceID = SMS_R_System.ResourceId where SMS_G_System_SERVICE.Name like "ClusSvc"
-----
SCEP Server EXCHANGE
select * from SMS_R_System inner join SMS_G_System_SERVICE on SMS_G_System_SERVICE.ResourceID = SMS_R_System.ResourceId where SMS_G_System_SERVICE.Name like "MSExchange%"
-----
SCEP Server HYPER-V
select * from SMS_R_System inner join SMS_G_System_SERVICE on SMS_G_System_SERVICE.ResourceID = SMS_R_System.ResourceId where SMS_G_System_SERVICE.Name like "vmms"
-----
SCEP Server IIS
select * from SMS_R_System inner join SMS_G_System_SERVICE on SMS_G_System_SERVICE.ResourceID = SMS_R_System.ResourceId where SMS_G_System_SERVICE.Name like "W3SVC"
-----
SCEP Server RDS
select * from SMS_R_System inner join SMS_G_System_SERVER_FEATURE on SMS_G_System_SERVER_FEATURE.ResourceID = SMS_R_System.ResourceId where SMS_G_System_SERVER_FEATURE.ID = 18
-----
SCEP Server SCCM
select * from SMS_R_System inner join SMS_G_System_SERVICE on SMS_G_System_SERVICE.ResourceID = SMS_R_System.ResourceId where SMS_G_System_SERVICE.Name like "SMS_SITE_COMPONENT_MANAGER"
-----
SCEP Server SCDPM
select * from SMS_R_System inner join SMS_G_System_SERVICE on SMS_G_System_SERVICE.ResourceId = SMS_R_System.ResourceId where SMS_G_System_SERVICE.Name like "MSDPM"
-----
SCEP Server SCO
select * from SMS_R_System inner join SMS_G_System_SERVICE on SMS_G_System_SERVICE.ResourceID = SMS_R_System.ResourceId where SMS_G_System_SERVICE.Name like "orunbook"
-----
SCEP Server SCOM
select * from SMS_R_System inner join SMS_G_System_SERVICE on SMS_G_System_SERVICE.ResourceID = SMS_R_System.ResourceId where SMS_G_System_SERVICE.Name like "cshost"
-----
SCEP Server SCSM
select * from SMS_R_System inner join SMS_G_System_SERVICE on SMS_G_System_SERVICE.ResourceID = SMS_R_System.ResourceId where SMS_G_System_SERVICE.Name like "OMCFG"
-----
SCEP Server SCVMM
select * from SMS_R_System inner join SMS_G_System_SERVICE on SMS_G_System_SERVICE.ResourceId = SMS_R_System.ResourceId where SMS_G_System_SERVICE.Name like "SCVMMService"
-----
SCEP Server SHAREPOINT
select * from SMS_R_System inner join SMS_G_System_SERVICE on SMS_G_System_SERVICE.ResourceId = SMS_R_System.ResourceId where SMS_G_System_SERVICE.Name like "SPTimer%"
-----
SCEP Server SQL
select * from SMS_R_System inner join SMS_G_System_SERVICE on SMS_G_System_SERVICE.ResourceID = SMS_R_System.ResourceId where SMS_G_System_SERVICE.Name like "MSSQL$%"
-----
SCEP Server WSUS
select * from SMS_R_System inner join SMS_G_System_SERVICE on SMS_G_System_SERVICE.ResourceId = SMS_R_System.ResourceId where SMS_G_System_SERVICE.Name like "WsusService"
-----
Source: Microsoft TechNet
Just great to have many SCEP templates to build on!
Tuesday, December 30, 2014
Happy New Year (2015)
From Henk's blog (and sponsors) we wish you all a Happy New Year! Thanks for visiting my blog, and hope you liked all information last year about Microsoft System Center and Microsoft Intune.
Expect more to come in 2015 again!
#HappyHolidays
Expect more to come in 2015 again!
#HappyHolidays
Labels:
HappyHolidays,
Jalasoft,
Savision,
Veeam
Tuesday, December 23, 2014
2 weeks left: Veeam end-of-year limited-time offers
Sponsor post
Veeam Special Offers until the end of December: Take on the NEW v8
There are only 2 weeks left to save with these special offers before the price increase! Improve your modern data center with 200+ new features and improvements of the NEW Veeam Availability Suite v8, including Veeam Backup & Replication v8:
Save up to 10% + upgrade to v8 for free
Offer ends December 31st
Veeam Special Offers
Or have a look at Full list of Veeam's special offers and promos
Happy holidays!
Veeam Special Offers until the end of December: Take on the NEW v8
There are only 2 weeks left to save with these special offers before the price increase! Improve your modern data center with 200+ new features and improvements of the NEW Veeam Availability Suite v8, including Veeam Backup & Replication v8:
Save up to 10% + upgrade to v8 for free
Offer ends December 31st
Veeam Special Offers
Or have a look at Full list of Veeam's special offers and promos
Happy holidays!
Monday, December 22, 2014
ConfigMgr 2012 R2 User-based application deployment
Today I deployed applications for Application Catalog usage. During installation the following error message was showed: The software change returned error code 0x643(1603). This is just a generic MSI error and tells you very little. Within Event Viewer the following error message was showed: Administrative Privileges Required. For it seems the user doesn't has enough permissions here?
Within the application deployment, User Experience tab, you can choose Installation behavior. There's "Install for user", "Install for system", and "Install for system if resource is device; otherwise install for user". Mine was configured on last one. Changed that to "Install for system", and all my issues were gone.
So long story short, when deploying to "Install for user", the account must have permissions to run the command-line provided in the chosen deployment type. When deploying to "Install for system", this isn't needed, and deployment is done under SYSTEM permissions.
When looking on Microsoft Technet HERE and HERE it seems that administrator permissions are needed indeed. When using "Install for system" this isn't needed. Issue solved.
Within the application deployment, User Experience tab, you can choose Installation behavior. There's "Install for user", "Install for system", and "Install for system if resource is device; otherwise install for user". Mine was configured on last one. Changed that to "Install for system", and all my issues were gone.
So long story short, when deploying to "Install for user", the account must have permissions to run the command-line provided in the chosen deployment type. When deploying to "Install for system", this isn't needed, and deployment is done under SYSTEM permissions.
When looking on Microsoft Technet HERE and HERE it seems that administrator permissions are needed indeed. When using "Install for system" this isn't needed. Issue solved.
Wednesday, December 17, 2014
Using offline servicing in a server image with multiple indexes
Within ConfigMgr 2012 it's possible to update images with offline servicing functionality. When doing that on server media however, it's possible that multiple indexes are found. When that's the case, updates will be installed on all indexes, which takes a lot of time. In this scenario I'm installing 75 updates on a Windows Server 2012 R2 image with 4 indexes, which are:
-SERVERSTANDARDCORE-SERVERSTANDARD
-SERVERDATACENTERCORE
-SERVERDATACENTER
When starting offline servicing on this image, a total of 300 updates (4x 75) will be installed. Let's have a look at the ConfigMgr logfile (OfflineServicingMgr.log):
| 4 images are detected |
| 300 updates are installed |
When using DISM however it's possible to remove existing indexes from an image, so offline servicing can do a way better/faster job. This can be done with the following command: DISM /get-imageinfo/imagefile:<path to WIM file>
Now that we know which index to keep and which to remove, use the following command: DISM /delete-image /imagefile:<path to WIM file> /index:<index number to remove>
In my case I removed 3 indexes, because the only index needed is SERVERSTANDARD. Let's have a look again with: DISM /get-imageinfo/imagefile:<path to WIM file>
There's only 1 index left now. Let's start offline servicing again on this image and have a look at the logfile (OfflineServicingMgr.log):
| 1 image is detected |
| 75 updates are installed |
As you can see this did the trick on my Windows Server 2012 R2 image. Did see another image with 8 indexes before also, which is crazy when using offline servicing. Just use above steps for removing them in the future. Just great isn't it?Offline servicing is still very handy for updating images easily/quickly, when MS Office is not included in the image.
Source: Microsoft TechNet
Option: /Get-ImageInfo
Displays information about the images that are contained in the .wim, vhd or .vhdx file. When used with the /Index or /Name argument, information about the specified image is displayed, which includes if an image is a WIMBoot image, if the image is Windows 8.1 Update, see Take Inventory of an Image or Component Using DISM. The /Name argument does not apply to VHD files. You must specify /Index:1 for VHD files.
Option: /Delete-Image
Deletes the specified volume image from a .wim file that has multiple volume images. This option deletes only the metadata entries and XML entries. It does not delete the stream data and does not optimize the .wim file.
This command-line option does not apply to virtual hard disk (VHD) files.
/CheckIntegrity detects and tracks .wim file corruption when used with capture, unmount, export, and commit operations. /CheckIntegrity stops the operation if DISM detects that the .wim file is corrupted when used with apply and mount operations.
Labels:
Dism,
ImageX,
Index,
Indexes,
Offline Image Servicing,
Offline Servicing
Friday, December 12, 2014
Stop a hung service during Cumulative Update installation
Today I started a Cumulative Update 3 installation, which is the most recent one on ConfigMgr 2012 R2. As always (?) a reboot is needed before installation is started. This will be mentioned in the prerequisites wizard. After reboot however, installation hung on the first step. Stopping services.. This on the Windows Management Instrumentation (WMI) service. Let's have a look how to stop this service manually.
First have a look in the Services console for the service name. In this case the service is called WinMgmt. Then open a Command Prompt and type in the following command:
-sc queryex [servicename]
Replace [servicename] with the services registry name.
After running the query the PID is showed, which is 836 in my case. Type in the following command to stop it definitely:
-taskkill /f /pid [PID]
Replace [PID] with the number showed before.
This will forcefully kill the hung service! After that installation can be continued as expected.
First have a look in the Services console for the service name. In this case the service is called WinMgmt. Then open a Command Prompt and type in the following command:
-sc queryex [servicename]
Replace [servicename] with the services registry name.
After running the query the PID is showed, which is 836 in my case. Type in the following command to stop it definitely:
-taskkill /f /pid [PID]
Replace [PID] with the number showed before.
This will forcefully kill the hung service! After that installation can be continued as expected.
Labels:
Kill service,
PID,
Query,
Service,
Stop service,
Taskkill,
WMI
Wednesday, December 10, 2014
Remote installation fails on Windows 8 and 2012
When deploying the ConfigMgr client on Windows 8 or 2012 systems, it's possible that remote installation fails. This because off User Account Control (UAC) which cannot be completely disabled. Remote Endpoint Agent installation requires that UAC is disabled on the Endpoint. This can be fixed however with a registry change and service restart. Let's have a look.
Deploy the following rule to Windows 8 or 2012 systems to enable Remote installation:
REG ADD "HKLM\SOFTWARE\Microsoft\Windows\CurrentVersion\Policies\System" /v LocalAccountTokenFilterPolicy /t REG_DWORD /d 1 /f
net stop LanManServer
net start LanManServer
Deploy the following rule to Windows 8 or 2012 systems to disable UAC:
REG ADD "HKLM\SOFTWARE\Microsoft\Windows\CurrentVersion\Policies\System" /v EnableLUA /t REG_DWORD /d 0 /f
After that Remote installation is enabled and UAC disabled, and deploying the ConfigMgr client from the Management Console will be fine.
Source: Microsoft Support
Deploy the following rule to Windows 8 or 2012 systems to enable Remote installation:
REG ADD "HKLM\SOFTWARE\Microsoft\Windows\CurrentVersion\Policies\System" /v LocalAccountTokenFilterPolicy /t REG_DWORD /d 1 /f
net stop LanManServer
net start LanManServer
Deploy the following rule to Windows 8 or 2012 systems to disable UAC:
REG ADD "HKLM\SOFTWARE\Microsoft\Windows\CurrentVersion\Policies\System" /v EnableLUA /t REG_DWORD /d 0 /f
After that Remote installation is enabled and UAC disabled, and deploying the ConfigMgr client from the Management Console will be fine.
Source: Microsoft Support
Tuesday, December 9, 2014
End of the Year Promotion started from Jalasoft
Sponsor post
Great news for this month. This because Jalasoft started their special End of the Year Promotion today! You can purchase ANY of their solutions throughout the month of December with a 40% OFF discount. Isn't that good news? The End of the Year Promotion includes the following solutions from Jalasoft:
-Xian Network Manager
-Xian Wings (mobile solution!)
-The Xian SNMP Device Simulator
-XIAN Network Manager includes a FREE Xian Wings license!
To request a quote just click >HERE< or contact any of the sales representatives at sales@jalasoft.com.
Xian Wings can be a great help for the holidays since it lets you view your OpsMgr environment information anytime, anywhere. More on this can be found in the following blog post: How Xian Wings Saved Christmas and in a few others as well:
My personal experience with Jalasoft Xian Wings (part 1)
My personal experience with Jalasoft Xian Wings (part 2)
Let the Xian Suite help you make the most of your holiday time off!
Happy holidays!
Great news for this month. This because Jalasoft started their special End of the Year Promotion today! You can purchase ANY of their solutions throughout the month of December with a 40% OFF discount. Isn't that good news? The End of the Year Promotion includes the following solutions from Jalasoft:
-Xian Network Manager
-Xian Wings (mobile solution!)
-The Xian SNMP Device Simulator
-XIAN Network Manager includes a FREE Xian Wings license!
To request a quote just click >HERE< or contact any of the sales representatives at sales@jalasoft.com.
Xian Wings can be a great help for the holidays since it lets you view your OpsMgr environment information anytime, anywhere. More on this can be found in the following blog post: How Xian Wings Saved Christmas and in a few others as well:
My personal experience with Jalasoft Xian Wings (part 1)
My personal experience with Jalasoft Xian Wings (part 2)
Let the Xian Suite help you make the most of your holiday time off!
Happy holidays!
Friday, December 5, 2014
Microsoft Surface Pro 3 second experience
One month ago my new work device was delivered, a Microsoft Surface Pro 3. I decided to order one because of great look & feel, very good feedback (reviews) and Windows 10 in pipeline. A blogpost about my first experience can be found HERE. Let's have a look at my second experience, after using it for over one month now. Most of my experiences are positive, but some negative ones also!
Still very happy with my device, it's fast, quiet, and have a good battery. It's both a notebook and tablet. Let's have a look!
Pro's
-Fast (with i7 CPU, i5 performance don't know)
-Quiet (on battery always, on power not all the time)
-Battery (approx. 6/7 hours with Office and Internet open)
-12" display (sharp, resolution, pen support)
-Pen (great in presentations)
-Weight (1,1 kg with keyboard)
-New generation device, high wow factor!
-Windows 10 upgrade coming (free?)
-Kickstand (can be placed in all positions)
-It's both a notebook and tablet
Con's
-Fan blowing (on power only, not all the time)
-Out of sleep (when in sleep mode, it will wake up. for it seems because of the keyboard?)
-One USB port only (far too little to connect multiple devices!)
-Keyboard function keys (sometimes Fn is needed, sometimes not, which is confusing)
That's it for now. As you can see more pro's than con's are mentioned, so my total experience with the device is still very good. Hope that Microsoft can fix fan blowing with a future system firmware. Then it will be even better. Microsoft did a great job here!
Still very happy with my device, it's fast, quiet, and have a good battery. It's both a notebook and tablet. Let's have a look!
Pro's
-Fast (with i7 CPU, i5 performance don't know)
-Quiet (on battery always, on power not all the time)
-Battery (approx. 6/7 hours with Office and Internet open)
-12" display (sharp, resolution, pen support)
-Pen (great in presentations)
-Weight (1,1 kg with keyboard)
-New generation device, high wow factor!
-Windows 10 upgrade coming (free?)
-Kickstand (can be placed in all positions)
-It's both a notebook and tablet
Con's
-Fan blowing (on power only, not all the time)
-Out of sleep (when in sleep mode, it will wake up. for it seems because of the keyboard?)
-One USB port only (far too little to connect multiple devices!)
-Keyboard function keys (sometimes Fn is needed, sometimes not, which is confusing)
That's it for now. As you can see more pro's than con's are mentioned, so my total experience with the device is still very good. Hope that Microsoft can fix fan blowing with a future system firmware. Then it will be even better. Microsoft did a great job here!
Wednesday, December 3, 2014
Failed to find the current TS configuration path (0x80070003)
When capturing Windows 7 SP1 on VMware with a VMXNET3 network onboard, the following error is displayed during Capture media:
-Unable to read task sequence configuration disk
-ConvertBootToLogicalPath failed to convert 'MULTI(0)DISK(0)RDISK(0)PARTITION(2)\_SMSTASKSEQUENCE\WINPE\SOURCES\BOOT.WIM' (0x80070003)
-Failed to find the current TS configuration path
-Failed to find the configuration path. The system cannot find the path specified. (Error: 80070003; Source: Windows)
-Execution failed with error 80070003
This because of the following configuration:
-VMXNET3 Network device in virtual machine
-VMware Tools installed/running in virtual machine
-VMXNET3 Ethernet Adapter driver missing in boot image
-VMware PVSCSI Controller driver missing in boot image
Just use a virtual machine with Intel E1000 or VMXNET3 Network, and uninstall VMware Tools when installed/running. Make sure that both VMware Ethernet and PVSCSI drivers are installed in the boot image(s) used for Capture media.
After that you will be fine!
-Unable to read task sequence configuration disk
-ConvertBootToLogicalPath failed to convert 'MULTI(0)DISK(0)RDISK(0)PARTITION(2)\_SMSTASKSEQUENCE\WINPE\SOURCES\BOOT.WIM' (0x80070003)
-Failed to find the current TS configuration path
-Failed to find the configuration path. The system cannot find the path specified. (Error: 80070003; Source: Windows)
-Execution failed with error 80070003
This because of the following configuration:
-VMXNET3 Network device in virtual machine
-VMware Tools installed/running in virtual machine
-VMXNET3 Ethernet Adapter driver missing in boot image
-VMware PVSCSI Controller driver missing in boot image
Just use a virtual machine with Intel E1000 or VMXNET3 Network, and uninstall VMware Tools when installed/running. Make sure that both VMware Ethernet and PVSCSI drivers are installed in the boot image(s) used for Capture media.
After that you will be fine!
Monday, December 1, 2014
New ConfigMgr Hotfix speeds up retire or wipe to seconds
Last month a new ConfigMgr hotfix became available, specific for Mobile Device Management devices in Microsoft Intune. This hotfix greatly reduces the time that's required to execute a successful retire or wipe of an MDM device by using a notification to "push" these tasks. Without this hotfix, retire and wipe operations could require 24 hours to run successfully, because they relied on a "pull" mechanism of this frequency. This happens with me on installations also, where retirement could require 24 hours of even more!
After you apply this hotfix, retire and wipe operations are pushed to the following MDM device types: iOS, Android, Windows 8.1
These operations now run on the device in a matter of seconds, assuming the device is reachable by Microsoft Intune. The device must have an active data connection for Intune to communicate with it. Just great that this ConfigMgr Hotfix speeds up retire and wipe operations to seconds!
Note: If a device is not reachable by Intune when a retire or wipe operation is requested, the operation will run the next time that the device comes online and connects with the Intune service. This could require up to 24 hours.
To apply this hotfix, you must have Cumulative Update 3 for ConfigMgr 2012 R2 installed.
Download hotfix: Microsoft Support
After you apply this hotfix, retire and wipe operations are pushed to the following MDM device types: iOS, Android, Windows 8.1
These operations now run on the device in a matter of seconds, assuming the device is reachable by Microsoft Intune. The device must have an active data connection for Intune to communicate with it. Just great that this ConfigMgr Hotfix speeds up retire and wipe operations to seconds!
Note: If a device is not reachable by Intune when a retire or wipe operation is requested, the operation will run the next time that the device comes online and connects with the Intune service. This could require up to 24 hours.
To apply this hotfix, you must have Cumulative Update 3 for ConfigMgr 2012 R2 installed.
Download hotfix: Microsoft Support
Labels:
2990658,
Android,
ConfigMgr,
Hotfix,
Intune,
iOS,
KB2990658,
Microsoft Intune,
Windows Phone 8.1
Subscribe to:
Posts (Atom)